by Baxter
Last week I posted a strength practice for the lower body. I mentioned how preserving and sometimes improving our lower body strength is essential for our daily activities as well as for our hobbies, exercise and sporting desires. And it is equally important that we keep the lower body flexible and open, in good balance with our developing strength. It’s great to have the strength for a long hike, but if you are hampered with tight inflexible muscles, hopping over that creek might be a real stretch (sorry, couldn’t resist)! Staying flexible is not only a good way to increase the possibilities of activities we can participate in, but it is also a good way to preserve the full range of motion of all our joints, and ,in doing so, keep the joint space healthy and fully functional.
Recent research shows that holding poses longer then upwards of 90 seconds can result in maintaining the muscles at the new stretched length, versus having them shorten up the next day. But you may need to work up to 90 seconds if the intensity of the held poses is too much at first, or if you muscles get super shaky and you need to come out before trying again. So, when you see suggested timings, know that you are working towards 90 second holds, but you should start out wherever it feels best for you!
Today’s sequence will include mostly static, held postures, but I often will begin with a dynamic mini-vinyasa, moving in and out of the “full” pose on my inhale and exhale as a way to warm up the muscles and joints, and prepare my body for the full pose. Take a look at last week’s sequence for ideas on how to do that.
Warm-Up Pose
Dynamic Reclined Hip Stretches: Since you will be working with all the joints of the lower body, it is nice to start by warming them up to their fuller range of motion. Repeat the sequence few times on each side (see Dynamic Reclined Hip Stretches).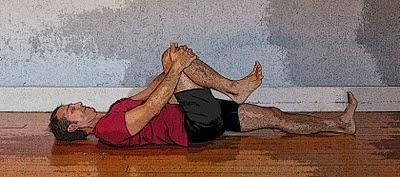 Reclining Poses
Reclined Leg Stretch (Supta Padangustasana): Three variations of this pose improve flexibility around the hip joint.
Version 1: Lying on your back, bring one knee into your chest and place the strap around the arch of the right foot and extend the leg towards vertical (getting vertical depends on your unique muscle and joint challenges). Push out along the line of your leg bones towards your heels, and pull back towards your hip via the strap. Work your way gradually towards 90 seconds, and then move on to Version 2.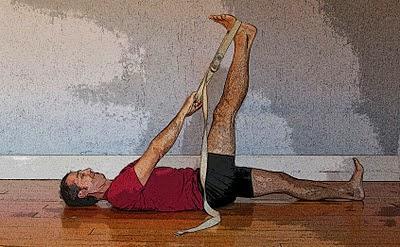 Version 2: Take both ends of the strap into your right hand, take your left arm out to your left in a T position, and slowly lower your right leg until it is about 12 inches off the floor (or more than 12 if you are tight). Repeat the same action in your legs as version 1, working towards a 90-second hold. Then exhale your leg back to vertical.
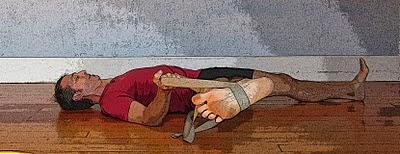 Version 3: Now take both ends of the strap into your left hand and take your right arm out to the right in a T position. Now bring your top leg and hips into a twist to the left, until your right leg is parallel to the floor and your hips are stacked one on top of the other. Work towards 90 seconds, then inhale and come back to Version 1.
Repeat all three versions on the left side.
Bridge Pose (Setu Bandha): This pose improves flexibility at the front of the hip joint. Come into Constructive Rest pose, on your back, with your knees bent and your feet about fourinches from your hips. Warm up by lifting your hips up as you inhale and lowering them down when you exhale, up to six times. Then inhale and stay for up to 90 seconds. Press down evenly into your feet, and lift from both your hips and your lower tip of your breastbone. Optionally, you can turn your upper arm bones under the pose, being mindful to not put any strain on your neck. As you come out of the pose, release your shoulders.
Standing Poses
Standing Forward Bend (Uttanasana): This pose opens the back buttock muscles and the hamstrings, as well as the back calf muscles. From Mountain pose, you might warm up for full Uttanasana by inhaling your arms overhead, exhaling into Uttanasana (maybe keeping the knees a bit bent first few times), inhaling up to Urdva Hastasana (Arms Overhead), and exhaling back to Mountain pose. Then, when you are ready, on an exhale, come into full forward bend and stay for up to 90 seconds. If you are super tight, keep a slight bend in your knees. If your hands don’t easily come to the floor, place them on blocks. Come up on an inhale.
High Lunge: This pose stretches different areas of the lower body in your two legs. A great way to get into High Lunge is from Standing Forward Bend, so with your hands on the floor or on blocks, step your left foot way back on you mat, keeping your feet hip-distance apart. Bring your right knee directly over your right ankle, arms long and strong, and work up to 90 seconds. After your hold, you can step forward into Uttanasana to transition to the second side, or step back into Downward-Facing Dog pose to do so.
Downward Facing Dog (Adho Muka Svanasana): This pose, like Uttanasana, is a good way to open up the back of the hips and legs. From High Lunge, step your front foot back to match your back foot, and place both hands flat on the floor, shoulder-distance apart. Press your hips up and away from your hands, coming into a pyramid shape. With either straight legs or slightly bent knees, imagine your hips are lifting away from your heels and your heels are releasing down away from your hips. Very gradually work your way towards a 90-second hold. 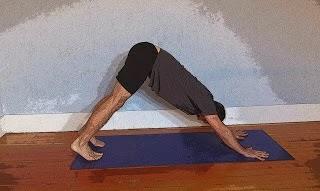 You can transition into our next pose, Upward-Facing Dog, from Down Dog by swinging your shoulders forward over the wrist into Plank pose.
Upward-Facing Dog (Urdhva Muka Svanasana): This pose opens up the fronts of the thighs and hips. From Plank pose, pivot at your shoulder joint, let your hips come forward towards your wrists, allowing your chest and legs to come into a back bend shape, with your thighs coming parallel to the floor. You can keep the toes turned under, or you can shift your feet so the tops of the feet are pressing into the floor. I’d suggest short holds at first, very gradually working towards your goal of 90 seconds. Keep your arms long and strong, and your legs engaged as well. A good rest in Childs Pose after Upward-Facing Dog is usually well deserved!
Triangle Pose (Utthita Trikonasana): This is great pose to open up the front leg inner thigh and hamstring, and back leg side hip and calf. From Mountain Pose, step your feet wide apart, perhaps between 4-5 feet, depending on your height and leg length. Turn your right foot and leg out 90 degrees, and kick your back heel back out an inch to adjust your feet. Allow your hips to rotate few degrees towards your right foot, but keep your chest aligned with the long edge of your mat. Inhale your arms parallel with the floor, and tipping from your hips and upper leg bones, bring your hips and torso out over your right leg until the stretch in your right inner thigh or hamstring indicates a good place to stop. Rest your bottom hand on your leg or a block or chair seat, depending on your tightness. Gradually work up to 90 seconds. Come up on an inhalation, exhaling your arms to your sides. Then repeat on the left side. 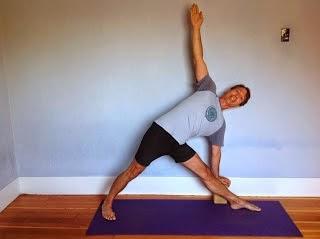 Seated Poses
Cobbler’s Pose (Baddha Konasana): This pose is a great stretch for the inner thighs and outer hip muscles. Sit with a folded blanket under your hips and your legs straight out in front of you. Then bend your knees out to the sides and bring the soles of your feet together a few inches in front of your hips. You can support yourself by placing your hands on the floor by your outer hips or you can hold onto your ankles or feet. Keep a nice lift in your spine, and press the soles of the feet together, while thinking of your knees moving away from each other.
Seated Wide Angle Pose (Upavista Konasana): This pose lengthens the inner thigh muscles and the hamstrings. From Cobbler’s pose, take your legs back out in front of you and straighten your knees. Then swing your legs wide apart on the floor, perhaps 90 to 120 degrees open. Use your hands to support your chest by placing them on the floor either just behind your hips (if you are tight in the hips) or just to the outside of your hips. Adjust the position of your legs so your kneecaps point straight up. Keep your arms long and strong. If this position is really intense, consider slightly bending your knees. Work towards your 90-second goal.
Hero Pose (Virasana): This pose is a great stretch for the top thigh muscles and the ankles and shins, and it one of my favorite meditation sitting positions. But Hero pose can be challenging, so try using various props to help get comfortable. Place a blanket folded into a large rectangle on your mat and place a block near the back of the blanket. Next, kneel near the front edge of the blanket and place the block between your feet. Keeping your knees hip-distance apart, splay your shins behind you so your feet are wider apart than your hips and slowing sit down on the block. If you’re tight, start on a high side of block and gradually work your way down to the lower heights as your legs permit. Feeling a good stretch on the top of the thigh or front of the shin and ankle is to be expected, but you should not feel pain in your knees or other joints. Once you get to your 90-second goal, you can sit longer as your body permits. I usually come out by coming forward into my hands and knees, and stretching one leg at a time back behind me to open the knees up before moving on to any other pose.
If you want to keep your sequence short, you can end here. Otherwise, if you have time, you can move on to physical relaxation.
Relaxation
Choose any form of Savasana (Corpse pose) you prefer and focus on relaxing your lower body. If your legs feel uncomfortable, try the version with your knees resting on a blanket roll.  Subscribe to YOGA FOR HEALTHY AGING by Email ° Follow Yoga for Healthy Aging on Facebook

