by Bridget
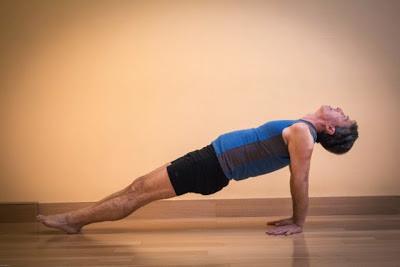
With my long neck and a body that prefers curling up into fetal position, Upward Plank pose (Purvottanasana) has always been a challenging pose for me. But I’ve also found over the years that the more challenging poses in yoga have been the most satisfying, both giving my body something that goes against its type, and strengthening and stretching areas that are very much in need of it. Andwhether or not you love or hate this pose, it's an especially good pose for strengthening your back body.
Upward Plank pose is especially good for strengthening your back body because it works in a way that other backbends don’t. If you look at Camel pose (Ustrasana), gravity assists your body when you drop into the backbend. In Upward Plank, however, you have to work against gravity to lift into the pose, so your back body needs to step up to the task. Upward Plank is excellent for building strength in the postural support muscles in the back. It’s like a “crunch” for the back body. It also loads the arms behind you in extension, building strength in the upper back and shoulders.
Caution: A special challenge in this posehas to do with the wrists. Upward Plank pose puts a lot of weight onto the hands (even the variations, though to a lesser degree). If you are dealing with general wrist pain, a sprain or any chronic condition that leaves your wrists feeling tender with pressure, you’ll want to be cautious when attempting the pose. I’ll discuss some props that can make the variations more accessible for people with wrist pain, but if none of the variations work for your wrists, you can take your hands out altogether by coming down onto the forearms.
With that said, there are so many variations of this pose. My hope is that one or more of them may help you to find what you need to work on to make your Upward Plank as strong and lifted as it can be!
Variations of Upward Plank Pose
1. Preparation for Upward Plank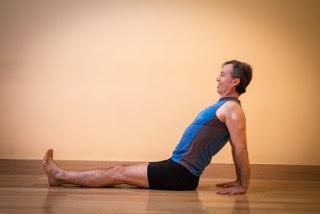
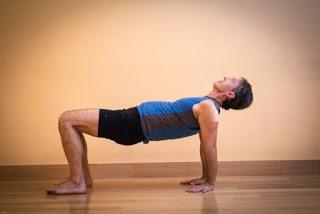
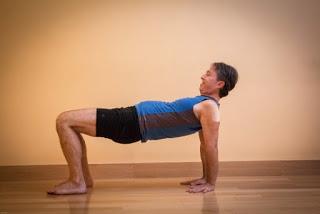
Reverse Table pose brings the first version to the next level. For some beginners, this might be a lot to manage, so if you’re just getting started, this is a good time to move with caution. I recommend taking some time to find the lift I mentioned in the previous variation before lifting into Reverse Table. Once you’re lifted in the pose, lengthen through your knees and head, pulling them apart from each other, while still opening your chest and lifting your breastbone.
You can either keep your head up, as the second image of the pose shows—the version my neck prefers, even after all these years—or carefully release your head back. To practice the version with your head back safely, please do not just simply drop your head back. Instead, lengthen the front of your neck while still maintaining some length in the back of your neck, like you’re trying to reach the base of your skull up over a rounded lift behind you.
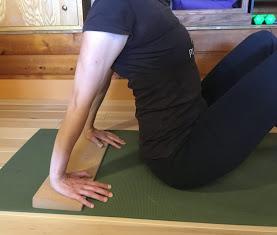
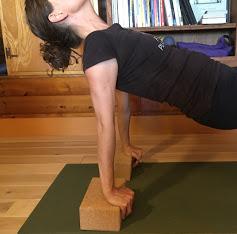
This variation puts quite a lot of weight onto the hands, though not as much as the full pose does. Here is where some wrist-calming props could come in handy. First, you could use a wedge under the heels of your hands. (Wedges can be confusing, especially behind you, so be sure that the fat side of the wedge is at the heels of your hands and that your fingers are gently sloping toward the skinny side.) Another wrist-relief option is to take a block for each hand and place the blocks under the heels of the hands (be sure your fingers are not supported by the block, but are instead hanging down the side of the block). The blocks can be a little bit tippy, so be careful when you’re getting started here—if they tip over, you might injure your wrist further.
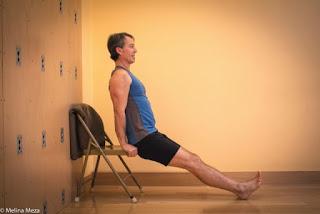
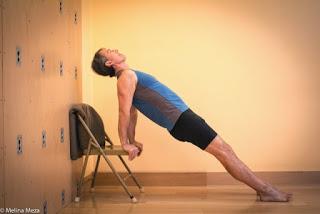
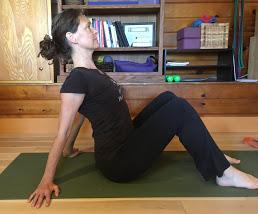
Start by sitting on the front edge of the chair seat, with your knees bent and feet flat on the floor. Place your hands on the chair seat, startingwith your fingers pointing out to the sides and the heels of your hands on the sides of your chair seat, on either side of your hips. (Wider hips make placing the hands more difficult here, but you can slide them back behind you a little until you find some purchase on the chair seat with the heels of your hands.) People with longer arms might want to take their hands back to the sides of the back of the chair. Turning the fingers forward (as shown in the photo) is closer to the classic pose, but it’s challenging to get the hands into that position, especially for those of us with wider hips.
Next, take the same steps offered in the first variation for finding the opening in the chest and the lift in the breastbone. Then press your hands into the chair and experiment with lifting your hips out of the seat. That might be enough, and you can repeat that a few times while maintaining the lift. If it’s easy to lift your hips, press your hands into the chair, and lengthen your knees away from your head, lifting into an elevated Reverse Table Top position. If this is easy for you, you can straighten one leg and then the other, remaining lifted in the hips as you extend through the legs and press the soles of your feet down toward the floor.
Working in the Classic Pose
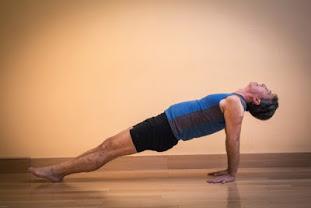
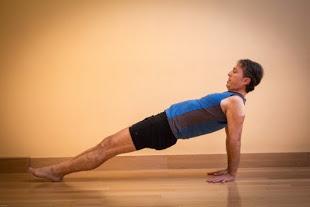
Start by sitting on the floor, with your knees bent and your feet flat on the floor. Place your hands 6-10 inches behind your hips (typically fingers point forward toward hips, but if this is challenging for wrists or shoulders, fingers can point out to sides). If needed, you can do theclassic pose with the wedge or blocks for wrist relief as described above under Reverse Table.
At this point I like to take a moment with my knees bent and hips still on the floor to spread my collar bones and draw my bottom shoulder blades together, so that I start with a lifted chest. From there you can straighten your legs and roll your thighs in toward each other, which will also result in your big toe mounds being pressed together. Point your toes. Now press your hands into the floor, and think about lengthening your tailbone out toward your heels as you press your heels down to engage your legs, then lift your hips, coming up into a long-bodied position.
You may be able to press soles of your feet down onto the floor here, but don’t force it. Keep your big toe mounds together—it’s easy for them to open apart. Reach through your toes and, while still lifting the front body toward the ceiling, lengthen out through your head. If it’s comfortable, you can extend your head back (don’t drop it back, lengthen with control); otherwise, leave your chin tucked as shown above.
To come out, lift your head, lower your hips, and come into a comfortable seated position.
Nina says more about timing and repetitions in her post Techniques for Strength Building with Yoga if you want to read more on this topic.
Find information on Bridget's current classes here.
Follow Yoga for Healthy Aging on Facebook ° To order Yoga for Healthy Aging: A Guide to Lifelong Well-Being, go to Amazon, Shambhala, Indie Bound or your local bookstore.
