 Q: I have a student who has hammertoe. He reports that he has difficulty in all standing poses because this throws off his balance. I will recommend buddy wrapping his affected toe to the stable, large non-effected toe for yoga class. Any other suggestions? Thank you.
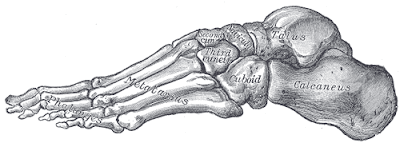
 A: Let’s begin by defining what a hammertoe is. Hammertoe a deformity in the second, third, or fourth toe, usually due to imbalances in the muscles, tendons or ligaments of the toe, which would normally keep the toes straight. This causes a bend in the joint between the first and second bones in the toe so the toe ends up looking a bit like a hammer’s head. Typically only one toe is affected, but in some cases several toes can be affected or both feet.
Risk factors for developing hammertoes include: ill-fitting shoes (especially high-heeled shoes or those with narrow box), certain foot structures, trauma to the foot (such as breaking a toe or jamming or stubbing your toes), certain illnesses (such as arthritis and diabetes), advancing age, being female, and having a second toe longer than the big toe (I live with someone like that!). Most commonly this condition is a result the foot being crammed into an ill-fitting shoe so that the toes end up bending and the tissues constrict around this new position. So one of the easiest preventative things you can do is to buy the right shoes to fit your unique feet! It might also make sense to get out of your shoes whenever possible, even when you are not doing yoga. But there are less common causes as well, including complications from diabetes, strokes, rheumatoid arthritis, or traumatic injuries to the ankle and foot. Once a hammertoe has developed, you may also experience stiffness and pain. In fact, after bunions, this is one of the most common causes of toe pain. Corns and/or calluses may also develop due to the rubbing of a bent toe on its neighbors. The good news for us is that even after a hammertoe starts to develop, some flexibility can remain, which we may be able to take advantage of with our yoga poses. In fact, stretching and strengthening exercises for the feet and toes are considered the first approach for both prevention and early treatment of hammertoes. And because we get our feet out of shoes for the practice of yoga postures, it is ideally suited to complement the work a physical therapist may recommend to you. For our student in question, since his balance is off already, I’d suggest using set ups that increase stability in standing poses, such as working at a wall or having a chair back for hands to rest on. If the hammertoe improves, hopefully balance will follow and the props can be reduced! Now here are some recommendations that anyone with hammertoe might find helpful.Recommended Practices for Hammertoe The following ten recommendations include both yoga poses that I feel will strengthen and stretch the feet and toes in ways that could help hammertoe and commonly used non-yogic techniques you can easily integrate into the yoga poses. 1. Mountain Pose, with conscious lengthening and spreading of the toes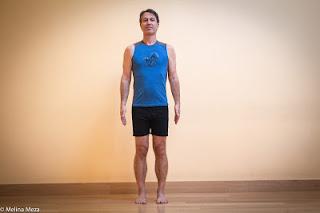 Come into Mountain pose with your feet hips-distance apart. Look down at your feet and toes, and mentally encourage the toes to relax, lengthen and spread. If they don’t respond to your mental encouragement, bend down and manually pull and spread them apart mindfully, and then come back to the upright position. See if they will remain in the position your set them in, and for how long, holding the pose anywhere from 1-3 minutes. 2. Mountain Pose, rolling the tops of the feet Stand in classic Mountain pose as shown above, with a folded blanket behind your feet. (If you need help with balance, stand in front of a wall so you can place your hands on it if needed.) Shift your weight onto your right foot, and take your left leg a bit behind you, pointing your foot and toes backward and resting the tops of your toes (where the toenails are) on the blanket. Then, circle the heel of your left foot around in a small circular motion in one direction about 6-8 times and then circle the same number of times in the opposite direction. This will massage and release the muscles and fascia in the left foot, which can help open the joints.Return to classic Mountain pose and repeat on the second side. This variation of Mountain was introduced to me by yoga teacher Melina Meza. 3. Lunge Pose
 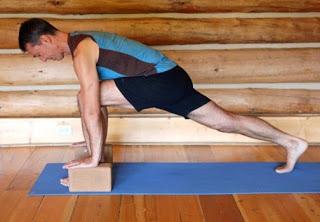 From Mountain pose, come into Standing Forward Bend and then step one foot back into Lunge pose, version 1, 2 or 3, using any props for your hands that make the pose more accessible and stable. (For variations see Featured Pose: Lunge Pose.) Now bring your attention to your back foot. Place the ball of the foot evenly on the floor side to side and encourage your toes to lengthen and spread in their flexed position. This stretches both the toes and the bottom of the feet. 1-2 minutes. Repeat on the second side. 4. Child’s Pose
 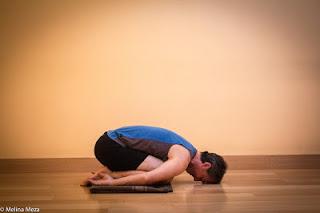 Come into Child’s pose with a blanket under your shins. Reach your hands back and use your hands to gently spread and lengthen your toes behind you, allowing gravity and your body weight to then passively stretch the tops of your feet and toes. Stay for 1-2 minutes. Come up to kneeling for a moment to release the pressure on the feet, and consider repeating again. 5. Standing Poses, working with the toes In the past, some of my teachers suggested that we lengthen and relax our toes when doing all standing poses. In fact, if your toes looked like they were gripping into the mat, you’d be asked to relax them. In the case of hammertoes, the opposite action, pressing them down into the mat to strengthen them, may be helpful! One way to do this is anytime your feet are flat on the floor is by pressing all your toes down into the floor for a moment and then releasing them, repeating this 10 times or more. This will strengthen the muscles on the soles of the your feet. Also, if it does not interfere with balance, you can roll your toes. On one foot at a time, lift all your toes up and then try to roll them down one at a time from big toe to little, like you might roll your fingers on a tabletop, 6- 10 times. Then repeat in the reverse direction the same number of times. Repeat on the second foot. You can also do this at work, either standing or sitting in a chair, which could make a great little movement break for your feet when sitting at your desk at work. 6. Dynamic Poses Dynamic standing poses and flow sequences, such as Sun and Moon Salutations, are also potentially helpful because they take the feet and toes through a healthy range of motion, strengthening and stretching the toes and feet along the way, while also improving balance and agility. Here's my video of a Sun Salutation:
 7. Stretching the Toes
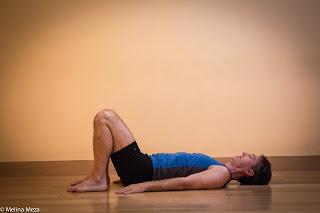
You can stretch your toes when doing seated poses where at least one leg is out straight in front of you, such as Seated Forward Bend (Paschimottananasa), Staff pose (Dandasana), and One-Legged Seated Forward Bend (Janu Sirsasana). Simply use either your hands or a strap to draw the toes of one or both feet back toward your shin with a steady and reasonable pressure. Hold the stretch for 1-2 minutes. 8. Toe Crunches To strengthen the muscles on the bottom of the foot, you can “toe crunches” into any pose where one or both feet are flat on the floor. In a toe crunch, you briefly curl your toes as if you were going to pick up a towel with your toes (you might actually find you can do that with practice!). For example, you could try this in Constructive Rest position:
“Toe squeezes” can help to loosen tight muscles and fascia around the toes as well as strengthen the toe muscles. You can do this in any of pose where you can easily reach your toes and are able to interlace your fingers with them, such as Easy Sitting pose, Cobbler’s pose, or Thread the Needle pose. For example, you can do this is in Thread the Needle pose with a block under your foot as shown in this video.

