by Nina
 In my post yesterday Depression May Be Caused by Inflammation, I extolled the value of supported inverted poses for reducing stress, especially for people with depression or others who find it difficult to focus internally. I’ve been writing about this special group of poses since the early days of the blog because I’ve found that using supported inverted poses for stress management is one of easiest ways to calm yourself down because all you have to do is set yourself in the pose and stay there for a while. The shape of the pose itself causes the baroreceptors to work their magic (see Why You Should Love Your Baroreceptors). I even wrote a post that described all the supported inverted poses (see All About Supported Inverted Poses).
I realized yesterday that it was was about time I provided you with a simple, accessible sequence that warms you up for doing these poses and moves you gradually into a gentle, full inversion. So here it is! This sequence is suitable for almost everyone, but if you have high blood pressure, back problems, eye problems, or are pregnant, please see Cautions for Inversions.
Easy Supported Inversion Sequence
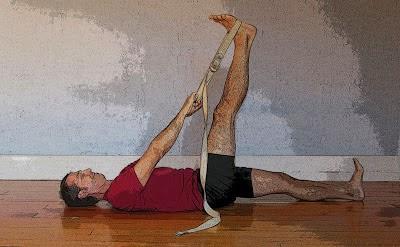
1. Reclined Leg Stretch Series (Supta Padangusthasana). This series of reclined stretches opens your hips and stretches the backs of your legs. These are perfect starting poses for just about any practice, but are especially good for preparing you for the partial inversions, which are different types of standing forward bends. See http://yogaforhealthyaging.blogspot.com/2012/01/reclined-leg-stretch-sequence.html for full instructions. Stay in the pose for 30 seconds to 1.5 minutes per side.
 2. Reclined Arms Overhead pose (Supta Urdva Hastasana). This pose is an excellent shoulder opener (see Opening Tight Shoulders http://yogaforhealthyaging.blogspot.com/2013/06/featured-sequence-opening-tight.htmlfor other ideas), preparing you for the Downward-Facing Dog poses that come next.
Start by taking your strap and making a loop that is about the same width as your shoulders and placing a block on the floor next to you. Then lie down on your back, with bent knees and soles of the feet on the floor. Place the strap over your arms just beyond your elbow joints towards your hands. Then press out against the strap as you pick up the block between your hands and firm your hands against the ends of the block. You may have to make the loop bigger or smaller to keep your arms straight as you press on the block. Then, slowly take your arms up and overhead, heading towards the wall behind you. If your thumbs don’t touch the floor without bending your elbows, put a lift of some sort, such as a folded blanket, under your hands. At this point, you can straighten your legs into Mountain pose position, keeping them active and strong. Stay in the pose for 1 to 3 minutes.
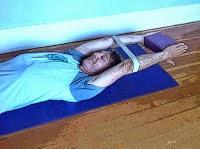 To come out of the pose, bend your knees and place the soles of your feet on the floor, and then bring your arms (and the block) back to your starting position.
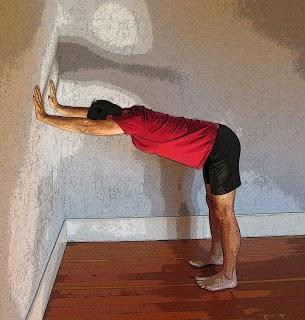
 3. Half Downward-Facing Dog Pose at the Wall (Arda Adho Mukha Svanasana). This pose continues opening your shoulders, and stretches your arms, backs, hips and legs, preparing you for the full Downward-Facing Dog and standing forward bends to come.
Start by standing about 1 foot away from a wall, facing toward it. Place your hands on the wall so they are at either at shoulder height for less flexible people or anywhere below shoulder height down to elbow height for more flexible people. Then, bend your knees a bit, press your hands firmly into the wall, and slowly walk your feet away from the wall. Keeping your hips positioned over your feet, gradually walk out until your arms are straight and form a long line with your torso and belly. Push your arms strongly towards the wall, while creating an upward lift from your knees to your hips. You can gradually straighten your knees as long as it doesn't cause pain in your lower back. See Half-Dog Pose at the Wall for more info. Stay for about 1 minutes.
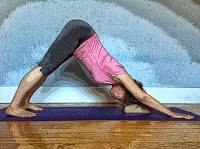
 4. Supported Downward-Facing Dog Pose (Adho Mukha Svanasana). This is a surprisingly soothing pose when you use support for your head. But you must use a prop that is high enough (try a bolster) and be careful to place the prop in the right position (below where your head naturally falls in the pose, and not so you need to move forward—or bend your arms—to rest your forehead on the prop). If your shoulders and/or hamstrings are very tight, this pose can be physically demanding and not quieting. However, it’s still a great warm up pose for other inversions, as it opens your hips, legs, and shoulders while getting you used to being partly upside down.
Before going into the pose, place the prop on your mat several inches behind your hands, not between your hands. Then, when you come into Downward-Facing Dog, allow your head to relax down toward the ground. If your head touches the prop, that’s great. If it doesn’t, move the prop, not your head! And if moving the prop doesn’t work, come out of the pose and find a higher prop (or stack a couple of blocks). When you get set up, if you can rest your forehead on the prop, try to gently tug your forehead skin down toward your eyebrows. Stay for 1 to 3 minutes.
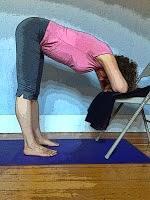
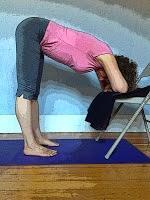
 5. Supported Standing Forward Bend (Uttanasana). This pose is surprisingly quieting if you find a prop that is high enough so you can do the pose without feeling an uncomfortable stretch in your hamstrings. Very flexible people can rest the crown of the head on a single block set up on its tallest side. Moderately flexible people will have to stack two blocks, one flat and the other on its narrow end. Less flexible people should use a chair (which is actually lower that two blocks stacked end to end, not to mention more stable). Be honest with yourself and use a chair if necessary (or even if it's not). However, if you are very tight and can’t bend your body to 90 degrees in a seated forward bend, you may not be able to get comfortable in this pose, so feel free to skip the pose.
As you come into the forward bend, keep your legs strong and focus on moving from your hip joints, not rounding your back. If you are using a chair, have the chair far enough away from you so you can keep your back as straight as possible and, as you rest your forehead on your folded arms, try gently tugging your forehead skin down toward your eyebrows. Stay in the pose 1 to 3 minutes.
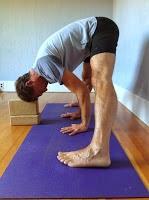
 6. Supported Wide-Legged Standing Forward Bend (Prasarita Padottanasana). This pose feels more grounding than quieting to me because it’s so demanding on the hips and legs. But for people whose hips are more open than their hamstrings, this may be more accessible than Standing Forward Bend. Very flexible people who can get the crown of the head to the floor can simply practice this pose as usual. Less flexible people will need to use a block or even a chair to support their heads. As you come into the pose, focus on moving from your hip joints rather than rounding your back. And, as in Supported Downward-Facing Dog, make sure you move the prop to support your head where it naturally falls in the pose (don’t move your head reach the prop). Be honest with yourself and use a chair if necessary (or even if it's not). Stay in the pose 1 to 3 minutes.
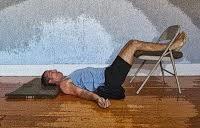
  7. Easy Inverted Pose. Because your legs are inverted as well as your heart in this pose, the pose is very quieting. And I’ve never been unable to help a student be comfortable in this pose! If two folded blankets is irritating to your lower back, try just one and make sure your tailbone and buttocks are fully supported by the blanket (and are not tilting into a backbend). Having the support under your pelvis is what makes your heart slightly higher than your head, so see if you can find a way to make it work. See Easy Inverted Pose for information. Stay in the pose 5 to 15 minutes.
 By the way, if you are comfortable practicing Headstand, Shoulderstand, and Plow pose, you could at this point, skip Easy Inverted pose and practice Headstand at the wall, Shoulderstand on a Chair, and Plow pose on a Chair. See All About Supported Inverted Poses for info on these poses.
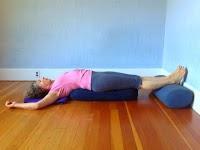
8. Supported Bridge Pose with Straight Legs (Setubandha Sarvangasana). This pose is special because (if this pose is comfortable for you) you can stay in this pose for a very long period of time. People with lower back problems sometimes have a hard time getting comfortable in the pose, but lowering the propping (by using two folded blankets instead of a bolster under your torso) can help.
Before going into the pose, set up a prop up (bolster, folded blankets or blocks) at the base of a wall to support your feet and another second prop (bolster or folded blankets) perpendicular to the wall to support your torso. Make sure the prop at the wall is at least as high as the prop for your torso (you don’t want your feet dropping lower than your hips). You’ll have to estimate based on your height how far the second prop is from the first one.
Then, as you move from sitting on the second prop to a reclined position with straight legs, make sure that while the tips of your shoulder blades are supported by the prop, both the back of your head AND your shoulders are off the prop and are firmly touching the floor (place a think blanket or mat there for your head if you like). This is very important because you don’t want your shoulders and/or head hanging in mid-air, causing you to back-bend your neck. If this is happening to you, grit your teeth and come out of the pose and move the prop supporting your torso closer to the wall. Stay in the pose at least 5 minutes or as long as you like.
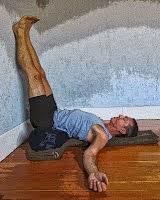
 9. Legs Up the Wall pose (Viparita Karani). This pose has a very dramatic quieting effect because your legs are inverted in this pose as well as your head and heart. I notice the relaxation response kicking in after about seven or eight minutes. However, I’ve observed that people with very tight hamstrings have trouble getting comfortable in Legs Up the Wall pose. If you have this problem, experiment by doing the pose slightly further from the wall, with a bolster in a vertical position supporting your legs. See Legs Up the Wall Pose for instructions. Stay in the pose for 5 to 20 minutes.
 If you are pressed for time, you could always skip some of the poses, but do the remaining poses in the same order as they are in this sequence. And if you try this sequence at home or teach it to your students, I'd love to hear back from you.
Subscribe to Yoga for Healthy Aging by Email ° Follow Yoga for Healthy Aging on Facebook ° Join this site with Google Friend Connect

