 As we have talked about many times here at YFHA, balance is one of the key physical skills to cultivate as we age. As Shari said in Nina's interview with her about aging and balance:
“ …if we can’t balance, we fall and break bones or hurt ourselves in different ways. Twenty percent of all Americans have balance issues, and falls are a public health catastrophe. They send people to hospitals and may require costly surgeries and months of pain, suffering, and hard work to try to regain prior levels of functional independence.
In addition, if we are afraid to move because we fear falling, this fear affects every aspect of our lives and starts the spiral of further decline and illness. People who fall are afraid of exercise and movement because of the anticipation of future falls. But if you don’t use your physical body the decline is unrelenting.”
The good news it that balance is a skill you can practice and improve if you do a home practice regularly. The following sequence is the first of two that I will share with you to help you on your way to better balance. If you have poor balance already or have recently taken a fall secondary to losing your balance, I recommend working close to a wall that is behind your back. That way you can easily lean back against the wall if you feel like you are losing your balance.
Easy Balance Sequence
1. Mountain Pose (Tadasana): You might say, “Hey, this is not very balancey.” But Mountain pose is the foundation of all standing pose work, so it is good place to begin. Start with Mountain pose with a block on its narrowest side between your thighs and your feet set so you feel a nice squeeze of your inner leg muscles against the block. Stand for 60-90 seconds with your legs actively squeezing the block. This will strengthen your inner thigh muscles in addition to working all of the standing muscles in your legs. Then repeat the pose without the block. When working without the block, try to feel evenly balanced on the ball and heel of the foot, the inner and outer edges of the foot.
2. Mountain Pose with Arms Overhead and Heels Lifted (Urdhva Hastasana): Starting in Mountain pose, bring your arms slowly out to the sides and up until your arms are overhead alongside your ears.To make it more of a balance pose, try coming up onto to the balls of your feet, lifting your heels just a few inches off the floor. Try to stay as even side-to-side on the balls of your feet as you can for a few seconds, and then lower your arms and heels back to the earth. Repeat one or two more times, focusing on getting steadier each time. If you are feeling particularly off balance, try facing the wall with your feet just a few inches from the wall and rest your fingertips on the wall overhead as you lift you heels.
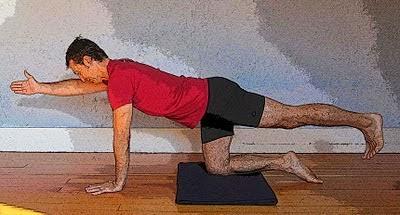
3. Hunting Dog Pose: Come down to hands and knees, trying to keep your body very steady going into the pose. Follow the instructions at Featured Pose: Hunting Dog Pose. If you feel too wobbly in the pose, keep the toes of your straight leg lightly on the floor. Stay for at least 30 seconds, but work up to 90 seconds gradually over time. As you come out of the pose, try to keep your body very steady.
For those already experienced with practicing the full version of Tree pose, feel free to do any version of the pose that you’re comfortable with.
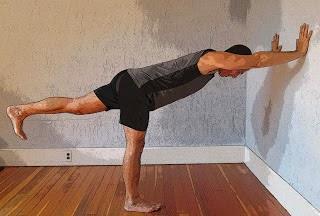
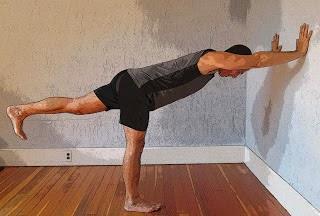
7. Warrior 3 Pose (Virabadhrasana 3), Easy Version: Start at the wall, coming into Half Downward-Facing Dog Pose at the Wall, as described here. As your press your hands into the wall, lift your left leg up behind you as close to parallel to the floor as you can manage while still keeping your hips relatively square. While you’re in the pose, try to lighten the touch of your finger on the wall, as you continue to keep your hips square with the floor beneath you, your bottom foot squarely on the floor, and your lifted leg strongly reaching back behind you. Try to stay for six breaths or so, gradually working way up to 60-90 second holds. Repeat on second side. See Featured Pose: Warrior 3 (Wall Version) for detailed instructions on this pose.
8. Standing Forward Bend (Uttanasana): Come back into Mountain pose and savor having both feet back on the ground! Place your hands on your hips, on an exhalation, begin to bend forward from your hip joints. When your pelvis won’t rotate over your upper leg bones any more, allow your spine to round gently into a full forward bend, as you release your arms toward the floor. If your hands easily make it to the floor, great. But if they fall shy of the floor, don’t force them down; instead place your hands on opposite elbows. Feel free to bend your knees a little bit if your lower back or hips feel strain or pain. Stay for 30-60 seconds.
9. Boat Pose (Paripurna Navasana): Sit on the floor with your knees bent and your feet on the floor in front of you. Hold onto the backs of your knees and rock back to balance on your buttocks with your feet just off the floor. See how long you can stay before your front thighs begin to tire. If Version 1 is easy, try Version 2, bringing your shins parallel to the floor and holding there. If Version 2 is easy, try Version 3, letting go of your knees and stretching your arms forward. Finally, if Version 3 isn’t challenging enough, try Version 4, straightening your knees so your upper and lower body forms a “V” shape. Start with six breaths and work up from there.
10. Reclining Twist (Jathara Parivartanasana): Lie on your back, with your knees bent and your feet on the floor. Keeping your knees bent, bring your legs and feet close together, and stretch your arms on the floor out to your sides in a T position. Now let both knees drop easily to your right, as close to the ground as they will go. Allow your head to turn gently to the left. Rest in this position for a minute or so, noticing any tension or fear that might have crept into your body from the challenge of your balancing poses. As you exhale, imagine releasing as much of that emotion and feeling as you can. Come back to center and repeat on the second side.
11. Relaxation Pose (Savasana): Focus today on feeling the security, stability, and safety of your entire body resting on the floor. Use any props that would make your body more comfortable (see Corpse Pose Variations). Ideally, set a timer for 10 minutes, and let your mind stay focused on the gentle flow of your relaxed inhalation and exhalation, and enjoy your relaxation pose!Subscribe to YOGA FOR HEALTHY AGING by Email ° Follow Yoga for Healthy Aging on Facebook

