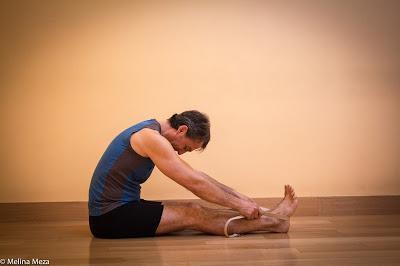
 Seated Forward Bend (Paschimottanasana) provides an excellent stretch for the muscles and fascia of your entire back body, from your heels to the back of your head. In general, many of you will also find the pose soothing to your nervous system and quieting for your mind and emotions, so it’s a good pose to include at the end of a practice, to prepare you for relaxation or meditation. The exception to this that some of you who experience intense stretch sensations in your back body in the pose due to muscle tightness may feel agitated instead. Two of our variations below, however, can help even some of you stiffer people find a more peaceful experience. I prescribe this pose for:
 - Improving flexibility in the spine, hips, hamstrings and calves
- Stimulating your digestive system
- Soothing your nervous system
- Quieting your mind
- Managing stress
- Reducing anxiety
- Improving insomnia
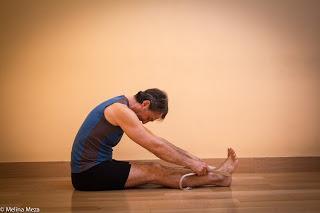 If you typically use support in seated poses, set up a folded blanket on your mat to support your hips and if you can’t easily reach your feet in this pose, place a strap where you can easily grab it. Then, sit either on the edge of the folded blanket or directly on the mat with your legs straight out in front of you. With knees straight, either bend your ankles and feet forward to a 45-degree angle (which can help with hamstring and calf muscle tightness) or flex your feet to a 90-degree angle. Elongate your spine, and then on an inhalation take your arms overhead. On your exhalation, tip forward from your hips. When your hips stop rotating forward, release your arms and reach your hands towards your feet. When you come to a comfortable limit, either bring your hands on to your feet if you are flexible enough or place the strap around your feet as shown in the photo above if you are less flexible (if you don’t have a strap, you can place your hands on the outsides of your legs—this could be your knees if you are really tight). With your hands in position, mindfully release your spine into a forward bend. Keep your arms firm to stabilize your forward bend, but do not use them to pull your chest closer to your thighs; this could strain your lower back or worse. Instead, with each round of breath, invite your body to release into the forward fold. Look for a reasonable stretch sensation along the backs of your legs and spine, letting your internal experience of sensation be your guide rather than the desire to look like a photo in a yoga magazine. Start by holding the pose for about one minute or 16 rounds of breath, and gradually work up to longer holds, as long as 2-4 minutes. To come out of the pose, strongly engage your leg muscles and, on an inhalation, release your hands and come back up to an upright position as you sweep your arms towards the sky. Then, exhale and release your arms to your sides. If you are tight, try bending your knees to release the tension in the backs of your legs. 2. Straight Back (Extended Spine)
 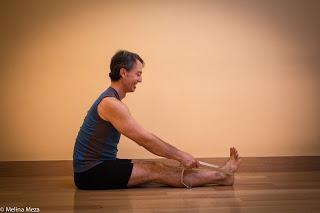 This variation is excellent for those who cannot safely round their spines, such as those with lower back pain, disc issues, or osteopenia or osteoporosis with or without wedge fractures (see See Friday Practice Pointers: Forward Bending of the Spine for more info). If you use a blanket and/or strap in the classic version, use them in this version as well. Enter the pose as with the classic version, but after tipping initially from your hips and bringing your hands into position, instead of rounding your spine forward, keep your spine extended as you would if you were trying to do a slight backbend. Keep your head and neck in a neutral position, aligned with your spine rather than thrown back. Use the same timing for this variation as for the classic version. And come out of the pose in the same way. 3. Knee Support
 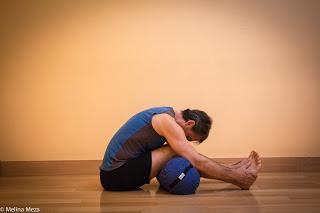 This variation is excellent for those of you who are very tight in hamstrings and buttocks because practicing with bent knees takes tension out of those muscles and allows you to tip your hips more easily over your legs (you probably won’t need a strap!). And, for others, this variation is as relaxing and restorative as version 4. Before coming into the pose, place a round bolster or a thick blanket roll underneath your knees, so your knees are bent and your legs are relaxed and completely supported. From there, follow the instructions for the classic version. 4. Restorative Version
 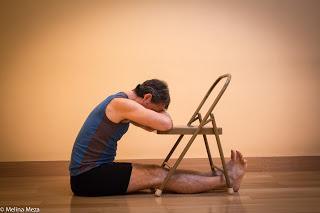 Using a chair to support your head and arms allows you to experience the quieting nature of this pose without any strain. So this version is appropriate for anyone who wants to practice Seated Forward Bend as a restorative pose, either as part of a restorative sequence or simply on its own. This variation is also for those who cannot safely round their spines (except those with or at risk of wedge fractures), as well as for those with tight hamstrings and buttocks. Start by sitting in front of the chair (if the chair has a hard seat, place a folded blanket or sticky mat on it to create a softer surface). Sit on a folded blanket if you use one in the classic version. Then extend your legs straight in front of you and between the legs of the chair, so your feet and calves are under the chair seat. (You will have to experiment with having the chair closer or farther away from your hips find a distance that allows either for a straight spine or for just a gentle rounding that does not stimulate much stretch in the back of the spine or legs.) Come into the pose as you did for the classic version, and as you extend your spine toward the chair, place your forearms on the chair seat near its front edge. Now release your neck and rest your head on your arms, gently rounding your spine only if necessary. (If the chair seat isn’t high enough for you, try adding a folded blanket on top of the seat.) Start by holding the pose for about one minute or 16 rounds of breath, although if you are very comfortable, you could stay for much longer, for 5 minutes or a bit more. Come out of the pose slowly by rolling your head and chest up to a sitting position. Then bend your knees a bit and use your hands to help you scoot back away from the chair. Subscribe to Yoga for Healthy Aging by Email ° Follow Yoga for Healthy Aging on Facebook ° Join this site with Google Friend Connect

