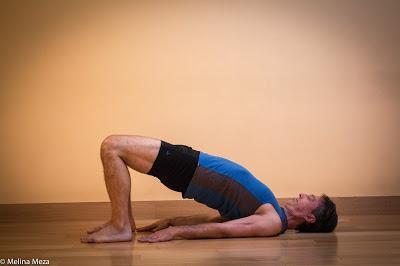
 Compared with the backbends we have previously featured, including Cobra and Upward-Facing Dog pose, in Bridge pose, your back body is in a back-bending shape just from the base of your neck (around C7-T1 for my anatomy geeks out there) to the backs of your knees. So in this pose, you are encouraging back bending movement in most of your spine, but none in the neck or below the knee joints. This makes this backbend suitable for people who have neck problems and experience difficulty or pain with other backbends, as long as the pose is comfortable for you.
But as with many of the other backbends, this pose is great for increasing flexibility along the front of your body—from the crook of your throat to your knees—and for strengthening the muscles that line your back body—from the backs of your knees to the base of your neck. Because you’re lifting your thighs away from the ground, this pose is a good way to strengthen your hamstring muscles, which tend to become weak from too much sitting. For those with low back pain, this can be a helpful pose because it returns your lumbar spine to its natural healthy curve and strengthens lower back muscles that may be weak and contributing to pain. When practiced as an active backbend, this pose can be energizing for your body and mind. It is particularly uplifting if you practice it dynamically, lifting up into the backbend on your inhalation and dropping back down on your exhalation. When practiced with support under the sacrum, this pose acts as a supported inversion, with a gentle downward gradient from knees to head, so it can be very calming (triggering the Relaxation Response) and also provides some of the other benefits of supported inversions. This backbend is accessible to anyone who can get down on the floor or even has access to a fairly firm mattress!
I prescribe this pose for:
- Improving front body flexibility
- Improving flexibility of the spine
- Improving strength of the back body, including the hamstrings
- Relief of lower back pain, especially versions 2 and 4 and very low lifts of version
- Quieting your nervous system
- Releasing tension around the front of the chest to help improve overall breathing
- Counter-pose for forward bends and twists
- Uplifting pose for mild depression when practiced dynamically

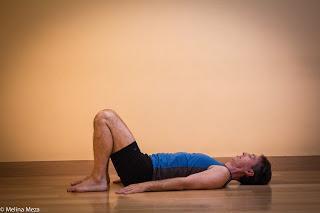
Start in Constructive Rest position (lying on your back with knees bent and heels about four inches from your hips).
 From here, establish the normal, slightly arched shape of your lumbar spine. Then push down into your feet and lift your hips straight up off the floor—like an elevator going up a few floors—maintaining the neutral arch of your lower back. Stop this action when the stretch on your front body becomes strong or if you feel the knees coming apart, usually about 6-12 inches off the floor. Keep your thighs parallel each other. Once in Bridge pose, bring some focus to your arms. Press the upper backs of your upper arms (where your arms meet your shoulders) firmly down into the floor while actively lifting up the lower tip of your breast bone to the sky. Then press your arms, which are lengthening toward your feet, firmly down into the floor. This will encourage extension of your shoulder joints and spine. Optionally, you can try to roll your upper arms bones under your chest and clasp the hands together under your body, pressing the entire length of your arms down firmly into the floor (this part is best learned from an experienced teacher). Keep your head and neck relaxed and centered, and look straight up at the ceiling above you. Stay in the pose for 15-30 seconds, gradually extending your hold over time, up to 1-2 minutes. To come out of the pose, move your arms out to your sides if necessary and then lower your hips straight down, like an elevator returning to the lobby floor. Rest for a moment and consider repeating one more time.If desired, you can also practice the pose dynamically, coming up into the backbend on your inhalation and lowering down on your exhalation, repeating for about six rounds. This is a good way to warm up for longer holds of the pose or simply to energize or uplift yourself.2. Supported Bridge Pose with Low/Medium Block
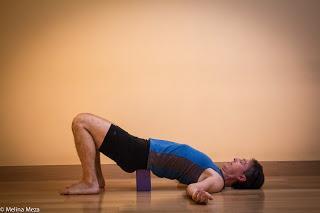
 When you rest your pelvis on a prop, Bridge pose shifts from an active pose to a passive, restorative pose. This version still provides the benefits of opening your front body and extending your back body, but there is less strength building than in the active version. And because you are not usually lifting to your maximum, this version is also gentler on the neck. This makes it ideal for gentle practices, for situations of fatigue, as a good closing pose for a practice. To come into the pose, start in Constructive Rest pose with a block handy near your hip. Then, come into the pose as in the classic version, but lifting your hips only high enough to slip the block crosswise like a belt is oriented, on its medium or lowest height, under the top part of your buttocks, just below your waist. Then rest your pelvis fully onto the block. Keep pressing your feet into the floor just enough to keep your legs parallel with each other (not turning out) and work your arms and create the lift of your sternum as in the classic version. Stay in the pose from 1-2 minutes unless you feel pain or sense you need come out before then. To come out of the pose, press into your feet, lift your hips off the block and slide the block and your arms out of the way. Then lower your hips gently to the floor. Rest a few breaths before moving on.3. Supported Bridge Pose with High Block
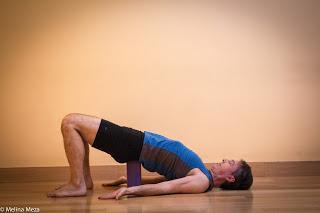
 This version has the same benefits as version 2, but because you are on the highest height of the block, it invites more stretch to the front of your body at your hips, abdomen, and chest. For many, this version will be near or even a little beyond what you can do on your own, so be mindful that it does not cause pain in the lower back or neck. If it does, return to a lower height of the block. To come into the pose, follow the steps for version 2, but as you lift your hips up, you may need to also lift your heels and come onto the balls of your feet to be high enough to slip the block, crosswise like a belt is oriented, under your pelvis. As you set your pelvis onto the block, your heels should be able to easily come back to rest on floor. If they don’t, come out and turn the block down to a lower height. Stay for 8-12 breaths initially and work up to 1-2 minute holds. Even though this is a restorative version of Bridge pose, it may create a lot of sensation in your front body, so you may decide to come out earlier than for version 2.To come out the pose, exit the same way as you did for version 2, although, once again, you may need to lift your heels to move your pelvis off the block and move the block out of the way before you lower your hips to the floor. Rest for a few breaths before moving on.4. Supported Bridge Pose with Bolster(sorry, no photo)Resting your pelvis on a bolster is similar to the resting on the lowest or middle height of the block, with the same benefits, but adds in the benefit of the bolster’s softness and size, which may provide more comfortable support for those with a sensitive lower back and pelvis. For everyone, using the bolster may make the pose feel more restful and restorative. To come into the pose, follow the same steps as version 2, using a bolster instead of a block. When you slide the bolster crosswise under your pelvis and release down onto it, make sure the entire bolster is below your waist and is not supporting the curve of your lower back. If necessary, move the bolster to a better position. From there, use the same actions and timing as version 2.Subscribe to Yoga for Healthy Aging by Email ° Follow Yoga for Healthy Aging on Facebook ° Join this site with Google Friend Connect

