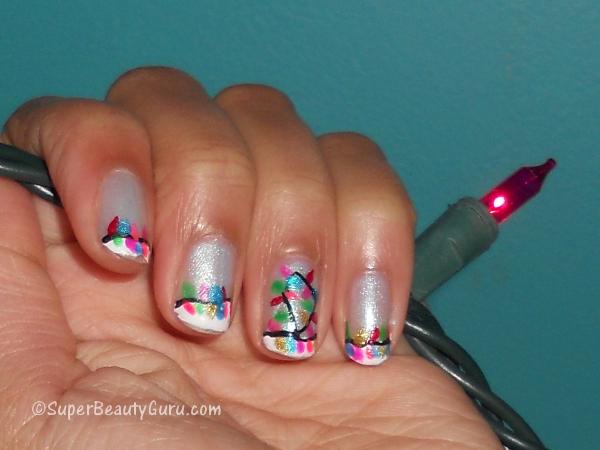
I was going through my old pictures, cleaning out my computer when I came across a few photos I took two Christmas’s ago of my Christmas lights nails. I’m one of those people who really wants to blog more often so sometimes I’ll record a video or take pictures that never end up on my blog, but just sit there on my computer because I’m really busy, but I mean well.

I decided I’m going to go through all of the pictures I have that I meant to post, and just post them, so here I am on a march day at 4 in the morning on a school night posting these pictures. It’s in tutorial form, so this will show you how to create Christmas Light nails if you want to do so as well. So here’s a tutorial on how to achieve this look:
Step 1
Start off with a base coat. Use a clear nail polish before using any other nail polishes to prevent staining and help your nail polish go on smoother and stay on longer.

Step 2
Paint your nails with a light shimmery nail polish color. I used this one because it reminded me of a winter wonderland. It’s a great winter color, and isn’t too bright so it doesn’t distract from the Christmas lights.

The nailpolish I used was from Sally Hansen

Step 3
Use a white nail polish to make very sloppy french tips. You want these tips to be squiggly because that’s what we’re going to line up the chord for the lights with, and we all know that those chords are never straight, so make the tips wavy to add a realistic feel.

Step 4
Use a black nail polish striper or a black nail polish and thin nail art brush to add thin black squiggly chords on the top line of the tips. On the ring finger you can add a loop, or do so on more than one finger.

Step 5
Gather assorted nail polish colors…

And use them with a toothpick or nail art brush to add bulb shapes along the light chord. Use a bunch of different colors for this! That’s all you need to do, then add a top coat and you’re done!


I hope you liked this tutorial even though it’s March and these pictures were from forever ago. I know it’s sloppy, but I wasn’t as experienced back then as I am now in nail art, so it’s to be expected. Tell me what you think about this look in the comment section down below!
Subscribe by email if you like my style
Enter your email address:Subscribe with: Google Reader | Feed Reader | Bloglovin’
Thanks for stopping by! Please subscribe to my blog if you like it! xoxo Amber C Johnson from Super Beauty Guru <3

