 Hello,
One of the biggest concerns when you start to blog is to be indexed by Google. But due to the limitations of wordpress.com, sometimes you see it far away.
But not anymore.
WordPress.com is working its way to become the best userfriendly blogging platform service with the social media focus.
Ok let’s get this done
First of all, a Google Webmaster Tool account must be created or activated. If you do have a Gmail account, it is simple:
- Log into your Gmail Account
- Go to the Google Webmaster Tool and click on “Sign in to Webmaster Tools”.
If you do not have a Gmail account, you need to create one in order to get benefits from Google’s products.
Ok done with that. Now how do I create a sitemap.xml file?
Don’t worry about that, WordPress.com dealed with it and created an automatic sitemap.xml generation for you. To check your sitemap is simple, just go to http://yourblogname.wordpress.com/sitemap.xml.
How do I submit my sitemap.xml file to my Webmaster Tool account?
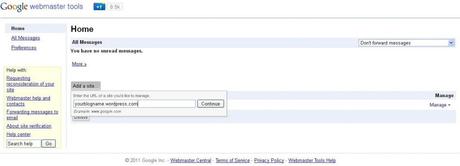
After you successfully created/activated your Google Webmaster Tools account, the next step is to add your site URL. The next image explains the process.

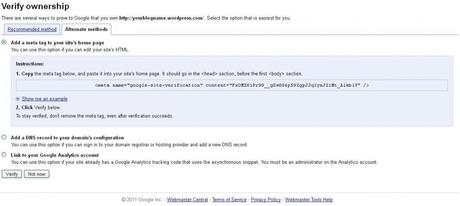
After you submit your site, we need to complete the verification. This is done in order to demonstrate that you are the owner and administrator of the site. In order to complete this, there are several ways:
- Upload an .html file to your blog: As I explained in my post on How to Submit Your WordPress.com Blog to Google and Yahoo, we can’t upload this type of files to our blogs.
- Add a Meta Tag to your site’s homepage: This is the best methood. So we have to select this option on the “Alternate Methoods” Tab. Google will give you a meta tag for you to include in your site, so you have to copy it.

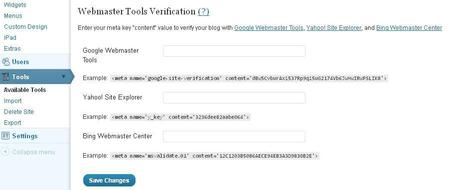
To include the meta tag in your blog, just simply open a new tab in your browser and go to your blog’s Dashboard, click on Tools. Then go to the bottom of the page in which you will see exactly what is displayed in the following image. On the Google Webmaster Tool’s box, you will Copy-Paste the code that was given to you. After that, remember to save your changes.

The next step is to go back to the Google Webmaster Tool and click on verify.
Ok now you successfully completed the verification of ownership process. Finally, we can do what we want to: Submit our sitemap.xml file to Google.
First, go to your Google Webmaster Tool Dashboard and click on “Site Configuration” then “Sitemaps”

You will be redirected to the submition site where you will see a button called “Submit a Sitemap”. Once you click there, you blog’s URL address will be displayed with a box next to it. You just have to type sitemap.xml and click on the button next to the box and done, you have successfully included your sitemap.xml into Google. Additionally, now have full access to Google Webmaster Tools and all the features it has to offer.
You can also use online tools like Sitemapwriter and this will allow you to submit your sitemap to a few other search engines. You will then see how people are reaching your blog through webmaster tools by what search term they are using.
Other cool tip that you can use to see if Google has crawled your web, is to type site:yourblogname.wordpress.com in the google search a few days after you have submitted your sitemap.
I hope this helps you to get more visits. Feel free to leave a comment.
Enjoy!

