A few FB friends recommended I post a workout they can do when they’re traveling and no time to hit the hotel gym, or maybe your hotel has no gym. Well, here are two options for you. “Please excuse the crudity of this model, I didn’t have time to take high quality pictures or insert fancy graphics.”
There are two programs to choose fromBeginner or Intermediate/Advanced. Each program consists of 10 exercises that you should perform in succession with about 20-30 seconds max rest in between each exercise. Your goal is to do 4 Sets of these 10 exercises, resting about 2 minutes in between Sets.
First set = 10 reps per exercise.
Second set = 12 reps per exercise.
Third set = 15 reps per exercise.
Fourth (and final) set = 20 reps per exercise
Of course, it’s optional to do all 4 rounds but it’s ideal if you CAN.The Beginner program is for people who are currently working out on a consistent basis but would consider themselves “Deconditioned” and “trying to get in shape.”
Intermediate/Advanced is for those who workout consistently for more than 6 months and consider themselves to be “in decent shape.”
As always, start with a little warm up to get those limbs…limber. I’ve been doing this one for awhile: The Limber 11
Beginner BodyWeight/Hotel Workout
If at any point you can’t perform all the reps listed, do as many as you can, rest, and then move on to the next exercise.
1. ATG (Ass to Grass) Squats
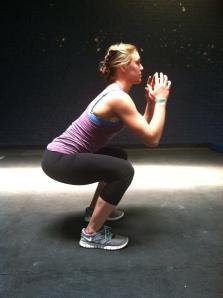
- As low as your butt can go, weight in your heels, hips back, chest out, eyes forward, feet hip width apart.
- Try not to let your knees turn in or flare out, they should face forward. Heels do not come up off the floor, EVER.
2. Push up to Plank
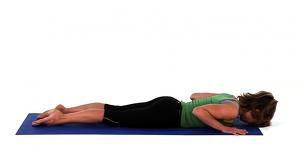
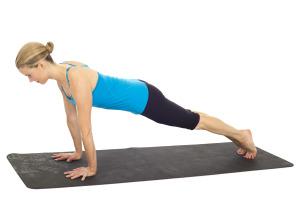
- Start out hands close to chest as pictured above. Slowly begin to push your body up into a plank position as in the second picture. You’re merely attempting to push up your body off the ground in this order, almost like a worm:
- Chest comes off the ground, then stomach, then hips, then knees. Hold the plank for a second, then slowly descend (as opposed to flopping down) in the reverse order: Knees come down, then hips, then stomach and finally chest. Try not to rest for more than a couple seconds before “worming” your way back up.
- Abs are engaged (think of someone about to punch you in the gut and brace the abs), glutes squeezed together to protect the lower back, hips are not sagging.
3. Single Leg Dips
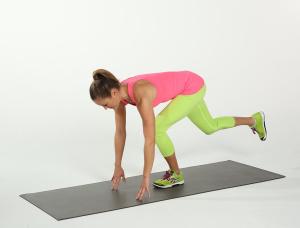
- Start standing in place, put all your weight on one foot. Bend the standing leg as you reach with both hands to about 6 inches in front of you to the floor. If you can touch the floor, that is the goal. If you are not flexible enough, just reach as far as you can without toppling over.
- Return to the standing position but keep the opposite foot off the floor if possible. Stay on the same side for the reps required.
4. Bridge on Bed
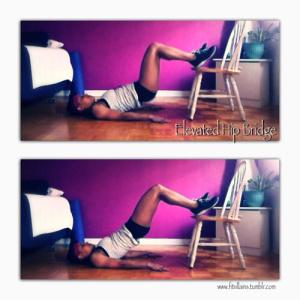
- Lie down so your feet are on the bed (or chair if you so desire). It’s preferable that the feet are digging into the bed on the top, not the side. (You don’t want to be able to push the mattress off.)
- With your body at a 90 degree angle, push your feet into the bed and lift your hips and butt off the floor.
- Hold for a couple seconds, squeezing the glutes before bringing hips back down and returning to starting position.
- You should feel this in your hamstrings (back of the legs).
5. Sit ups with feet under Bed
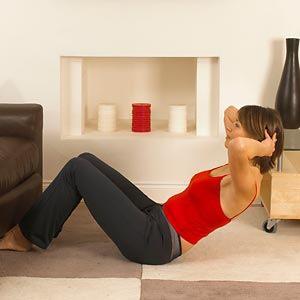
- Bring feet down to under the bed (flex feet if needed to keep feet from moving) place hands behind head and come up as far as you are able, keeping abs engaged as much as possible.
- Don’t pull your neck, think of lifting from the chest. Try not to use momentum to cheat.
6. Plank Jacks
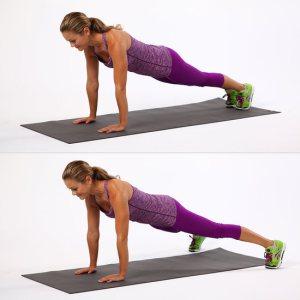
- Plank position on hands to start. Feet hip width apart.
- Jump the feet out as if you’re doing a jumping jack horizontally, jump the feet back in. Maintain the plank position the entire time, do not let the hips or butt rise, do not allow the back and hips to scoop or droop. Abs engaged, glutes squeezed entire time.
7. Alternating Lunges
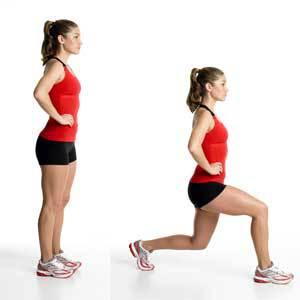
- Hands on hips or above head for added difficulty, step forward with one foot bending the back knee towards the floor at the same time
- Push off the front foot as you return to the starting position.
- Alternate to the other foot and repeat on that side. This completes 1 rep.
- Note: The back knee does not need to touch the floor, just as far down as you are able.
8. Dips on Chair or Bed
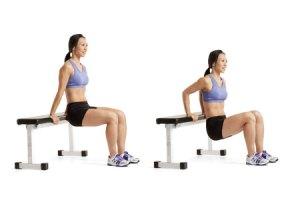
- Palms on chair facing forward, feet out in front of you.
- The further the feet are out, the more difficult the exercise becomes.
- Dip your body down to the floor as you bring the elbows directly behind you. Push into the chair (or bed) and bring yourself back up to starting position.
9. Leg Tucks on Chair or Bed
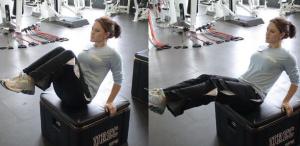
- Sitting on the bed or chair, slightly lean away from legs.
- Grab a hold of the sides of the chair or just on the bed and position hips at one end, legs out in front.
- Raise legs so they are in front of you, pull knees in toward chest. Extend legs out straight in front and repeat.
10. Side Plank Lift and Lower
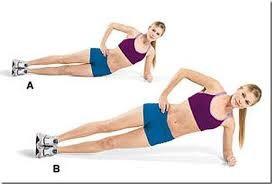
- Lie on your right side with your legs straight. Prop yourself up with your right forearm so your body forms a diagonal line. Rest your left hand on your hip. Brace the abs and lift the hips and knees off the floor.
- Hold for a second and slowly lower back down (try not to flop down). Repeat for the required number of reps before switching to the left side.
Intermediate/Advanced Bodyweight Hotel Workout
If at any point you can’t perform all the reps listed, do as many as you can, rest, and then move on to the next exercise.1. Jump Squats
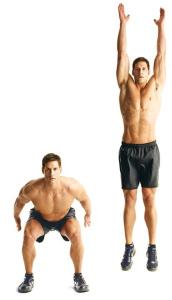
- With feet shoulder width apart, descend into a squat. Go as low as your butt can go but keep weight in your heels, hips back, chest out, and eyes forward.
- Try not to let your knees turn in or flare out, they should face forward. Heels do not come up off the floor as you descend. Once you are as low as you can go, drive through the heels and jump up.
2. Push up to a Plank – Slow descent to floor
A.
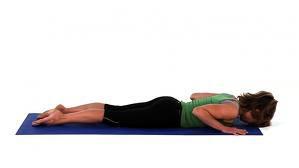
B1.
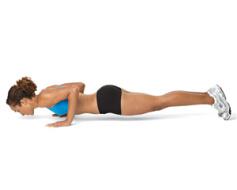
B2.
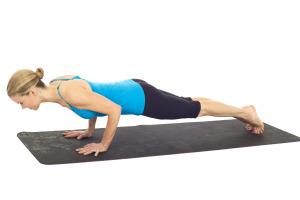
C.
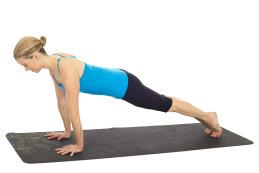
This is best described as a push up from the floor – meaning you start completely on the floor and come up in one motion.
A. Start out lying on stomach and chest as pictured, and bring hands lower to be in line with your chest. Press hands into the floor as you begin to ascent.
You don’t want to WORM yourself up into a plank, you want to come up in one motion. THIS is what makes it difficult.
B1. and B2. Although you are not in this position for more than a nano second, THIS is what your body should look like as you ascent.
C. Come up into a plank position, engaging the abs, glutes squeezed to protect lower back, hips not sagging! Hold for a second and SLOWLY descent all the way back down to the floor. Try not to FLOP down, although after a few reps, you will be tempted to.
Rest for no more than 3-5 seconds in between reps.
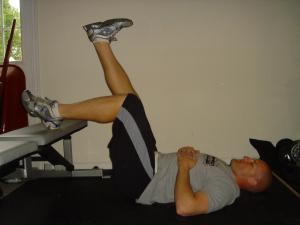
3. Single Leg Glute/Hammie Raises on Bed
A.
B.
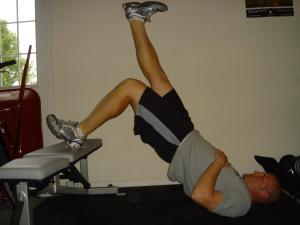
- Lie down so your feet are on the bed (or chair if you so desire). It’s preferable that the feet are digging into the bed on the top, not the side. (You don’t want to be able to push the mattress off.) Your heels should be digging into the bed/chair.
- With your body at a 90 degree angle, hands at your sides, push your heels into the bed and lift your hips and butt off the floor into a bridge.
- A. Extend one leg up.
- B. Pressing your hands into the floor at your sides, lift your butt and hips off the floor, aiming the extended foot towards the ceiling.
- Squeeze the glutes the throughout. Bring the hips and butt back down to the floor but not completely; allow them to hover about an inch or two above the floor before lifting again for the next repetition. You should feel this in your hamstrings (back of the legs). It might be possible that the bed is too high, in which case a chair might be better suited.
4. Full sit ups with Arms Raised
A.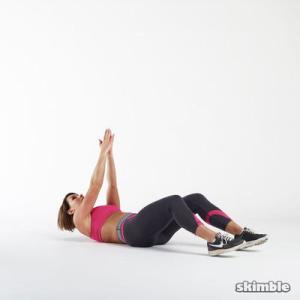
B. 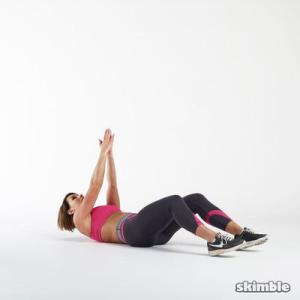
- Lie down with knees slightly bend and feet under the bed (flex feet if needed to keep from moving) for stability if need be.
A. With abs engaged, bring arms straight out in front of your chest.B. Slowly lift yourself straight up into a sit up position. Slowly roll yourself back down as opposed to flopping down. Try not to use momentum to cheat throughout.
5. Plank with Knee to Opposite elbow
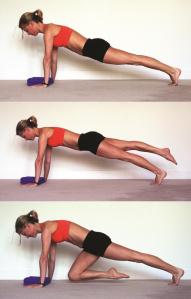
- Plank position on hands to start. Feet hip width apart.
- Lift right foot up off the floor slightly. Bend right knee and bring knee to left elbow.
- Return right leg to starting position and alternate with the left foot. This completes One Rep.
6. Lunge Jumps
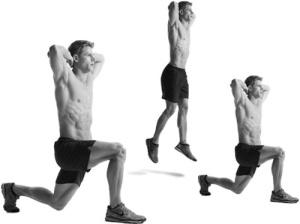
- Hands on hips or behind head (as pictured) for added difficulty
- Stand with your feet hip width apart and lunge forward with right leg. Hold the lunge with your right knee bent at 90 degrees
- Push off your right foot, jump, and switch legs, landing with your left leg forward into a lunge. Hold this position for a second, then repeat. One side is One rep. (You’ll do 10, 12, 15 or 20 TOTAL, not 20, 24, 30 and 40 reps, unless you want a ridiculous challenge).
- Note: The back knee does not need to touch the floor, just as far down as you are able.
7. Push ups with feet elevated
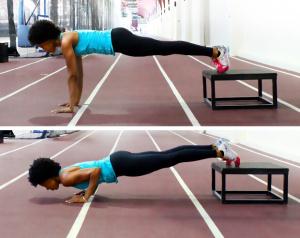
- Place hands on floor below shoulders and prop feet on bed (or chair). The HIGHER your feet, the more difficult this becomes. You might want to consider starting out on a higher elevation and as the reps are increased, you can decrease the difficulty. Example: Bed, Chair, Step, Floor.
- You must be able to maintain stable hips and a straight back (no scooping) throughout. Keep abs engaged throughout to maintain this position.
- Elbows should bend slightly behind you at an angle as is the case in a regular push up. Elbows should never flare out to the SIDES. Descend into a push up aiming your chest to the floor and bending the elbows slightly behind you as mentioned. Repeat for the required number of reps.
8. Prisoner Get up Get Down
A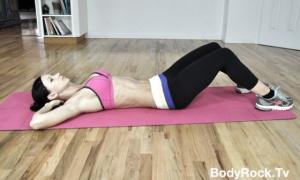
B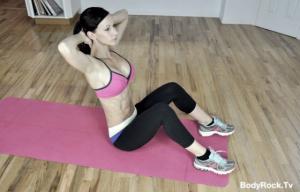
C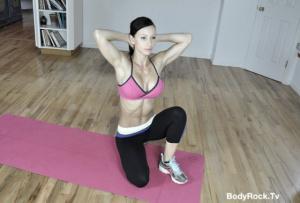
D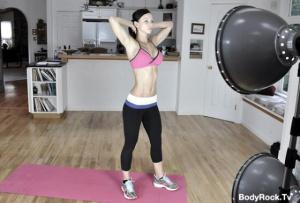
A. Start lying down on back completely flat, hands behind head as if you’re going to do a crunch or sit up.
B. Criss-cross your feet (not pictured) as you lift upper body up off the floor
C. and D. and come up to a standing position without using your hands..
- Reverse the process, bend your knees and sit back down on the floor, again without using your hands to help you. Your hands are in a “prisoner” position behind your head for the entire time.
- If you aren’t able to do as many reps as required without using your hands, try to use just one hand to help you. Avoid using too much momentum to bring yourself up off the floor.
9. Side Burpees
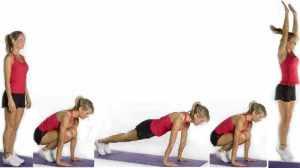
- Pictured is a traditional Burpee. You are only changing the direction of your feet on the jump out (The Picture in the middle).
- You will squat down, place your hands down on the floor, jump both feet out to one side, bring the feet back in to center, and jump up. This completes one rep.
- Return to starting position, jump the feet out to the other side, jump the feet back in, jump up. This is rep #2. Etc.
10. Side Plank with Rotation
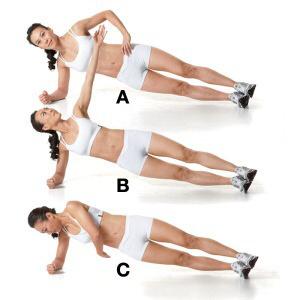
- Lie on your right side with your legs straight. Prop yourself up with your right forearm so your body forms a diagonal line. You can stack the feet (as pictured) or you can place your top foot in front of your bottom foot forming a “scissor” position.
- Reach your left arm up to the ceiling. Brace the abs and lift the hips and knees off the floor.
- Bring your left arm down in front of your, bending it slightly so it comes down and reaches thru behind you.
- Return the left arm to the starting position, keeping your hips and knees off the floor and repeat the rotational move. The hips and knees remain off the floor the entire time.
- Repeat for the required number of reps before resting the hips and knees back down and switching to the left side.
I hope you enjoyed these and please let me know if you tried it and how you did!
And if you want some extra inspiration, please check out my little interview with David Shook HERE over on FFTP.
Exercise Disclaimer: Michelle Piccolo and From Fit To Figure specifically DISCLAIMS LIABILITY FOR INCIDENTAL OR CONSEQUENTIAL DAMAGES and assumes no responsibility or liability for any loss or damage suffered by any person as a result of the use or misuse of any of the information or content from this program. USE AT YOUR OWN RISK: This exercise program is for informational purposes only. Consult a physician before performing this or any exercise program. It is your responsibility to evaluate your own medical and physical condition and to independently determine whether to perform, use or adapt any of the information or content in this program. Any exercise program may result in injury. By voluntarily undertaking any exercise displayed here, you assume the risk of any resulting injury.

