Starting today, I will share with you one aspect of the blog design every week. Hopefully, this will help some of the bloggers out there who are looking for quick fixes and a way to make their blogs more beautiful.
The blog header is the first thing that a reader sees on visiting your blog and like most other user experiences, first impressions are important. Never let anyone tell you otherwise. I prefer a header with a transparent background since it gives the blog a clean look.
In today's post, I will show you how to create a blog header with a transparent background using IrfanView. You could use any other Picture software such as PicMonkey, GIMP or Photoshop.
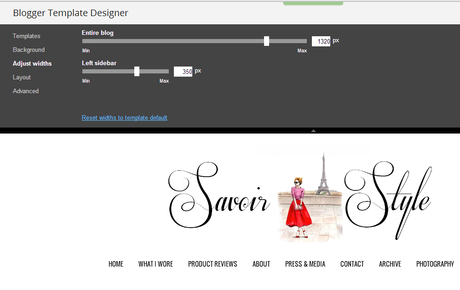
Step 1: Check the widths for your blog by going to your blog's dashboard and selecting Template --> Customize. I use a blog width of 1320 px which is why I will use a width of 1100-1200 px when creating the blog header. You can use the same ratios depending on what is the blog width you prefer.
Also, depending on how much space you want the header to occupy, keep the height of the image from anywhere between 120-350 px.
Step 2: Once you have figured the width you will use for the header image, you need an image you want to use for the header. Remember to resize this image based on the height you want for the blog header.
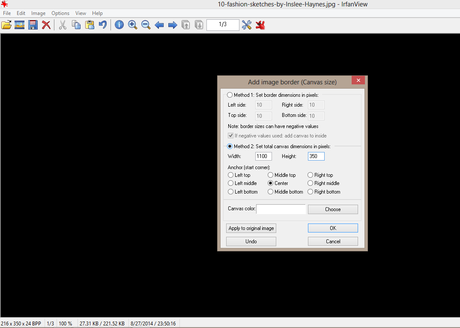
Open this image in IrfanView and select Image --> Change Canvas Size.
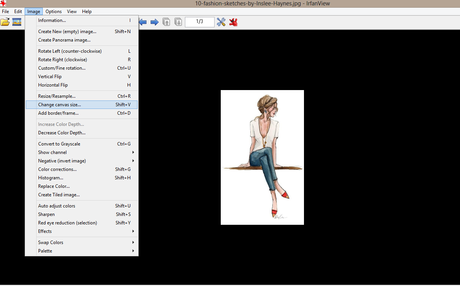
Step 3: Set the canvas dimensions as 1100 X 350 px. Depending on where you would like to place the text, select the anchor as Left Middle, Center or Right Middle. I wanted the image to be as the center of my text and chose center.
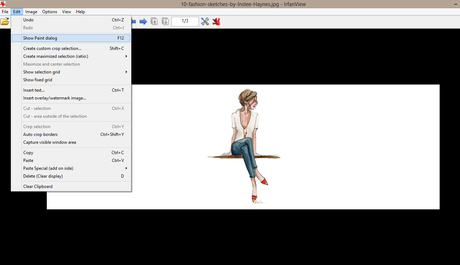
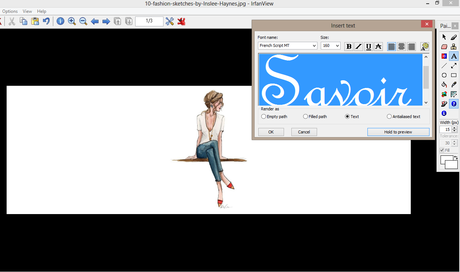
Step 4: Select the Show Paint Dialog in the Edit Tab and Select the Insert Text option in the dialog. You will have to experiment with the placement of the text here. Once you have decided the point you want the text to start, chose the font & font-size. Repeat the same steps for the second half of the text.
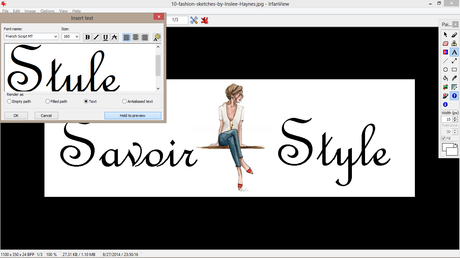
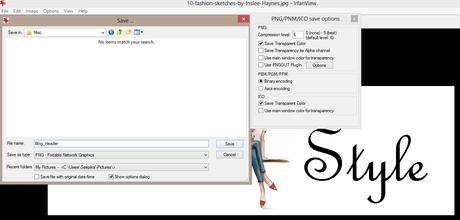
Step 5: Save the image as PNG (Portable Network Graphics) type and while saving remember to check if the Save Transparent color option is selected. Saving it as a PNG file ensures that the transparency of the image will be restored.
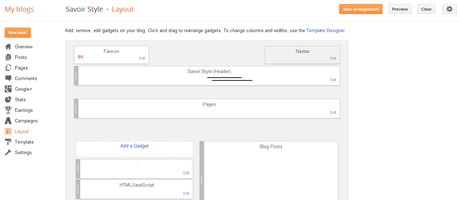
Step 6: Once you have the image created & saved in the right format, go to the blogger dashboard again and click on Layout. Here, select the Blog Header (underlined below) and upload the image. Chose the "Instead of Title & Description" option to use just the image as a blog header.
It takes less than 15 mins to create a blog header this way once you have practiced it a few times and you can create a new header as and when you wish.
Designing your own website comes with a set of challenges but it is also very rewarding. If you have the time & inclination, you will end up saving big bucks, have the creative freedom to change the design whenever you wish and learn a new language in the process.
Hope this helps those of you who have been looking for ways to makeover your blog. I look forward to your comments and thoughts on this new series. Do you have any specific questions related to this post? Let me know and I would love to help you out.


