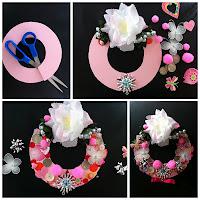
It's no secret that wreaths are in vogue, whether they're made of Christmas 'ball-balls,' felt flowers, or vintage ephemera. Surrounded by so much inspiration, I recently saw a gorgeous one made of paper-flowers. The canny crafter had punched the flowers out of a variety of papers, then pinned the paper flowers together with pretty brads, then hot-glued all the flowers onto a particleboard wreath shape. The quirky selection of colours and shapes, combined with the sheer variety of it all got me in the mood to try something even more 'whimsical'. Here's what I did;
- From a piece of coloured card, trace two circles, one inside the other.
- With scissors cut the outer circle out, and the snip through to cut the inner circle out.
- Reseal the slice where you cut through with tape, front and back.
- Collect everything and anything that you want to use for decorations; I went with pink and silver 'things' and laid them all out in piles, roughly graded from large to small.
- Starting with the largest items first, start sticking the items down (I used glue for the paper, and then double-sided tape for the more '3D' items.)
- Progressively add items, on top of each other, or slipping them underneath petals and so on, to create a layered effect.
- Leave to dry overnight.
- Hang it up.
If you can. And here's the catch. My wreath idea was a bit of a 'wobbler'. Perhaps because I included some overseas silver coins, the composition got rather heavy, and way too heavy for the type of card I used as the base. Furthermore, some of the 3D items didn't love being stuck on and started to flop off. Sigh. Not all ideas work; but the concept of a whimsical party wreath is still a fun one; maybe next time I'll use a thicker base, stronger glue, more time and some extra patience.
 It's no secret that wreaths are in vogue, whether they're made of Christmas 'ball-balls,' felt flowers, or vintage ephemera. Surrounded by so much inspiration, I recently saw a gorgeous one made of paper-flowers. The canny crafter had punched the flowers out of a variety of papers, then pinned the paper flowers together with pretty brads, then hot-glued all the flowers onto a particleboard wreath shape. The quirky selection of colours and shapes, combined with the sheer variety of it all got me in the mood to try something even more 'whimsical'. Here's what I did;
