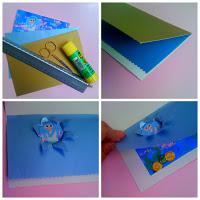
 It's no secret that we want the things we make to be different, to get noticed, to be special. I'm always experimenting with cards and invitations, trying out a variety of approaches; some work, some don't. Recently, I accidentally snagged a piece of paper and tore it slightly. It gave me an idea; what if you deliberately created a torn section in a sheet of coloured paper, and placed another image behind.
 I experimented with the mermaid papers that I used for Mimi's mini aquarium keepsakes (those of you who subscribed last month received your free copy so you can try this project too.)
- Firstly I stuck one panel of the mermaid picture onto the inside of a golden card (any picture can work; consider a photograph, a piece of wrapping paper, a child's drawing, or one of last year's Christmas cards.)
- I cut an A4 sheet of sparkly blue paper to fit the card, and then laid it over the mermaid picture.
- using a ruler I got an estimate of where the mermaid's face was underneath, and used a pin to poke a hole in the blue paper.
- With small nail scissors I snipped a small star out from the pin-hole.
- I lifted a couple of the triangular edges to see if I was in the right spot, and then tore each 'triangle' a little further out to make the hole bigger.
- I then glued the top edge of the blue paper into the card, so that when the card was opened the blue panel (with the peeking-mermaid) was visible, and then they could lift the blue page to see underneath.
Words for the card could be placed on the inside cover of the gold card, to one side of the blue page, or even underneath, on the mermaid picture.
This torn-window approach could work well for party themes such as jungle, dinosaur, monster, or superhero - any theme that involves ripping and tearing, action, or adventure... remember, that not everything works when you experiment, but it's fun to try... so go on... get crafty and try something different... when you find the time!

