 It's no secret that inspiration is contagious, and that we all seem to be trying similar things at the same time. Just as I was photographing my mini-travel-advent-calendar, I noticed that a favorite site; make + takes, was going to show case advent calendars next week (and yes, if you did go to their site to have a look, they did showcase Mimi in her color-wheel craft!). Similarly, no sooner had I posted the woolen bangle project, than one of my most avid readers and best commenter's, Twinkle Star, remembered her woolen bangle project and posted about it; help support your fellow-crafters and pop across to her blog and have a look at her great work; I'm especially in love with her ribbon-wreath tutorial.
Now, back to the mini-travel-advent-calendar. My girls are aged 2 and 4 and I believe they're in the 'perfect' age group for Christmas; old enough to get it, but still young enough to be mesmerised by the magic. That's why I decided this year would be the year for their first Advent Calendar to help count-down to Christmas. I found one in a store which I instantly wanted; a painted timber one in the shape of a house with little drawers and hinged doors; divine. However, as we're still not totally sure where we'll be this Christmas, I decided to make a lighter, more mobile version.
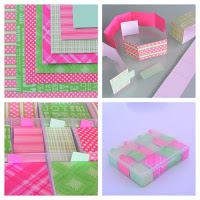
I found two clear stationary boxes, the sort where there are lots of compartments under the lid, to hold pins, staples, buttons and so on. I measured the shapes, and discovered there were only 3 different sizes. Cutting some plain cardboard, I made templates for each size to check dimensions. I considered doing whole boxes (six sided, fully enclosed), but opted for an easier wrapped-strip instead. I realised the little boxes would need a little tab to pull them out of the big box, so added these to the template design.
I selected 7 patterned scrapbook sheets in shades of cranberry and sage (pink and green!) and started making the boxes. It took longer than I hoped, but once I had a system going I was able to make 2 sets in a little over an hour. I also forget that you would be able to see in the sides, so to hide the treasures I had to cut some plain coloured panels for the visible sides.
Self-criticism (and console-myself responses) of the craft idea include;
* It's not particularly reminiscent of the Nativity as these calendars often originally were - I hope to find some stickers to place on each box that might spark some discussion about the meaning of Christmas.
* Each box only has 14 boxes - 2 weeks is an age-appropriate expectation to stay excited about a project.
* There are no numbers on the boxes - my girls can't read very well so I figure the future stickers will be more applicable than numbers.
Overall I'm content that my girls will enjoy pulling boxes with treats out each day for the 2 weeks leading up to Christmas, wherever we happen to be. I'll post Part 2 shortly to show how it ends up with eth stickers, and what non-melting treasures I find to put inside the boxes.
Until then, keep an eye on Make + Takes site for their Advent Calendar wrap-up, or send your own links to my email address, linda(at)partycraftsecrets.com and I'll try to include some links for you.

