 We live in a world that teaches us to look over our shoulder each time we use / cite / quote / link out to another person’s work.
It’s especially true when it comes down to finding great free images to add more visual appeal and enrich our blog posts.
The common thinking of “If I give them credit for the image, I am actually doing them a favor by spreading out the word about their work” simply doesn’t work.
Here’s why.
“Free Images Are NOT Free”
I created a killer Slideshare presentation on how to get more Facebook fans based on James Bond movies: 10 Killer Ways to Get More Facebook Fans James Bond Style?
This is what it used to look like:

It was awesome, edgy, and landed over 100,000 views on Slideshare.
Well, lo and behold, I get a notice from Slideshare:
Hello Ana,
We received a DMCA complaint from Metro-Goldwyn-Mayer Studios Inc. and Danjaq LLC regarding your file and the use of 007 property claiming that it infringed on their intellectual property and rights.
Apparently, my little insignificant Slideshare presentation pissed of some people in Metro-Goldwyn-Mayer Studios!
Never occurred to me that mentioning James Bond will get me into trouble; PLUS, I thought I was using Creative Commons free images.
Thankfully, Benjamin Woodard of Slideshare was very willing to work with me on this one (thanks so much, Benjamin!), and my Bond-free Slideshare presentation was restored to its original URL with all the views, embeds, etc. intact.
This is what it looks like now:
Not so edgy any longer, even though the message is still the same.
”Attribution Doesn’t Make it Right”
That’s right, just because you give appropriate attribution to the image creator, it doesn’t mean you can use it in your blog post.
Peg Fitzpatrick posted a quote rom attorney Sara Hawkins:
“Taking another person’s image or graphic and giving them a “shout out,” linkback, or any other type of attribution does not negate copyright infringement.
Common sense may say that an artist wants exposure for their work, but we’re talking about the law here and common sense doesn’t always parallel.
Copyright law gives the copyright holder the right to decide where their work is published and maybe they don’t want their work on your site, in your book, included in your newsletter or distributed to your social media network. It’s not for us to question why they wouldn’t want exposure.”
“Their Photo, Their Rules”
Here’s an example of when I thought I did everything right: found Creative Commons licensed photos, gave attribution, and yet still got a comment from one of the photo owners on this Slideshare presentation:
How to Milk Slideshare for Moo’ Website Traffic from Ana HoffmanThe comment was:

Mind you, Creative Commons licensing doesn’t require ME to include attribution ON the image itself, but in the end, it’s his photo, his rules.
Bottom line: when using other people’s images in your blog posts, you’d better be aware of image licensing requirements, plus be ready to fix things if and when trouble comes – even if you think you’ve done everything right.
Additional resources on image licensing
 12 Most Picture Perfect Ways To Ensure You’re Legally Using Online Photos – Sara Hawkins at 12most.com
 About The Licenses – at creativecommons.org
 Creative Commons on Flickr – Creative Commons explanation at flickr.com
Now onto the meat of the post.
Free Images: Where and How to Find the Best Ones
There are plenty of sites that aggregate Creative Commons licensed images (that’s what bloggers usually mean when they say “free images“).
This post is not about listing them all (they come and go, as most things online these days), but to show you the ones I found the best in my free image search, including images for Traffic Generation Café, as well as my Slideshare presentations.
Google Image Search
Yes, Google Image Search is still the ultimate image aggregator.
It offers the BEST results when it comes down to variety and quality of images.
The problem is you can’t really freely use the image you find there.
Here’s a trick most people don’t know about: sorting Google Image results by license.
How to find free images on Google Image Search
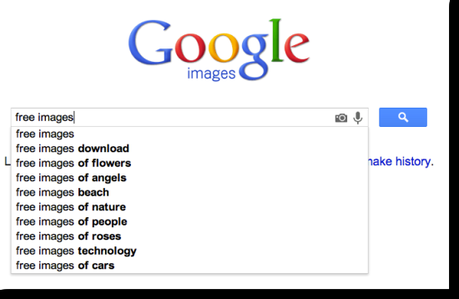
Step 1. Go to Google Image Search and type what you are looking for.
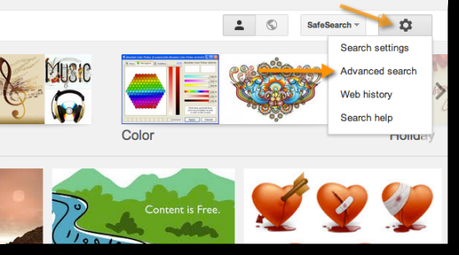
Step 2. Click on the wheel in the top right corner to see the drop-down menu; click on “Advanced Search“.
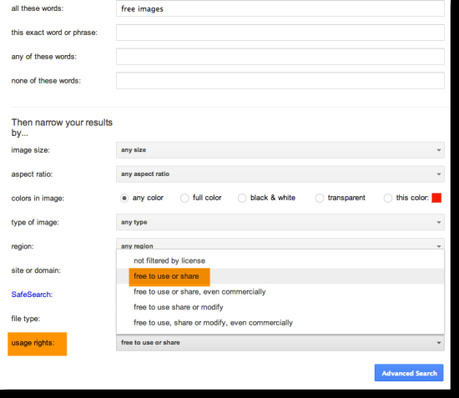
Step 3. Scroll down until you see “Usage Rights“; choose the type of license that best suits your needs; save.
The resulting search will be more concise, and most likely, not as much fun, but at least you are much better off using these images.
How to find similar free images on Google Image Search
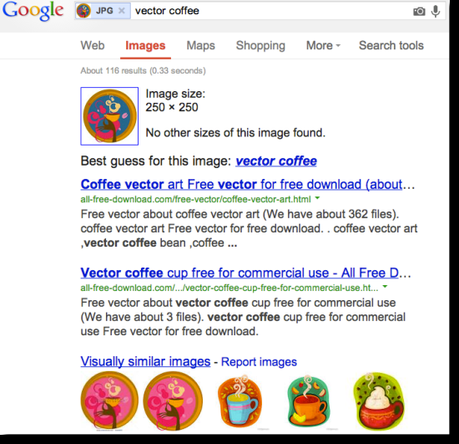
Here’s another tip: let’s say you found a Creative Commons image that’s almost right. Here’s a way to to find image look-alikes or the same image in different sizes.
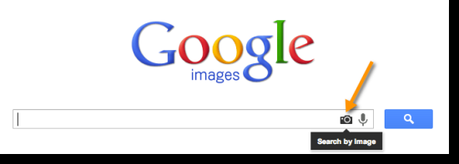
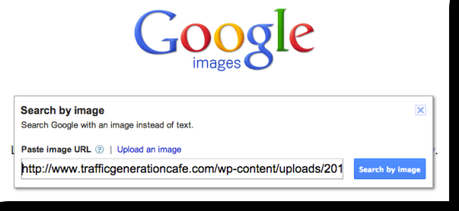
Step 1. Go to Google Image Search and click on the camera icon in the search bar.
Step 2. Paste Image URL that you want to find variations of (or upload an image if you have it saved on your desktop) and click “Search by Image“.
Step 3. Voilà – Google Image Search will show you other available options.
Bing Image Search
Bing now allows you to search images by usage rights as well.
How to find free images on Bing Image Search
Step 1. Go to Bing Image Search.
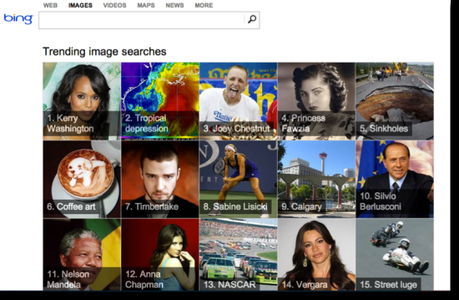
Notice how Bing immediately gives you some eye candy by showing you trending images searches – great to find new potential niche markets or simply cool images to share with your social media followers, like I do on Google+ (follow me there to keep up with my updates).
Step 2. Type what you are looking for and choose your desired license in the drop-down menu.
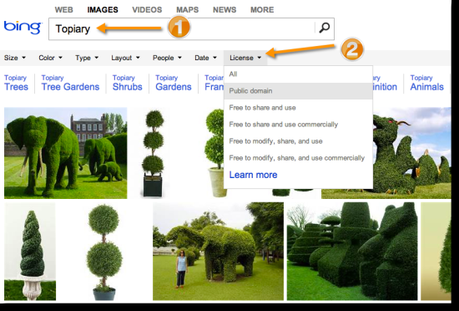
That’s it!
Creative Commons
If you want to find Creative Commons images, it only makes sense to go to… Creative Commons!
This is what you’ll see there:
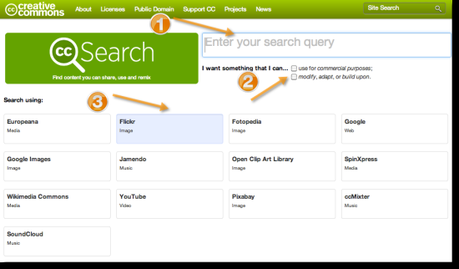
Step 1. Enter your search query.
Step 2. Click one of the boxes if you’d like to use the image for commercial purposes or modify it in any way (leave blank if neither applies).
Step 3. Choose the site/type of media you are searching for (one site at a time).
Using Creative Commons kills two birds with one stone:
- Find free material you can use in your blog posts;
- Allows you to access different media – images, videos, clip art, etc.
Compfight.com
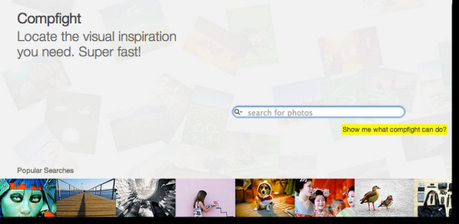
Compfight aggregates Creative Commons images from Flickr.
What I like about Compfight:
- offers different image size options;
- gives you HTML code to copy and paste to your blog post for proper attribution.
What I don’t like about Compfight:
- sometimes it’s buggy;
- every once so often, it will divert you to a pop-up window with paid images. I am not against it – I understand that’s how they make money, but it could get old pretty quickly.
All-Free-Download
All-Free-Download.com is a great site to find free graphics.
No catch; just find what you need, download, alter as you need to, and use them to your heart’s content.
More Sites to Find Free Images
The sites above is all I use for my personal free blog post image search, for both Traffic Generation Café and my Slideshare presentations.
If you are into tools and lists, here are some additional resources to keep you running in circles find the best free image sites.
 11 Places to Get a Free and Legal Photo for Your Blog – Caitlin Muir at authormedia.com
 30+ Websites For Stock Photos And Royalty Free Images – at hongkiat.com
I’d also suggest you try PhotoDropper - a free WP plugin that has over 62 million free images that blog owners can access and insert right from their WordPress dashboard.
I did test PhotoDropper at Traffic Generation Café and found it buggy, but it doesn’t mean it won’t work for you. Learn more about it here:
 PhotoDropper: A Great WordPress Plugin For Fast, Easy And Free Images – Jennifer Ledbetter at marketingland.com
How to Properly Add an Image to Your Post
Since we are on the subject of adding images to blog posts, I can’t help but mention a few things on how to properly add an image to your blog post.
Whether it sounds too basic or not, that’s not the question. The REAL question is do you DO IT on your blog. If not, you need to read this.
Tere are 3 main sections you need to pay attention to, plus 2 options, when uploading an image to your blog:
1. Image Name
Before you even upload your image, make sure it’s named properly and relevantly. That means that you shouldn’t name your image based on what it is about, but rather based on what your post it about.

Example:
I added this image to my Link Building: What’s Naughty, What’s Nice? post (an oldie, but a goodie).
I didn’t name it “half-dressed woman”, although that’s pretty much what the image is of.
Rather, I named it “link building”, since that’s what my post is about.
2. Image Title
After you upload your image, it’s time to add some relevant information about it.
Why is this important?
Because the search engines won’t see the pretty image you are adding, rather a string of code that tells the search engines that this is an image and this is what the image is all about.
Who adds that string of code? You do.
Thus, this is a great opportunity to enhance your on-page SEO by adding some relevant keywords to the title and alternative description of the image.
Let’s take a look at what it looks like in action:
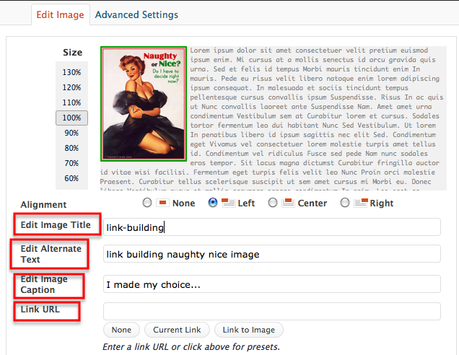
As you can see, my title is keyword-based.
3. Add Alternative Text
That’s what is also referred to as an ALT tag (“alt” stands for alternative).
It acts like a description of the image and is another great way to add some keywords.
Note I didn’t say “stuff it with keywords”. Keyword stuffing hasn’t worked in ages and it can have a negative effect on your SEO.
Your description shouldn’t be the same as your title, although it can definitely use the same keywords. I (almost) always like to add words like “image”, “graph”, “picture”, etc. to my ALT tag to make sure it’s different from my title.
4. Image Caption
That one is strictly for your readers.
That’s where it’s good to tie your image to your post if the relation is not too clear.
You can also show off your wit here by adding a joke or sarcasm – both work equally well.
5. Link URL
I almost always leave this one blank.
Why?
Since search engine spiders follow each link they find on a given page, what’s the point of sending them to the one that leads to a dead end with no content?
There are 2 exceptions I make to the no-link rule: when I want my readers to be able to enlarge an image and when I want to link it to an external resource.
How to Rank on Google Image Search
Let me start this section with “Every niche is different“.
Can you get traffic by ranking your images in Google Image Search? Sure you can.
Is it worth your time? It depends.
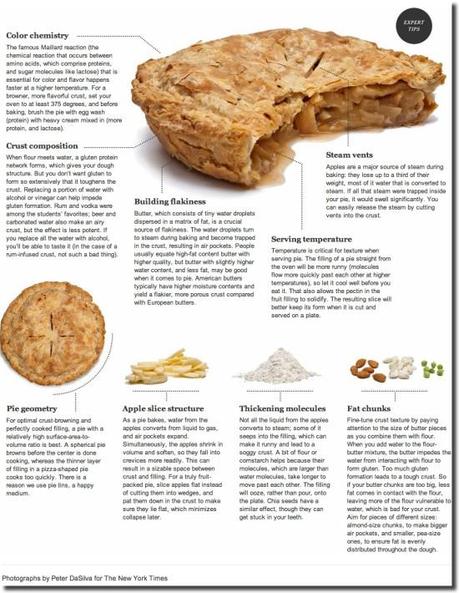
If someone is looking at pictures of apple pies, chances are they are looking for an apple pie recipe and will follow the image back to your site to see what you’ve got.
If you are like me and the only time you are looking at images is when you need one for a blog post or something similar, all you want to do is to get in and get out.
Do I get traffic from Google Images? Yes.
But it’s generally low quality traffic that doesn’t convert (i.e. doesn’t subscribe to my free Bite-Size Traffic Hacks email series, which is my primary conversion goal at Traffic Generation Café) and has the lowest stats all around:
- fewer pages viewed;
- less time spent;
- higher bounce rate than the rest of my blog.
If you are interested in learning more about ranking on Google for images, I recommend reading:
 The Ultimate Guide to Image SEO for Better Rankings – Joseph Adediji at bloggingtipstoday.com
Final Words on Blog Images
Images are great to have, but they have one great flaw – they significantly slow down your blog.
Two solutions here:
1. Add fewer images
I usually stick to one image per post unless I need to add more to give readers a visual explanation of the text.
2. Resize images before uploading them to your post
Easy to do.
If you are using software like Snagit, you can easily resize the image in the Edit panel.
Alternatively, you can use free tools like Image Optimizer.
2. Use WP Smush.it Plugin
WP Smush.it is a free WP plugin that will automatically reduce your image files, thus improving your blog performance.
Happy free blog post image hunting!


