When it comes to upgrades to your mountain bike, tubeless is one of the best moves you can make. Not only does it help to reduce a little rolling weight, but it means you’re a whole lot less likely to get a flat and – more importantly – you can really start playing with your tire pressure. Why’s that? Well for a start you don’t have to worry about pinch flats, which means you can drop the psi more than you would with tubes. There’s also some clever maths that goes something along the lines of the tire holds more volume so you need less pressure to keep it up, but don’t quote me on that!
Even if you’re relatively new to mountain biking, you’ll see that changes to your tire pressure are very noticeable. These aren’t just incremental gains, they’re massive ones – just take your bike out for a ride with 45psi in the tyres and you’ll see what I mean. Unfortunately, most of us who ride bikes tend to do a finger and thumb pinch for firmness and assume that’ll be ok (which it can be, a lot of the time). But by taking a little bit of time to get your tire pressure set right, you’ll see some pretty big differences in your riding. For those with a track pump, using the reading on that to measure your tire pressure is great but you could also use the Topeak Air Pressure Gauge if you’re out on the trails or if you don’t trust your pump’s reading.
What’s the best tire pressure for mountain biking?
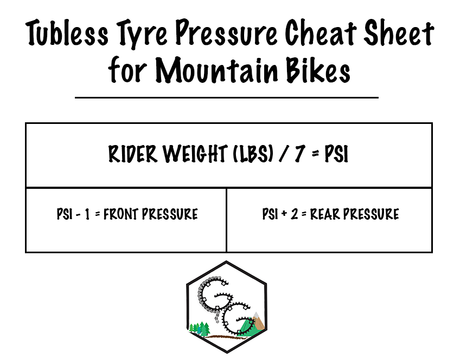
Sorry, you can’t cheat here. There is no hard and fast rule, but here’s a handy formula to give you a starting point.

So for example, I weigh 70kg in my riding kit (that part is important!) which is 154 stone, divide this by 7 and you’ve got 22 – so by the logic above I’d run 21psi in my front tire and 24 in the rear. Now if you’re just starting off tubeless you may think that those numbers sound ridiculously low, give it a try however and you’ll see that you’re probably not far wrong.
The formula above is brilliant for working out your base pressure for tubeless, however, there are a number of factors that could increase or decrease the pressure that you’ll want to run.
Other factors that affect your tubeless pressure
Honestly, there are more factors that affect your pressure than there are coffee options at Starbucks. Here are just a few things I think are important, your americano, latte and cappuccino if you will…
- Riding gear – if you’re bringing more stuff you’ll need more pressure and vice versa
- Tyre size – the wider your tire the less pressure you’ll need. Even going from the 2.3 Maxxis Shorty to the 2.35 Vee Flow Rumba made me rework my tire pressure.
- Grip – more grip means less pressure, careful not to go too low however
- Terrain – hardpack, fast rolling trails will let you get away with higher pressures than loamy, wet trails
- Riding style – personal preference trumps everything, if you like your tyres to feel every single bump then pump those tyres right up!
- Fear – scared of dinging your rims? You’ll want to run a higher pressure or invest in something like the “Huck Norris”
Getting tire pressure just right
The only real way to figure out if these calculations work for you is to get out there and see for yourself. Take a pump and a pressure gauge with you and go and hit the trails. You’ll want to ask yourself a few questions when you ride, such as:
- Does it feel like it’s dragging or unstable? It might be too soft and you’ve lost the sidewall support add a few more PSI
- How is the grip over rocks and roots? Can you feel everything or did you hear the dreaded ‘ding’ of a rim?
- Is the ride harsh? You may have too much pressure and will want to let a bit of air out
- How do your Strava times look? Ok, that’s kind of a joke but if you get your tubeless pressure right then you are likely to see some PBs rolling in
Unfortunately, that really is the best advice I can give you. Try and find a base number and then work on it from there – use a trail that you know, which covers a range of features like rock gardens, jumps, berms and other things you normally ride and play around with the settings until everything feels plush. It’ll take some time, but when you get that buttery smooth feeling flowing down a trail you know it’ll be worth it!
