I've read a lot of water heater installation manuals, and they all give the same advice on water heater maintenance, but most people don't do any type of maintenance on their water heaters, period. Today I'm going to go over the routine maintenance that water heater manufacturers recommend, and I'll throw in my two cents. My take on water heater maintenance should be much more interesting than reading the installation manual.
Drain Flush the water heater
Every month (yes, every month) you're supposed to flush some water out of the bottom of your tank. There's a drain valve at the bottom of the water heater tank that can be opened to allow water to drain out. You don't need to literally drain the water out of the water heater, just open the valve and let some water come out; Rheem says a few quarts is fine.
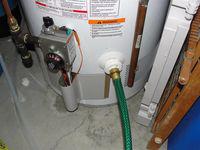
 If you want to really flush out the bottom of the water heater tank, you could attach a garden hose and let a bunch of water flow through. This water is constantly being replaced by the cold water coming in to the water heater, so you don't even need to have a floor drain close by if you have a long enough garden hose.
If the drain valve leaks when you're done, don't worry. The cheap, easy, and effective repair is to screw a garden hose cap on to the end of the drain valve. This is a perfectly safe and perfectly acceptable repair.
The reason for flushing the water heater is to help prevent the accumulation of sediment on the bottom of the tank. As sediment collects in the bottom of the water heater tank over the years, it will begin to surround and insulate the thermostat, which can lead to the water heater running for longer and longer periods of time, which will decrease the life of the water heater and lead to eratic water temperatures. I'm pretty sure this is why most water heater manufacturers don't actually publish the water temperature on their control valves.
 So there's the what and the why... and now my two cents. I don't drain my own water heater. It seems like a pain in the butt, and I'm not convinced that doing this will actually help to extend the life of my water heater. I know it's anecdotal evidence, but just last year I came across a used water heater sitting out in someone's garage for disposal. The water heater was installed in 1998 and failed approximately 12 years later. For the record, water heaters typically come with 6, 9, or 12 year warranties. What made this so juicy was that there was a chart on the water heater that the owner had diligently filled out every time he drained the water heater... but the water heater still failed after 12 years. Even though the owner hadn't drained the water heater every month I would have thought this would have helped out at least a little more.
Just for this blog, I hooked up a garden hose to the drain valve on my water heater and flushed some water out. After about three seconds, the valve itself started leaking extremely hot water out all over me. I quickly closed the valve and decided not to flush the water heater again.
If you have a new water heater and you're a diligent homeowner, go ahead and flush your tank every month. If you have a water heater that's several years old and has never been flushed, I've heard it's better to just leave it alone.
Test the pressure relief valve
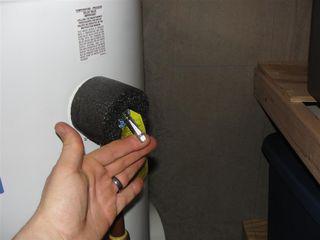
Every year, the temperature and pressure relief valve is supposed to be opened to allow several gallons of water to drain out. Doing this will help to clear out sediment accumulation, and will let you know that the valve still operates freely.

The problem with this test is that the valve may not close properly after it gets opened. The older the water heater, the greater potential you have for a leaking valve. If the valve leaks after this test, it can be replaced. Temperature and pressure relief valves sell for about $10 - $15, and they're fairly easy to replace.
Check the Anode Rod
Every year, the sacrificial anode rod is supposed to be checked for deterioration and replaced if neccessary. The purpose of the anode rod is to save the rest of the water heater from destruction by sacrificing itself. Hey, maybe they should call it a Jesus rod ;). I don't remember much from chemistry, but I found this text at by doing a quick google search:
Cathodic protection is a scheme in which a piece of reactive metal, typically magnesium, is connected to the steel to form an electrochemical cell. Magnesium ions (Mg2+) form more easily than iron ions and enough electrons are given up by the magnesium atoms as they become positive ions to completely dominate the hydroxide ion formation process. With nowhere for their electrons to go, the iron atoms can't become iron ions and rusting can't proceed. As long as the magnesium metal, often called the "sacrificial anode", remains intact and connected to the steel, the steel won't rust significantly.
Wonderful. I don't quite follow, but the bottom line is that once the anode rod is badly deteriorated, the rest of the water heater will follow. Replacing the anode rod when needed is supposed to go a long way toward extending the life of the water heater.
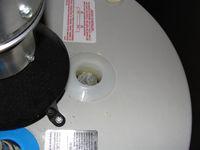
 To check the anode rod, you'll need to start by turning off the water supply to the water heater, and draining a few inches of water out of the tank. Now you just need to locate the thing on the top of the water heater that looks like a hex head plug - see the photo at right; that's the top of the anode rod. Get a 1 1/16" socket wrench (yes, this is a standard size), unscrew the anode rod, and pull it out of the water heater to inspect it. Once there is more than six inches of core showing at the anode rod, it's time to replace it.
There are four problems you might run in to if you want to check on / replace your anode rod:
- Most homeowners in Minneapolis and Saint Paul don't have enough ceiling height in the basement to pull the anode rod out. If that's the case, they'd actually need to completely drain and un-install the water heater and lay it on it's side to check on the anode rod.
- Most homeowners don't own a 1-1/16" socket wrench.
- It will probably require an impact wrench to get this thing out. I tried getting mine out, but it's in there so tight that the water heater actually started to turn, and I didn't have a second person to help me hold the water heater steady. If you want to see just how tough it is, check out this video - changing a water heater anode rod.
- Water heater anode rods aren't readily available at local home improvement stores - the Menards and Home Depot by my house don't sell them, but the Hardware Hank in Maple Grove does. They had two in stock - one long one, and one short one.
Sorry to be cynical, but checking on and replacing an anode rod is too difficult. When the manufacturers make it just about impossible to do this step that's supposed to dramatically increase the life of your appliance... of course nodody is going to do it. What incentive does the manufacturer have in making this step easy? Oh well.
By the way, if you do happen to replace your anode rod, I've heard you're supposed to save the old magnesium rod for Independance Day. That's just what I've heard.
Reuben Saltzman, Structure Tech Home Inspections - Email- Home Inspections in Minnesota

