How to add feature post slider
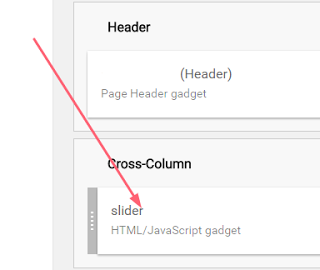
Login to blogger account go to layoutAdd gadget of Html/javascript Paste below code there.
<style> #BloggerSpiceCarouselSlider { height:130px; background-color:#ffffff; border:2px solid #3399ff; position:relative; margin:50px 50px; overflow:auto; } #BloggerSpiceCarouselSlider:before, #BloggerSpiceCarouselSlider:after { content:""; display:block; position:absolute; top:0; bottom:0; left:-4px; width:4px; height:100%; box-shadow:0 0 4px black; z-index:10; } #BloggerSpiceCarouselSlider:after { left:auto; right:-4px; }/* CarouselSlider by 5gblogger.blogspot.com */ #BloggerSpiceCarouselSlider .container { position:absolute; top:0; left:0; margin:5px 0 0 5px; width:300%; height:120px; } #BloggerSpiceCarouselSlider figure { display:block; background-color:white; float:left; width:150px; height:120px; margin:0 5px 0 0; position:relative; overflow:hidden; } #BloggerSpiceCarouselSlider figcaption { display:block; position:absolute; right:0; bottom:-50px; left:0; background-color:black; font:italic normal 11px Arial,Sans-Serif; color:white; padding:4px 10px; text-align:left; opacity:.8; } #BloggerSpiceCarouselSlider figure img { display:block; border:none; margin:0 0; } </style> <div id="BloggerSpiceCarouselSlider"> <div class="container"> <figure> <a href="#" title="Title for Caption"> <img alt="" src="http://1.bp.blogspot.com/-EE_tp-P3r9A/UfYvm5HykII/AAAAAAAAEJY/NuTPF5nNasA/s1600/7.jpg" /> </a> </figure> <figure> <a href="#" title="Title for Caption"> <img alt="" src="http://2.bp.blogspot.com/-bp70bq1oUmE/UfYvnxZrc-I/AAAAAAAAEJs/ESVCQ3EKimk/s1600/9.jpg" /> </a> </figure> <figure> <a href="#" title="Title for Caption"> <img alt="" src="http://3.bp.blogspot.com/-cqHmDnU6IUo/UfYvkiKD-pI/AAAAAAAAEIs/6rNbrWl2n5U/s1600/10.jpg" /> </a> </figure> <figure> <a href="#" title="Title for Caption"> <img alt="" src="http://4.bp.blogspot.com/-zneaAHQlNgI/UfYvnaCia6I/AAAAAAAAEJc/aKEJCLOExJA/s1600/8.jpg" /> </a> </figure> <figure> <a href="#" title="Title for Caption"> <img alt="" src="http://3.bp.blogspot.com/-0l9Jf0vageQ/UfYvmpUuOKI/AAAAAAAAEJk/6412AvMPgJs/s1600/6.jpg" /> </a> </figure> <figure> <a href="#" title="Title for Caption"> <img alt="" src="http://1.bp.blogspot.com/-oe6eNCRFrPs/UfYvlop75fI/AAAAAAAAEJE/atL7k6y5bpI/s1600/4.jpg" /> </a> </figure> <figure> <a href="#" title="Title for Caption"> <img alt="" src="http://4.bp.blogspot.com/-a5Ek7XZxIyE/UfYvlUlOyxI/AAAAAAAAEJM/XyZzkVtklF4/s1600/3.jpg" /> </a> </figure> <figure> <a href="#" title="Title for Caption2"> <img alt="" src="http://1.bp.blogspot.com/-xarVMAVA3YU/UfYvkhm4MCI/AAAAAAAAEIw/cehXZF6MeRw/s1600/2.jpg" /> </a> </figure> <figure> <a href="#" title="Title for Caption"> <img alt="" src="http://4.bp.blogspot.com/-A6GKQkWlf4o/UfYvkYZjF0I/AAAAAAAAEIo/goOT3YD4D_Y/s1600/1.jpg" /> </a> </figure> </div> </div> <script type='text/javascript' src='https://ajax.googleapis.com/ajax/libs/jquery/1.7.2/jquery.min.js'></script> <script type='text/javascript'>//<![CDATA[ (function($) { var config = { itemMargins: 5 // Distance between the thumbnails }; var $thumbnailScroller = $('#BloggerSpiceCarouselSlider'), $container = $thumbnailScroller.find('.container'), $item = $container.find('figure'), item_length = $item.length, item_width = $item.outerWidth(), item_margin = config.itemMargins, total_width = (item_width + item_margin) * item_length, $window = $(window); $thumbnailScroller.css('overflow', 'hidden'); $container.css('width', total_width); // Auto caption builder & hover effect $item.each(function(cap) { if ($(this).children().attr('title')) { cap = $(this).children().attr('title'); $(this).children().removeAttr('title'); $(this).append('<figcaption>' + cap + '</figcaption>'); } }).hover(function() { $(this).find('figcaption').stop().animate({ bottom: 0 }, 200); }, function() { $(this).find('figcaption').stop().animate({ bottom: -50 }, 200); }); $window.on("resize", function() { var o_l = $thumbnailScroller.offset().left, t_w = $thumbnailScroller.width(), c_w = total_width; $thumbnailScroller.on("mousemove", function(e) { if ($(this).width() < $container.width()) { $container.css('left', -((e.pageX - o_l) * (c_w - t_w) / t_w)); } }); }).trigger("resize"); })(jQuery); //]]> </script>Place the gadget below header and do not forget to save arrangements.

How to change image and links in slider
You will find many section like this in above code highlighted in red color.<figure> <a href="#" title="Title for Caption"> <img alt="" src="image url" /> </a> </figure>Change # with link of your post link
Replace Title for Caption with your post title, use small title for post.
Upload your image on blogger or any where on internet.copy your image url and replace it with image url in slider.
Remember use image of 150px width x 120px height
Save gadget after every change.Enjoy beautiful post slider in blogger.I have tested this slider widget, it is working fine but if you have any problem in installing feel free to ask me.Also hit like if you think this post is helpful.
