
Start with this

And end up with this, using Photoshop and a digital camera
(plus a sheet of sandpaper and a model car, of course). The
car is a 1:43 Trax model of a Golden Fleece Holden FB ute.
My ‘theft’ is simply that I regularly pinch images off Google Images for my backgrounds, and in my fancier dioramas I pinch images of people, movie stars, houses and anything else I need from Google Images (mostly… but sorry Flickr, I raid there too sometimes). I don’t have any qualms about doing this, as I make my dioramas for fun and entertainment, not profit. I carry no ads on my humble little blog, and I’m not stealing for money. I do it for art because it pleases me, and from the feedback I get I think it entertains a few other people too.
The second major introductory point I should make is not to trust me all that much, as a teacher. I’m a self-taught Photoshop user. In my December 2010 summer holidays, I wasn’t happy with my very crummy hand-made dioramas, and it occurred to me that a bit of Photoshopping might improve them. It did.
So, I just started Googling 'how to do' this and that in Photoshop, and up came dozens of very generously given free YouTube demos on how to use all sorts of things in Photoshop, such as deep etching, layering, etc. Once I started using Photoshop I quickly realised its potential. Googling the ‘how tos’ is where I learned 90% of what I know.
The other very valuable 10% of knowledge came from Benno, the Photoshop expert extraordinaire on the magazine I work on (I’m a writer and editor, so I don’t use Photoshop at work, but I know what it can do). Ben steered me in the right direction with generous advice (and encouragement) on several occasions, and he has saved me lots of hours of frustration with his great tips. Thank you Benno. (And that's a tip for you if you want to try this: ask around for anyone with even basic Photoshop skills, to help get you started. If that isn't likely to work, then read on as I try to spell it out, step-by-step.)
Nevertheless, my Photoshop methods are totally ‘incorrect’, in that I don’t use all the tools on offer, and I have all sorts of dodgy shortcuts and workarounds that probably (definitely) aren’t kosher. I feel like a guitarist who only knows four chords, yet I can belt out a few tunes nevertheless. Anyway, with these apologies and mea culpas out of the way, on with the lengthy tutorial, folks!
Photoshop diorama how-to
1. Find a background image
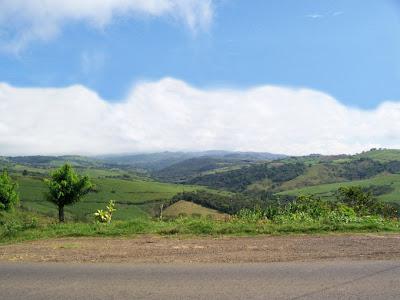
Here's the pleasant hillside scene I found in Google Images.
First think of a scenario, and find a background image to fit it. And boy, is that ever easier said than done! This sometimes takes hours of searching, as I kind of know what I want right from the start, but every now and then something surprising but great shows up that completely changes my mind.I search Google Images mostly for backgrounds, but Flickr can be a very good source, too. The main thing when looking for backgrounds is to find images big enough to work with. In Google Image Search, once you get your first set of image results, you can specify if you want Medium or Large images. I try to work from large images to start with. By a ‘large image’ I mean one that is about 500KB or larger, roughly, but sometimes smaller ones will do. This one here was 81cm wide by 61cm high, which is perfect to work with.
When searching for ‘roads’ for car dioramas, you’ll quickly notice that 98% of road photos look down along the length of any given road, and not across a road, yet for dioramas, images looking across a road are much more useful but harder to find. Good luck.
Sometimes you might find that shooting your own background pix might give you exactly what you are after, and leave you copyright-theft-free. As in the photo example above, I always choose photos for dios which have a bit of ‘dead’, unoccupied foreground with nothing much happening in it, such as plain grass, a road, footpath or whatever. That's where I'll overlay my fake road later on.
2. Photograph your model car on its road
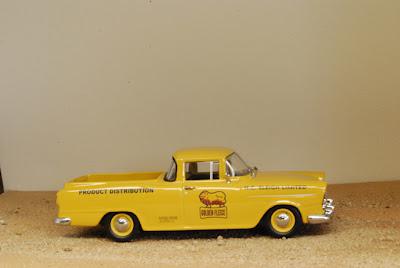
Here, I’ve photographed a Holden ute on a dirt road. I use natural
light for all my dio shots. However, the light is filtered through
a clear roof panel in my garden shed roof, with plenty more
light streaming in through the nearby door and window.
I always take several shots at different aperture settings of each pose for the car. It’s always extremely slow shutter speed settings such as f32 @ 0.5 seconds, with a good depth of field, that work best. I might take around 20-30 shots of the car on the road, in slightly different poses and angles, taking 6 different exposures of it each time, to get the right shot to go with the background lighting. As I have done this job many times now, this photography usually takes around 5-10 minutes at most. It becomes very routine and quick after a while, provided you are methodical about aperture changes, etc.
Tip: this is also why it’s best to have your background chosen already, as it helps to narrow down which ‘pose’ and angle the car is to be photographed in.
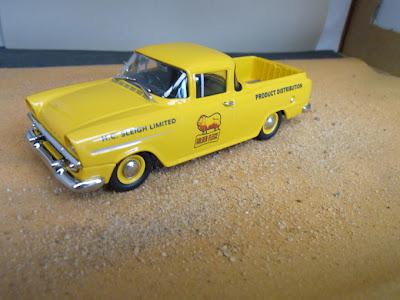
My ‘dirt road’ is actually sandpaper, with a bit of extra loose
sand scattered on top to make it look a lot less like a sheet
of sandpaper. For a tarmac road, I used different grades
of emery paper (as pictured below).
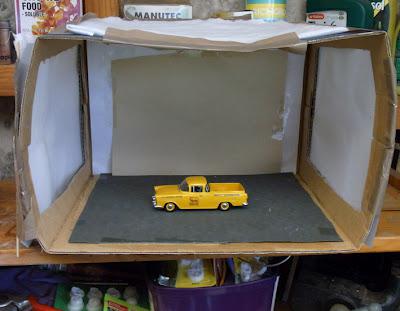
Pictured here, my photo lightbox itself is as crude as it gets.
In fact, this battered one needs replacing, after 18 months
of hard use! It’s a cardboard box with the top and sides cut out,
and the cut-outs are covered with light white muslin cloth.
I slip in an A4 sheet of off-white paper behind the car, as a
neutral background. Depending on the model car's colour
the background's paper color changes at times.
3. Resize the background and model car shots to roughly the same size.Back at your computer, after downloading and choosing the shots, the first job is to get the background photo and the car photo at roughly equal sizes. This is done in Photoshop. Now, for a bit of theory, folks.
Digital photos have two main measures you need to worry about. One is the ‘pixels per inch’, or the ‘resolution’ of the photo. The other is its actual size, usually expressed in centimetres, inches or pixels.
Pixels per inch (ppi): for all standard computer screens, including my iMac, 72ppi is all you need for a top quality image on screen. Higher resolutions don't give you a better on-screen look, but they do make for much larger file sizes.
A photo 30cm wide by 15cm high, at 300ppi is grand total of 135,000pixels (30 x 15 x 300).
If you change it to a 72ppi photo, it will become 124.99cm wide and 62.49cm high, but that’s still 135,000 pixels.
My background image (pinched from the net) started off at dimensions of (in round numbers) 81cm x 61cm @ 72ppi
My original Holden ute image is 33cm x 22cm @ 300ppi
So, the first job is to get both images to roughly the same dimensions – and the same number of pixels per inch (ppi). I prefer to work in the higher resolution format of 300ppi in Photoshop, then publish the finished photos, right at the very end of the whole process, in 72ppi format, which ends up becoming a much smaller file size for upload at forums, blogs etc. For example, a typical finished diorama file, when finished, might be 3.5-10MB in size when 300ppi, but when shrunk down to a 28cm jpeg image in 72ppi, it might be only 400KB, sometimes even less.
So, in my example below, I start with the background image. At 72ppi it’s 81cm by 61cm, but when converted to 300ppi, it becomes 19.5cm wide and 14.6cm high. That’s my working size. I then convert the background image to the same size, just a fraction bigger, to give me wriggle room, at 21cm wide and 14cm high.
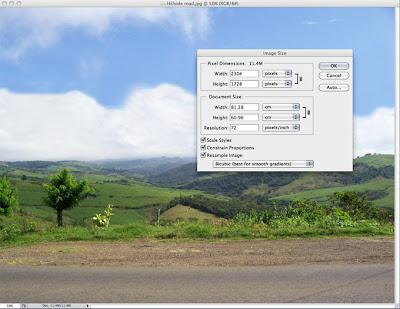
Here’s how to adjust the 72ppi image size in Photoshop to 300ppi.
1. First open the image in Photoshop.
2. In the command line at the top, go to Image, then to Image size.
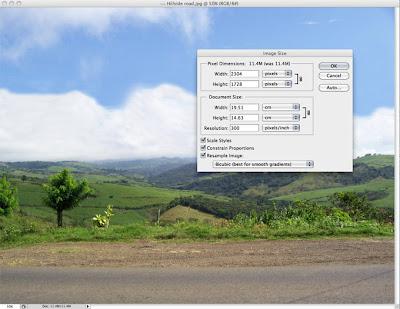
3. When that dialog box opens, uncheck the ‘resample image’
box bottom left on the window. Then change the Resolution
to your desired number (ie, 300).4. Recheck the “resample image’ box, and you’ll notice
the image’s width and height has been recalculated. Press
OK, that job is done.
Next, you'll need to re-size your own digital photo of the car to the same size as the background. Here’s how to adjust the size of a 300ppi image in Photoshop.

1. First open the image in Photoshop.
2. In the command line at the top, go to Image, then
to Image size. Here, the image is 32.78cm wide, which
is far wider than the background.
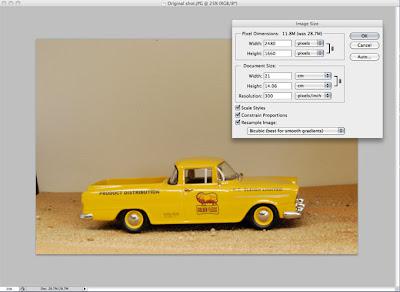
3. When that dialog box opens, in the ‘document size’
box, simply type in the figure for the new width you want
(eg, 21cm). You’ll notice that the height of the image
automatically changes for you. Press OK, that job is done.
PHEW! You now have two compatible documents to work with.
4. Deep-etch the car on its road
Next step is to deep-etch your car on its road. It’s not so hard to do, but my method is crude, and definitely not how the pros do it. Their way is infinitely better (they use more of the Photoshop tools palette), but is harder to learn and do for beginners. My method is the “self-taught amateur” beginner's way.
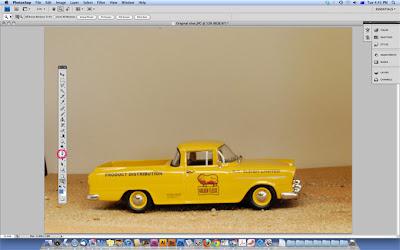
The pen nib tool is circled here in red. It is your friend.
In Photoshop, use the little pen nib tool (see pic above) to trace an accurate line of dots around everything you want to get rid of from the photo. This includes the area above the road, the car body above the road, and the glass in the windows. Here’s my dodgiest tip that the pros will really hate. Use lots of dots (they don’t), especially on any round bits or corners.
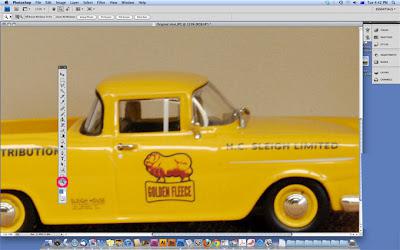
Another big tip: use the magnifying glass tool to 'blow up" the
image of the car as you work on it. This gives you much
better accuracy, and a much nicer result in the end.
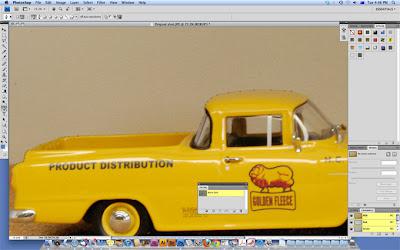
Look closely at the outline of the car above, with the series
of dots made by the pen tool outlining the shape of the car.
Once you have done this you have created a “Path”.
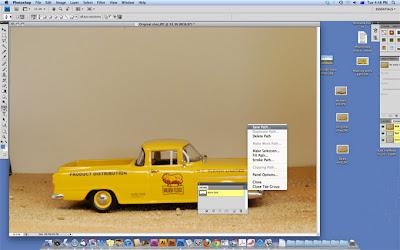
Find the Paths dialog box and give your etched-out path
a name, then make sure to 'Save Path'.
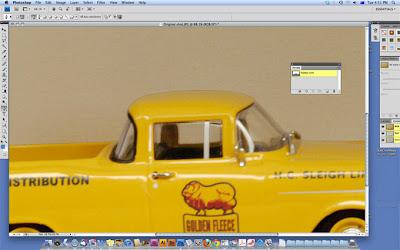
Make sure to click on the Path name to highlight in yellow,
and then you can use the pen tool to mark out the areas of
glass in the car's windows. Each time you do it, make sure
you end up where you started, so your Path is complete.
For the car window above, I etched out five mini paths
for each of the little pieces of glass that are to 'go', so
you can see 'through' the glass to the background behind.
Make sure to hit the ‘Save’ button as you work, and especially now.
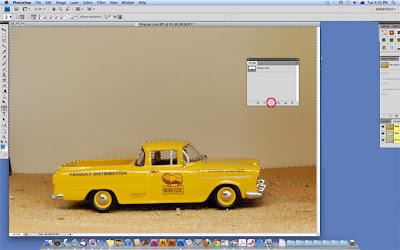
The little red circle in the pic shows the dotted circle to
click on in the 'Paths' dialog box: it will highlight everything
in your 'Path' – that includes the car on the road, and
the windows inside the car.
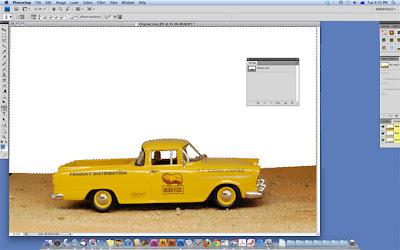
Hit the 'delete' button on your keyboard. Everything inside
your paths will now disappear. Hit 'Save'. Big step, that one!

Once more, in the Paths dialog box, hit that little dotted
circle at the bottom of the box, but this time, go back up to the
command line in Photoshop, to “Select” and in the pop-down
menu, hit “Inverse”. This time, your road and your car are
highlighted. Time to hit “Apple-Command C” (or whatever
'copy' is on a PC). You’ve got yourself a deep-etched on its
road, ready to be pasted into place on your background.
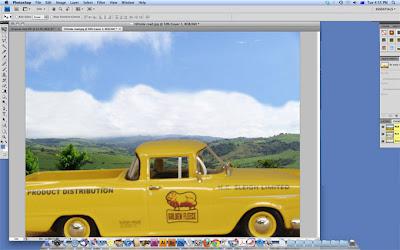
Now, in Photoshop, open up your background image. Hit the
‘Paste’ command (Apple-Command V on a Mac, not sure about
a PC, never used one), and your deep-etched car is now sitting
on your background (in a separate, automatically generated
layer). You’re almost there. But not quite. As pictured here,
the car is far too big. We have to make it smaller.
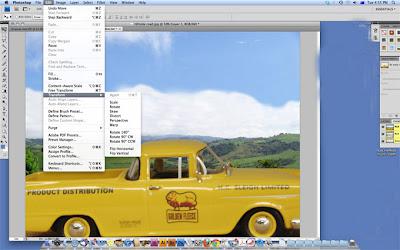
Go back to the command line in Photoshop, go to “Edit”
and in the pop-down menu find “Transform”. This little dialog
box lets you make your pasted-in image bigger or smaller;
you can angle it up or down, skew it if needed. Fiddle with it
until you’re happy. You can adjust the sizes by 1% at a time,
same too the angle of the car. It's very precise once you get the
hang of it. And of course you can move the whole car-and-road
up and down or side to side with your mouse.
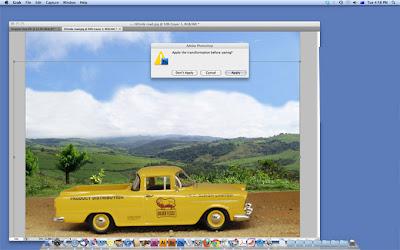
At the end of the fiddling in Transform, Then it will ask you if you
want to apply the changes, and click OK. If you later on think
you didn’t get it quite right, you can go back and Transform it
again (you do this by opening the 'Layers' palatte, inside
'Windows' on the command line), but working in layers is
something I'd prefer to leave until the next tutorial, later on.
Wait! Does it have some rough edges still?
Common problem 1: the background image isn’t quite big enough, especially at the bottom (ie, in the foreground).
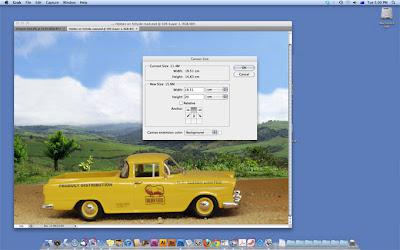
There's not much road showing in the bottom of the shot,
and I know a bit more is there, so I'm going to increase the
'Canvas size' to show a bit more road.

In the Photoshop command line, go back to ‘Image Size’ and in the
drop-down menu, go to ‘Canvas Size’. When that dialog box
opens, you’ll notice a little square at the bottom center of that
box, with 9 little squares in it. This lets you choose if you want the
image to be resized from any one of those nine positions.
To make the background image deeper at the bottom, make
sure the ‘starting point’ greyed-out bit (from which the arrows
emanate) is top center. Now make the image deeper (eg, if it
is 14.6cm high, make it, say… 16cm high).
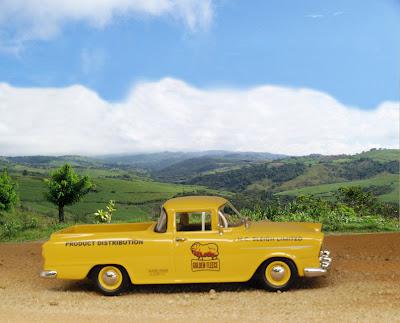
What happens is that the image is now 16cm high, and the
bottom shows more road. This is all guesswork. It could have ended
up with more road below, then plain white 'nothing' below that
if I made the canvas too big. No prob: just redo the canvas (from
the top) bit by bit so there's no white showing. I resize about half my
images this way, to fit the road in more naturally.
6. Finally, get ready to publish.
Once you have created your basic diorama, there’s a few simple steps left.
Flatten image. Never be in a hurry to do this, as it’s kind of a ‘lock’ on all your work, making future adjustments difficult (but not impossible).
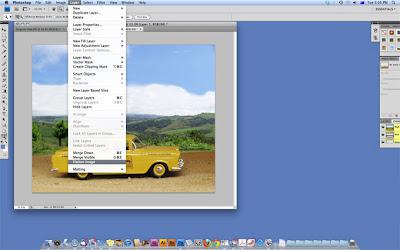
To do this, in the Command line go to “Layer” and in the pop-down
menu, choose ‘Flatten image’. Click OK when the “are you sure you
want to” box comes up.
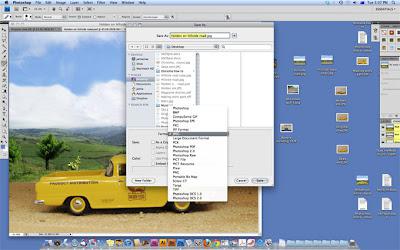
First, go to “File” then “Save As” and give your diorama a name,
and in the dialog box choose “jpeg” format.
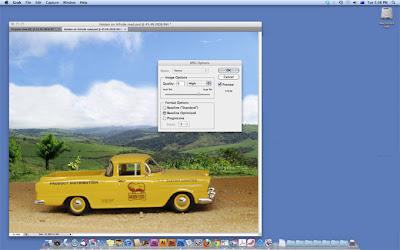
When it asks you what quality should the image be (from 1-12,
with 12 best) select a quality you want. I’m always happy
with 9, which is pretty nice, but a smaller file size than 12
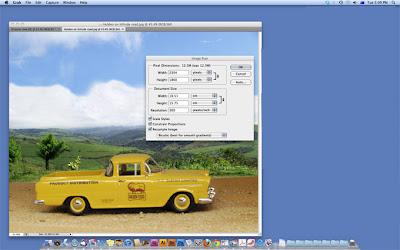
Once your image has been created with its new name, go
back to “Image” in the Command line, and “Image size”.
Uncheck the “resample image’ box, change the 300ppi
setting to 72ppi and re-check the 'resample image' box.
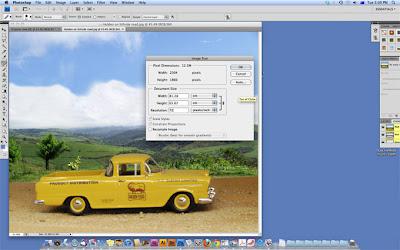
Now, your file will probably be a large 65cm wide, so resize it
to normal person’s screen size (I usually go for 26cm). Then hit OK.

Not the greatest diorama I've ever done, but it's not too shabby.
You’re ready to publish your first Photoshop diorama.
Footnote: fancier inclusions
You mean other people, drivers, etc? That’s another tutorial! Stay tuned for tips on the wonderful worlds of Layers, and more of those cool editing tools in the tools palette.
For starters, however, just try parking your model car on a suitable bit of fake road, deep etch it nicely and drop it into a suitable background. Pictured below is the first diorama I ever did this way, back in December 2010. An old Peugeot 203 Fourgonnette parked up against an equally old wall.
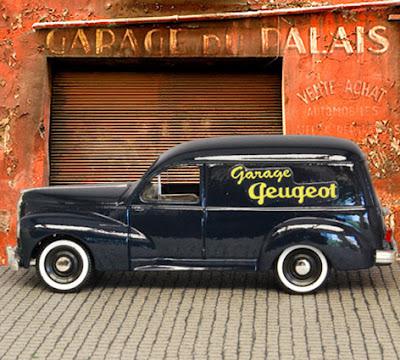
Not too bad for a beginner, so I think any beginner should
start getting some pretty good results very early on.
and post all my dioramas there. If you're looking for somewhere to show off your own efforts, you're always welcome there.
