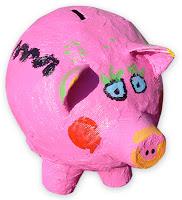
 These pigs did take a bit of work, but were worth all the effort in the end.
 SESSION 1: Students covered a 12" balloon with a layers of paper mache. My favorite recipe is posted here. Tie the balloon really tight so it stays inflated while drying.
SESSION 2: Students covered their balloons with a second layer of newspaper strips, preferably in the opposite direction.
SESSION 3: To smooth out the body and whiten the overall color, students covered their balloon with a layer of mache using white paper towel strips.
SESSION 4: For the the pig feet, I took small white styrofoam cups (the 2" tall type from Smart and Final) and glued them with Tacky glue to the bottom of the ballon. Another was added over the knot of the balloon for the snout. A curved section of the cups was also cut and glued for the ears. This was done a day before class to make sure the glue would dry. During class, time the students made one more paper towel covering, making sure they covered the ears, nose and feet of their pig.
SESSION 5: At last, paint day! I limited the students to one acrylic color (pink) to keep things simple, but let them add any decorations they wished. After the paint dried, I cut the coin slots with a razor knife and sprayed the entire pig with a shiny varnish. Lots of work, but darn cute when complete!
