Sorry for the long missing in action times and really running around schedules that made me ignore Beauty Traveller for a long time. I am trying to make some Instagram posts again to keep the spirit of the blog alive and then shall get into full on writing as soon as I permit some free time.
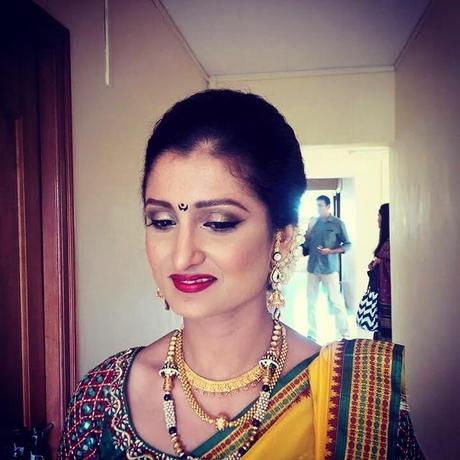
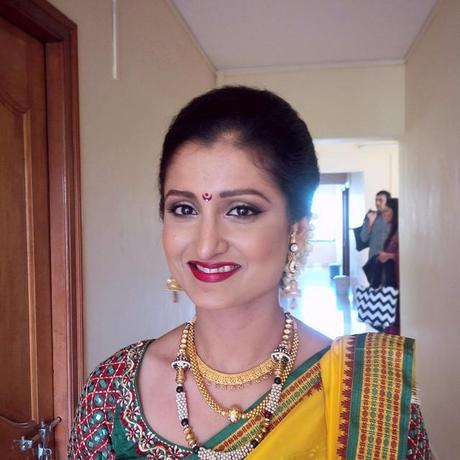
Yesterday's bride was an amazing challenge. One of the main reasons being, we had never done a makeup or hair trial before. Shreya is a chilled management graduate with a lucrative French job and really cool headed and calmer than calm. Its a boon to have someone like this who is so level headed and open for creativity. She is a die hard Deepika Padukone follower and wanted us to incorporate a nuance of her in the Maharashtrian wedding that was about to happen.
The hair was an amazing piece de resistance and I shall share more pics of the hairstyling too. Of course, since the makeup was done by me, I happened to click some quick pictures on my Blackberry and post them on Instagram and Facebook and other social media sites. Lets see how to achieve this look in some quick and easy steps....

FACE
- Prep the skin. Wipe with Johnson's baby wipes with a bit of Clarins White Plus toner. Apply Clarins Beauty Flash balm to prep and moisturize the skin. Do not massage. Just spread it to create a fabulous layer of moisture on her face.
- Apply a dot of Laura Mercier Oil Free Primer so that the foundation stays put longer. I always begin with the T zone and then rest of the face. Smaller the amount of primer better the glide of the foundation.
- Then with my favorite foundation brush and some lightning speed strokes I applied MAC Pro Longwear foundation in NC42 all over her face and neck and then buffed it into the skin using Real Techniques Buffing brush, which is supposedly a boon to mankind.
- Concealing is a key to mimic healthy flawless skin when one may not have any. Thence a bit of MAC Pro longwear concealer went in the under eye area, breakouts, pigmented areas of the face and hither thither wherever needed. In the under eye area I chose NC35 and then NC42 on the rest of the face.
- I set it all with my favorite Chanel Poudre Universelle loose powder to give an air brushed perfection. This powder is finely milled and a great makeup companion in the kit.
- When one does a full foundation or just a little bit, whichever, its very quintessential to contour and Benefit's Hoola Bronzer is what I go to when I have to do so. Contour under the cheek bones, sides of the temples, under the jaw line, bridge of the nose and on the hair line to create hollows and dimensions.
- I applied a mix of my two favorite blushes at the moment, MAC Cantaloupe and MAC Peachykeen to mimic a healthy peachy flushed glow and accentuated the glow more with Too Faced Cosmetic's Candlelight highlighter which looks divine in any light.
- I prepped the eye lids with MAC Paint pot in Groundwork. This not only allows the eyeshadows to adhere better but also creates a flawless base while hiding any darkness and broken capillaries on the eye lids.
- Then with my favorite eye liner pencil ever 'The Miss Claire One Stroke Eye liner' I traced a thick line tapering from the inner to the outer corners and quickly blended with a pencil shadow brush to create a smokey haze and a darkened base at the lash roots.
- From the Smashbox Masterclass Color and Contour III palette, apply SUMATRA in the crease to deepen it. I applied NUDE to create a transition color. Then applied BLACKOUT on the outer corners to create a smokey haze. Applied VANILLA to highlight under the brow bone and FLIRT in the inner corners.
- From Urban Decay Naked and Naked 2 Palettes - I applied HALF BAKED on the mobile lid and blended it hither thither. Highlighted the brow bone further with BOOTYCALL and applied CHOPPER on the center of the lids.
- Then I retraced the lash line to draw a very thin straight feline flick and extend the eye shape. This is my signature style for bridals. Applied a brown pencil in the inner rims of lower eye lids to create softness.
- I had to draw Shreya's sparse brows with Rimmel's brow pencil and bit of SUMATRA and SMOKE eyeshadow from the Smashbox Masterclass palette.
- Curled the lashes with my favorite MAC eye lash curler and applied 4-5 coats of shiny lacquered Yves Rocher Lash Plumping Mascara
- I traced and enhanced the lip shape with Bourjois Lip liner in Rouge with is a perfect compliment for MAC's Ruby woo lipstick.
- To ensure a lasting finish, I prepped the lips with MAC Lip Mix in Crimson for a maroonish wine stain to begin with. Enriched with silicones, Lip mix has an amazing staying power and is very long lasting and acts as a perfect base for other MAC lipsticks.
- Then I applied MAC's Russian Red all over the lips with a flat Kryolan lip brush and applied 2-3 layers with in between blotting and applying some transparent Tarte Smooth Operator Loose Powder. The lipstick lasted till the entire evening and I was very happy with the result.
Hope you liked the look. There are many more on their way and I am trying to find time to do so. Please do comment and support. Do access @neerajnavare on Instagram for more of such amazing tutorials.
Till then,
Ciao

Please do not copy any pictures or content of Beauty Traveller without prior permission. Thanks for reading my blog. I don't give 100% on the authenticity of the content here and it is subject to change without prior notice. Please read the disclaimer for any questions. The links provided here are not affiliate links and just used for reference so that one can have a look at what the actual product is.Thanks a lot for reading my blog. Do subscribe, follow and support. Thanks.
