For many athletes, cross training shoes are an important piece of gear to keep on hand. While they may look similar to a pair of running shoes, there are a few key differences that make cross training shoes an excellent choice for, well, cross training. So whether you’re a dedicated gym rat or you casually play multiple sports in your free time, it’s crucial that you find a pair of cross training shoes that suits your lifestyle and needs. But just remember that cross training shoes are not recommended for those who seriously engage in a particular sport frequently, they are meant more as all-around shoes that can fit the bill for most physical activities. With that being said, here is our guide on how to choose cross training shoes. Hope it helps!
How to Choose Cross Training Shoes Infographic

How to Choose Cross Training Shoes: In-Depth
Step 1: Discover the Anatomy
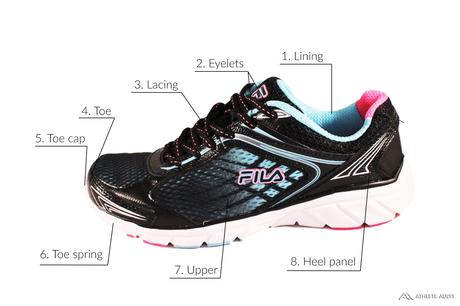
- Lining – A sock-like fabric on the inside of the shoe helps to add comfort
- Eyelets – Small holes toward the top of the upper keeps laces in place
- Lacing – Most cross trainers either use traditional laces or velcro for tightening
- Toe cap – The end of a shoe that is often reinforced for improved durability
- Rubber toe guard– A patch of rubber at the very end of the toe improves durability and helps with dynamic movements
- Toe spring – The rise or upward curve in the forefoot that helps the foot roll forward
- Upper – A very important part to consider. Uppers for cross training shoes are really tight-fitting to provide lateral support whereas running shoes do not provide much. Often made with stiffer materials such as leather or synthetic leather, with mesh added for breathability
- Heel panel – The part of the shoe that covers the heel
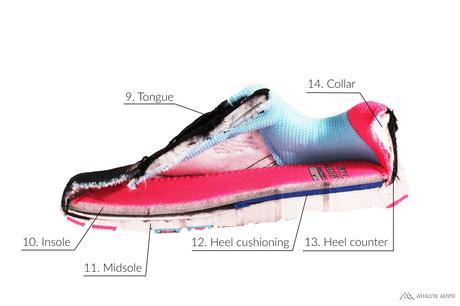
- Tongue – Well padded and breathable for comfort
- Insole – A soft footbed helps to add comfort and support for your feet
- Midsole – Built similarly to a running shoe, the midsole will be thinner in the forefoot and thicker in the heel
- Heel cushioning – Some cross trainers will have additional heel cushioning for shock absorption
- Heel counter – A rigid, often plastic, insert behind the heel keeps the structural integrity of the heel
- Collar – A padded collar adds comfort and ankle support
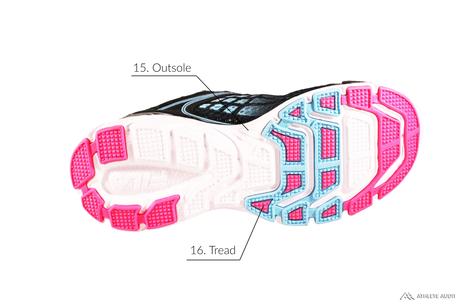
- Outsole – The rubber used on the bottom of a shoe provides traction
- Tread – Compared to running shoes, cross training shoes will have flatter tread that works for a variety of sports
Step 2: Know Your Sole
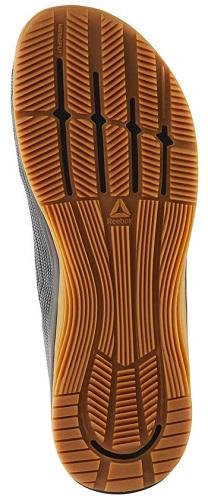
Cross training shoes are made of a durable but lightweight non-marking rubber, which keeps you quick on your feet in a number of situations. It should be flat and slightly wider than normal athletic shoes to provide adequate stability for whatever physical activity you may be doing. So, you should always feel solid and secure while wearing a pair of cross training shoes. There should also be a good amount of flex grooves to keep you comfortable when bending at the ball of your foot. Last but not least, it should provide superior traction on a variety of different surfaces.
Although the sole of a cross training shoe is fairly similar to a lot of other athletic footwear, its versatility is what ultimately stands out.
Step 3: What’s Your Foot Type?
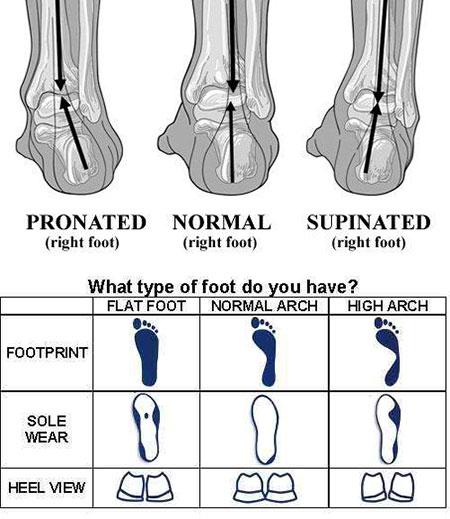
The easiest way to find out your foot type is by looking at your athletic shoes and seeing where they’ve worn the most. Shoes with a lot of wear on the inside of the soles or around the ball of your foot means you have a foot that regularly overpronates. If the outside of the heel or toes show wear, you have a supinated foot. Lastly, if there are even amounts of wear throughout your shoe, then your foot type is neutral.
However, if you want a more accurate measurement, you can always perform a wet test. Simply wet the bottom of your foot with water and place it on a visible surface such as a brown paper bag or concrete. Now, check the imprint and see what it matches. If your arch is very thin, your feet are supinated. If the arch is as large as the rest of your foot, you have pronated feet. And if your arch is not too thin or large, then your feet are neutral.
Neutral -A neutral arch is the ideal foot type, and allows you to wear almost any shoe you want, given that it’s comfortable for you. Comfort should be your biggest priority if you have neutral feet, although neutral cushioned shoes help to promote natural foot motion.
Supinated – Having a high arch means your ankles are naturally inclined outwards. This means that there isn’t a lot of inward stability so you’ll want to focus on cushioning and flexibility in a pair of cross training shoes. Neutral cushioned shoes work well with this foot type.
Pronated (Overpronation) – A pronated foot equates to a low arch, which means your ankles have the tendency to roll inwards, or overpronate. This can lead to injury more often than the other foot types, so you’ll want shoes that have lots of stability and lateral support. Motion control shoes are also a good choice for those who severely overpronate. You should also consider adding your own insoles or orthotics for the support you need around your arches.
Step 4: Find the Right Fit
Signs of a Perfect Fit
- 1/4 to 1/2″ of space in the toe with a snug fitting forefoot and heel that doesn’t slip
- Absolutely no pain discomfort, or chafing
- Fits the width and volume of your foot
- Appropriate amount of support and cushioning
- A tight fitting upper for more lateral support and foot control
- Flexible enough for a variety of movements
Tips for Fitting Cross Training Shoes
- Consider whether material will stretch; real leathers stretch, synthetics don’t
- Shop in-store and in the afternoon for an accurate fit
- Try multiple sizes of the same shoe to find the best fit for you
- Try out a variety of movements such as running and jumping to ensure comfort
- Consider adding your own insoles or orthotics for more comfort or a better fit
- Wear socks you intend to use when sizing for shoes

