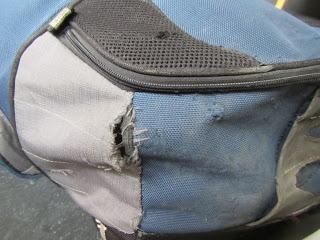
 Not but three weeks into our 500+ day journey around the world did I realize my backpack had a hole in it. Not just a tiny hole, one that you'd see after it was scraped on something, but a big gaping hole along a seam that was only going to get bigger. Although my pack is almost 5 years old I was surprised that this had happened so quickly. Not only that, it was on the bottom of the bag, one of the worst places it could have occurred. Cue panic.
The Options - Repair or Replace?
Since spending $200 to $300 to buy a new bag is quite an investment, especially for an item that would also likely get damaged on this trip, we opted to try the repair route. As we were in Switzerland at the time the entire purchase cost for the materials ran about $30, something that would be far cheaper in other countries. Even then, we went a bit overkill just because it is better to ensure the job will last or else we may face the same issue again down the road.
For all those who are out there with a similar issue, this is how we did it.
Materials
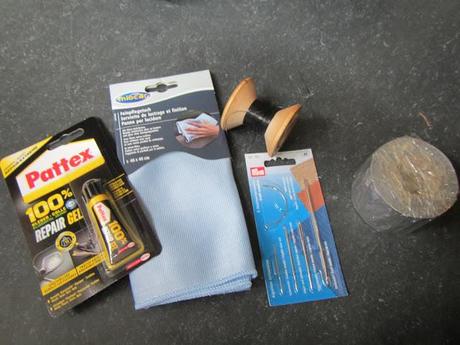
For this repair job we had to find a number of materials. I think we got a bit lucky in that we were in Zermatt, Switzerland at the time; a destination known for its hiking and outdoorsy nature. Depending on where you are at, finding these items may be a bit trickier (although your hotel or hostel should be able to suggest where to try):
- Duct Tape
- Durable Thread
- Sewing Needle
- Industrial Adhesive (Gorilla Glue, other Fabric Glues)
- Durable Cloth (Shammy/Chamois, Fabric, Cut up Jeans)
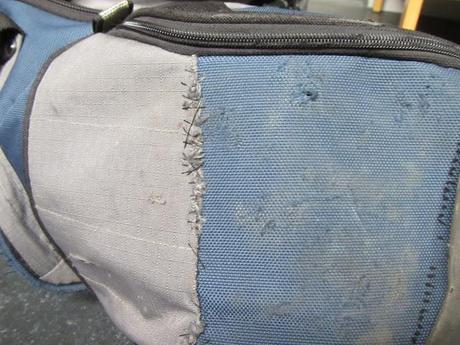
We were recommended to check out a seamstress in Zermatt who could repair our bag or perhaps sell us a sewing kit with thread. Although her English was limited she knew what we needed and gave us a kit to use as well as heavy-duty thread - for free! After we returned to drop off the thread and sewing kit we gave her 5 Francs for her trouble, even though she protested. We wouldn't have been able to buy the kit for that cheap.
Step 2: Duct Tape The Inside
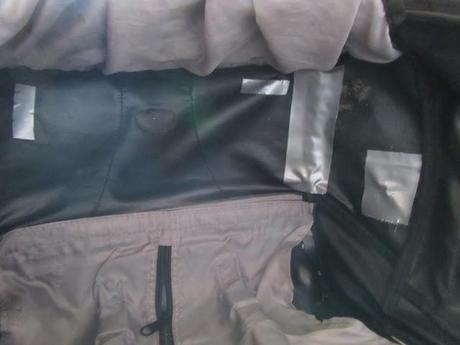
You may be comfortable with just sewing you bag depending on where and how large the hole is. As mine was on the bottom of the bag I wanted to reinforce it as best I could. After sewing and tieing off the thread on the inside of the bag we put down a layer of duct tape over the spots with the newly added thread. This should ensure that the thread is not frayed by your belongings on the inside.
Step 3: Glue Fabric Over Weakened Area
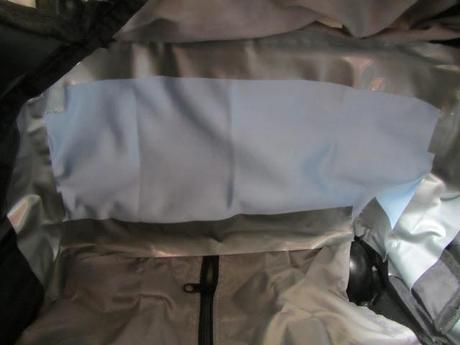
As the bottom of my bag was getting a bit thin, and I like to use the wheels when traveling, we glued a very durable shammy we found in the grocery store to the bottom of the bag with strong textile glue. The goal for this step was not so much to fix the old holes, but to add another layer of protection if a new one were to open up. As a bonus, the shammy was quite large and we got to double it over for added stability. In this instance we were not shy about the glue and made a layer along the edges as well as across the inside in several lines.
Another layer of duct tape on the edge to prevent items from pulling the fabric away from the glue and its done!
As I am not the best at sewing this repair took a bit less than an hour. I repaired two holes by sewing and a third by taping only (it was very small). In that time I ended up putting about four holes into my hand, a number that could have been quite higher. The holes in my hand have since healed, thankfully.
Other Ideas for Repairs
We spoke with several other travelers about this issue to see if they had any ideas. As we only used a few of them we wanted to share some other options that may be more useful for your unique scenario.
- Find a seamstress/shoe repair shop and pay them to do the fix. This option works best in countries with more favorable exchange rates and in cities where you have several days to wait.
- Use dental floss instead of thread as it is heavy duty. A novel idea that we did not try due to our seamstress giving us free thread. When comparing the material type of the thread we used to dental floss, many similarities were present.
- Buy an outer bag for travel days (especially with airlines) and sew the holes only. My major concern for the hole in my bag was not myself dragging it around but rather what happens when we fly and hand the bag off to a 3rd party. A quick sew job and a lined bag on top would easily do this trick, if you can find one or have one already.
- Contact the manufacturer to find authorized repair centers or replacement opportunities if in warranty. We sent our manufacturer a tweet to get a customer service email and will be sending them a message shortly. A lifetime warranty is great, but when you're on the road it is a bit hard to send your bag in for repairs.
Lets hope that doesn't have to happen.
A special thanks to A Skinny Escape, As We Saw It, Santa Fe Travelers, Europe For Visitors, Chicky Bus, and the many other awesome travel bloggers who helped us out with our bag issue!

