Food & Drink Magazine
Recipe Number One Hundred & Forty Two: Page 289.
Mary promises in her recipe header that this bread is really quick to make; she says it needs shaping and rising only once before baking. I was eager to try my hand at this recipe as the long process of bread making does tend to put me off. I wasn't sure I could believe that just one rise would be enough to produce a light and delicious bread but I hoped to be proved wrong!
Before turning my attention to my afternoon of baking, we headed into town for supplies. It was not an enjoyable experience due to the crowds of people desperately searching for a bargain in the January sales. I'm just too lazy to join the queues; being elbowed in the ribs isn't my idea of a good time! We only wanted a few little things but it took us ages to squeeze our way in and out of shops. By the time we stumbled through our front door armed with bread flour, walnuts and Neil's swanky new jeans, we had almost lost the will to live!
After a rejuvenating cup of tea it was time to summon what little energy I had left and trot into the kitchen. My first job was quite relaxing and a nice way to ease into a spot of baking. I find it quicker and more fun to break up walnuts with my fingers rather than chopping them with a knife. I did have a fair few to work through and, by the time my mission was complete, I was left with a little mountain of broken walnuts. I needed both granary flour and white strong bread flour in equal quantities. As a small child I hated granary bread due to all the bits; now I consider them to be the best part! I sprinkled a sachet of dried yeast over the flour and added a little salt. I've never used treacle in a bread recipe before, so it felt a little odd taking my unloved tin of treacle from the shelf. It was obvious that it hadn't been used for a while as the lid was glued on and it took a while to prize it open with the help of a spoon handle. The treacle inside still looked edible, so I decided to risk it! My poor Baking Bible has suffered some rough treatment and is looking more than a little worse for wear. I didn't help matters by placing the sticky tin of treacle on to the open page, whoops! I added a couple of glugs of olive oil; then it was time to add the warmed milk. I ended up with a bowl of milk with lumps of flour merrily floating on the surface. It did not look good. There was nothing left for it but to stick my hands in and give it a good mix – my goodness it was a messy job!
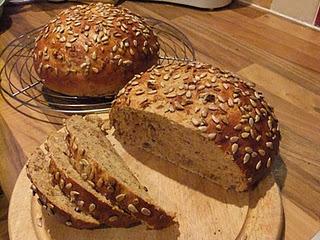
Finally I managed to work the gloopy mixture together and form a sticky dough. It was hard to knead it on the worktop at first but, after ten minutes, it was smooth and springy; my biceps felt sore by the time I'd finished! The broken walnuts were not to be forgotten as they had to be worked into the dough. I was also in need of a large quantity of sunflower seeds; this was going to be a very virtuous bread roll! Working in the walnuts and seeds proved to be a tricky task as they kept shooting off the worktop in all directions. I think most ended up on the floor! Some minutes later the dough was bursting with Vitamin B and essential fatty acids and ready to be shaped into two good sized rolls! I placed them onto separate baking trays and put each tray into a carrier bag. I should mention that I first checked to be sure the bags were clean! Mary mentions that it can take as little as 30 minutes to over an hour for the rolls to double in size. I turned on the oven and sat my rolls alongside it. It took about forty five minutes for the beauties to inflate! As if they weren't pretty enough, I had to glaze the rolls with some beaten egg and honey before sprinkling yet more sunflower seeds over the top. It was a perfect finishing touch. I placed the rolls in the oven to cook for around 25 minutes. Of course the bready smells that wafted through the house were heavenly. Maybe they should bottle the scent; it would make for an irresistible perfume!!
The rolls came out of the oven a gorgeous golden brown; they looked lovely and rustic. I left them to cool on a wire rack for twenty minutes before giving in to temptation! Unsurprisingly the flavor of the nuts and seeds shone through. The bread had such a light and soft texture. I was pleased to discover that it wasn't heavy at all; I certainly didn't think it required a second rise. I was surprised my little boy took a shine to it as it contains so many nuts and seeds. However, he kept coming back for more. Mary comments that the bread also makes excellent toast. I was keen to test this theory and I can confirm that it is amazing – YUM!