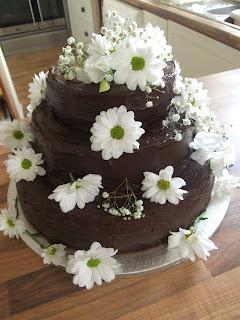
So here it is, my final recipe from Mary Berry's Baking Bible - and what a cake to finish on! A three tier chocolate wedding cake. I've never made a tiered cake before, and I felt a mixture of both trepidation and excitement! If I could successfully tackle this impressive cake I would be thoroughly pleased with myself!!
Scanning through the list of ingredients I was overwhelmed by the enormous quantities. I would need to purchase over 7lbs of chocolate, but most shocking of all were the eggs. I required thirty eight in total.....no that isn't a typo, it really was THIRTY EIGHT!!! I very much hoped this cake would be a success as it was proving to be very expensive. It was a shame not to be catering for a wedding as it seemed rather wasteful to make such a spectacular cake without a special occasion.
Isaac was spending the day with his grandparents so that I could get on with this time consuming cake. It was a hot and muggy day, so I pulled my hair up into a scruffy bun and wore one of Neil's long baggy t-shirts. I was not a pretty sight, but I was more concerned with comfort than appearance!
I decided to make each cake individually as there would be no way I could fit all the ingredients into my modest mixing bowl in one go. Thankfully Mary allows for this, and helpfully lists the quantities required for each cake. I would make the smallest cake first and, if it were a total disaster, then it wouldn't be too wasteful! In an attempt to be organised I made sure that all of the three tins were greased, lined and ready to go before I started baking. Not only did I have to line the bases but also the sides. This fiddly and quite frankly tedious job took half an hour. Heaven forbid how long it would take to bake and ice the cakes, but I tried not to dwell on this matter for long!
First of all, I gathered up a glass bowl and placed it over a pan of simmering water. I opened up the first of many bars of plain chocolate, broke it up into neat squares and shoved them into the bowl to melt. I resisted the urge to turn up the heat to hurry the process. Instead I paced the kitchen, stopping every so often to give the stubborn chocolate a gentle stir. Eventually I had a bowlful of glossy melted chocolate and I could take it from the heat to cool.
Meanwhile I separated a few eggs, placing the yolks into one mixing bowl and the whites into another. To the yolks I also cracked in a whole egg, followed by a pile of caster sugar. Now it was time to whisk the yolky sugary mixture until thick and light in color. I thought this would take a while, but it transformed almost immediately and I was quickly able to put the electric whisk to one side. I was surprised not to require any flour. Instead, I tipped in a good quantity of ground almonds. It appeared that this would be a fudgy dense cake, which wasn't what I had been expecting. Now I needed to put the kettle on and brew up a little cup of fresh black coffee. Sadly this wasn't for my own consumption (mine would be full of milk and sugar). I just needed to measure half a teaspoonful of coffee into the mixture. It hardly seemed worth bothering!! By now the melted chocolate had cooled off a little and was ready to be mixed in. It was a difficult mixture to mix as it was extremely thick; it certainly felt as though my biceps were receiving a tough workout! Last of all, I whisked up the egg whites until stiff before folding into the chocolaty mixture. It was a challenge to combine with the thick and heavy chocolate mixture. I found that the egg whites liked to sit on top of the bowl while the thick mixture preferred to be at the bottom! Surely in my attempt to fold the two together I'd knocked out any air it once contained?! I poured the doomed mixture into the awaiting tin, placed it into the hot oven and crossed my fingers very tightly!
I thought I'd better catch up with the washing up while the small cake cooked so that all the bowls and whisks were ready to be used again for the second cake. To my horror it wasn't long before I caught a whiff of burning. I hurtled to the oven at breakneck speed to investigate. The top of the cake had formed a crust which was turning a deep shade of brown! I grabbed some foil and hurriedly placed it over the top, hoping to avoid any further burning. Despite the burnt crust, I found that the cake took an extra ten to fifteen minutes in the oven and even then I didn’t feel confident it was ready.
I followed the same procedure for the second cake and found it a lot trickier due to the much larger quantities. The mixture reached the top of my mixing bowl with not even a tiniest sliver of space remaining. It was really difficult to fold in the whisked egg whites; some were lost over the side of the bowl! Again the almond mixture sank to the bottom of the bowl. I had little hope for this cake!
Again, the cake formed a crust which burnt in the oven, just like the smaller version. I re-checked the recipe and was relieved to read that a cake crust is normal! It is simply down to the high quantity of sugar, phew!
By now I was really dreading the third and final cake which required a twelve inch tin! The quantities were of course larger still. I would have to melt the chocolate and whip the egg whites in several shifts. The amount of washing up I was creating was alarming and I really wanted to run away and hide!!
I remembered the huge ceramic bowl my mother-in-law had given me. It was stored on top of the fridge and was full of cake sprinkles and other odds and ends. Most odd was Isaac's long lost toy recorder!!! I washed up this monster of a bowl and felt sure it would provide enough room for the final cake mixture. Although I only just had enough space, I managed to get the job done and the cake was finally ready to be cooked. I let out a whoop of delight after successfully manoeuvring the heavy tin into the oven! I washed up the final load of bowls and utensils and breathed a huge sigh of relief. I'd made the three cakes so that was, I hoped, the hard part of the work over. The icing looked fairly simple and straightforward, so I would leave that job until the evening.
When I finally sat down, the aches and pains hit me and I found it very difficult to get moving again. In fact, I felt the need to lie on the bed for an hour or so to give my muscles time to relax. It was really difficult to find the impetus to ice the three cakes later that evening. However, Neil reminded me that this was the last push and offered to help where he could.
I never would have imagined it possible to injure yourself whilst breaking up bars of chocolate. However, after breaking up over twenty bars, I'd developed red sore marks on my fingers!!! Surprisingly, I wasn't tempted to pinch a few squares; after dealing with so much chocolate I really didn't fancy it (shocking)! I made up the icing for the largest cake first. To the huge bowlful of melted chocolate I added almost a whole packet of butter and waited for it to give in to the heat. It took some time but it turned into a beautifully smooth and glossy mixture. It really did have an attractive sheen. I poured the thick icing over the cake and Neil assisted me by smoothing it out with a palette knife. We seemed to have way too much icing, but a fair amount slid off the sides of the cake which seemed very wasteful.
The same procedure followed for the remaining two cakes, but I managed to tackle the smallest cake all by myself!! It didn't take long for the chocolate icing to set. However, I decided to leave them overnight to set completely before attempting to stack them. I put all three cakes onto cake boards and stored the bottom tier in a huge cardboard cake box. The other two layers had plastic containers placed upside down over the top with wodges of kitchen towel shoved underneath; I hoped this would allow the air to circulate. I was worried that the icing would 'sweat' if I put the airtight lids on.
The following day I was pleased to discover that my cakes had all survived the night and were ready to be stacked. I feared that the bottom cake would not be able to support the weight of the other two cakes, but amazingly it did just that and there was no sign of subsidence! I smothered the three layers with some fresh white flowers. Mary's finished cake looked far more elegant than mine but I was still really pleased with it! I'd managed to make a three tiered cake – hooray!!
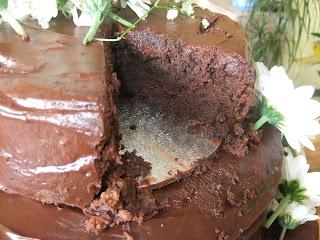
I was intrigued to find out what it tasted like considering the omission of flour. It was a very moist, dense and rich chocolate cake. The ground almond flavor was much in evidence. I thought it to be more of a dessert than a cake. The icing was fudgy and delicious, but there was perhaps a touch too much. You really couldn't eat more than a sliver as it was so chocolaty!!!
All in all I am delighted with this wedding cake. Eighteen months ago I would never have imagined that I could have made this cake and I wouldn't have bothered to try. I'm really grateful to this challenge for making me attempt new things and helping me to gain in confidence from doing so.

Yay - I made a wedding cake!!

Very moist and dense.

