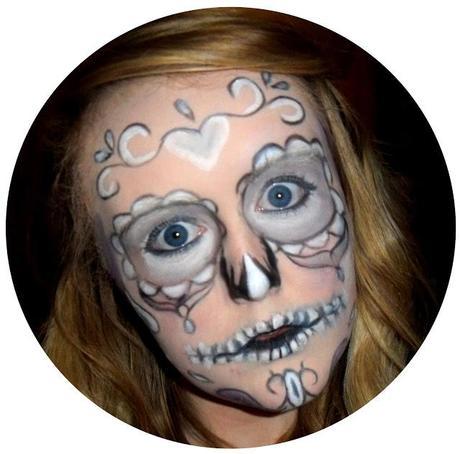
So this is what we're aiming for, of course, you can aim higher as I'm a novice.
What you'll need
Any pale base foundation or primer
White or ivory powder (the lighter the better)
Black eyeliner pencil or liquid (whichever you're more comfortable with)
White eyeliner
Any color eyeshadow pallet
Of course you could always use face paints etc, but I'm poor, curious & just fancied a go!
So roll with what you have basically!
- I literally spent £1.99 on Ivory collection 2000 powder, & £1 on MUA snow white eyeliner. It really doesn't have to cost the earth this Halloween malarkey!

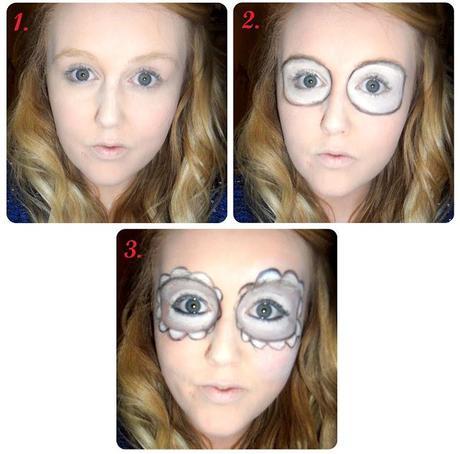
1. Base coat.
You need to create a really milky base tone.
My skin is already pretty pale, so my usual foundation Maybelline dream matte mousse - Sand works fine for me. If you're darker skinned you may need to invest in a paler primer or foundation (alternatively, buy white face paint and water down)
I then applied Collection 2000 powder - Ivory on top just to white my skin out a little more. You don't want to make your base skin coat to be 100% snow white as later you'll need to create highlights with brighter white tones to accentuate the black outer lines.
2. Eye base.
Next you need to create a neat (as possible) circle around your eyes, I used my eyebrows as the initial starting point, just to give a natural curve around the eyes.
I found it easier using my eyebrow brush to trace a thin very light line around the eye first, just as a reference point before using my black eyeliner to darken.
Follow this by colouring in the circle with you white eyeliner or pure (none watered down) white face paint.
Shortly after this I decided to smudge some of my dark brown eyeshadow close around the outer circle just to create a bruised effect, leaving the inner much whiter around the eye. But this is optional.
3. Eye detail!
Then I created a scalloped edge around the circle... which honestly was much more problematic that I first anticipated & really quite difficult to keep even. But if you have a steadier hand than me, you may fair better.
Again follow this carefully by colouring in the insides of the scalloped edge.
Finish this by lining your eyes as if you would on a normal day.

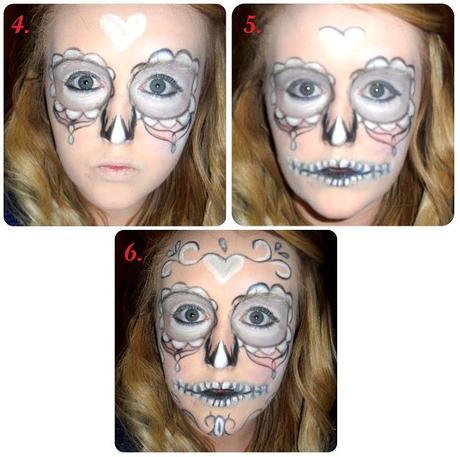
4. The nose.
This was a little bit of a 'wing it' moment. I created a zip zag motion getting smaller towards the middle of the bridge, but leaving a small gap in between both sides. Finishing off with a little white highlighting in the middle of the tip of the nose.
Of course if you have any better solutions or ideas, roll with it, because honestly, this wasn't the most create bit of the face art!
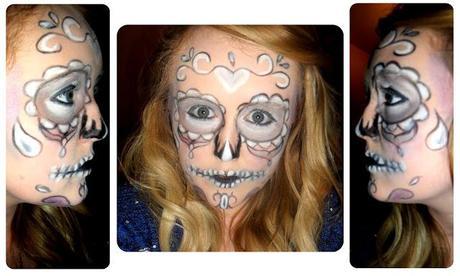
I then created a little pattern under my eyes. Again, optional, &I don't know how best to explain it, but copy as best you can from the photographs or better yet, create your own!
5. Lips!
I had a nightmare with these, although I must say, they came out better than I expected. I simply began with creating a thin light line, 2.5 inches from the corners of my mouth out across my cheek. I then coloured in the shape of half the fullness of my lips. ( only the bottom half because you need the top half to shape the 'teeth')
And then I used a sharpened eyeliner to create the teeth design, colouring them in white as I went along, Try to match them up evenly across the top and bottom too!
6. Decorations.
You can get loads of inspiration from google but I went with generic swirls and tear drops & a cheeky white heart on my forehead. The arty design is really up to you, be creative & if you're a little more confident, add some color with an eyeshadow or face paint pallet!

Voila!
So I hope you've enjoyed the tutorial, & I haven't done too bad for my first go at a tutorial!
If you need any more help just ask, I'm always more than willing to help & try to repond to any comments or questions within 24 hours.
So, what are you planning for Halloween this year?
- Don't forget my 10k giveaway will launch on the 02/11/2012


