 Growing up in a house built in 1905 spoiled me. Natural hardwood floors, tall ceilings, crown molding, wooden window frames! I love the attention to detail that you find in older homes and have been on a mission to make our 1980s home feel 60 years older. Our first step was to add wooden window frames to our bare windows. I've decided to share some photos in case others are inspired to do this to their own windows. It's a simple addition that makes a dramatic difference!
We forgot to take a lot of before photos, but here's an example of what our windows looked like before:
Before window:

All of our windows had small windowsills and no frames, other than the metal frames on the window itself. I begged Pete to add frames to the windows... his response, "I don't understand why you want that, but I'll do it because I love you."
I love you, too, Pete!
To start with, here's the supply list:

In addition to the frame itself, it will help tremendously if you also have a caulk gun to fill any gaps and a nail setter to hide nails in the wood.
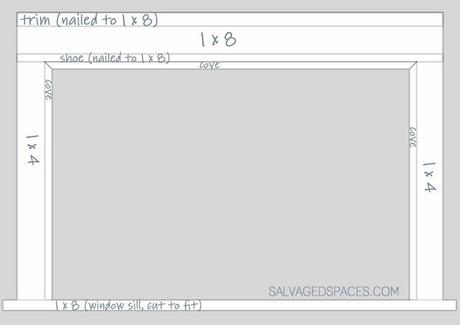
Pete designed a helpful diagram that illustrates how to properly construct the window frame:

We left our existing small windowsill and built the entire frame over it. It was an easy project since we didn't have to tear anything apart; altogether it took us about three hours for each frame (cutting, sanding, nailing, gluing, painting).
Here are some pictures of our finished windows!
Bedroom OneCats-approved!


Dining RoomThe room itself is a work in progress, but the window is done!

Bedroom Two
Before and After


And if you're curious about the beautiful yellow wall color, I just painted it "Concord Buff" by Sherwin-Williams!

