What tools you use to make your handmade jewelry is very important. After all you want your beaded necklace or handmade bracelet to look perfect when you are finished don’t you? What woman would want to be caught out wearing a less than perfect fashion accessory?
In a previous post I wrote about the four basic tools for beginners. If you missed that post follow this link to catch up:
http://www.quirkygirlz.com/handmade_jewelry_blogger/tag/how-to-make-jewelry/
This link describes how to use your bead board, an important basic tool for handmade jewelry:
http://www.quirkygirlz.com/handmade_jewelry_blogger/beading-board-basics-handmade-jewelry-gems-tricks/
In this post I will describe advanced tools that you will find handy as you develop your technique and stretch your artistic skills.
Split Ring Pliers
This is one tool that you will want to add but may not consider doing so until you have painfully ripped open one of your fingernails trying to open a split ring. This tool will make it a breeze to open these rascally rings and you will find them especially useful if you are trying to link many rings together. This tool might be especially important when putting together a contemporary jewelry design.

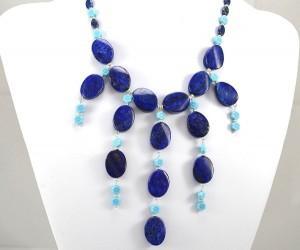
Handmade Necklace from QuirkyGirlz.com created using advanced tools.
Nylon Jaw Pliers
There will be times that you just won’t be able to find the component you need to make that special pendant, or you will want to do a project that calls for some wire work. These pliers have nylon coverings on the tips so that it won’t leave marks on the wire as you bend it. Traditional pliers can leave ugly marks, and this tool is handy for straightening out bent pins. You will discover that pins will be used often when creating beaded handmade necklace designs.
Bent Nose Pliers
They are just as their name implies, bent at the tip, which make it easier for them to reach into tight spaces. These can be handy if you are attempting a wire-wrapping project, or linking jump rings together. They can make it easier to see what you are doing when working with especially small components because the tips aren’t in the way. I use this tool often when creating semi-precious stone jewelry.
Follow this link for an example of a handmade necklace that was creating using these tools.
http://www.quirkygirlz.com/catalog/index.php?main_page=product_info&cPath=76_98&products_id=445&zenid=4b63a1583bdb43f6418612beaec535f9
Memory Wire Shears
If you have decided to create a memory wire bracelet these will be important to cut the wire. These are stronger than traditional wire cutters, which might be damaged if you try to cut memory wire with them. This might be a material you will choose to use for one of your first handcrafted jewelry designs.
Beading Awl
This is one handy device when you are trying to position knots between beads, or if your knot wasn’t placed correctly and you desire to untie it. This will be a tool that you will find indispensable if you choose to create a handmade pearl necklace or even a chunky bead necklace.
Bead Reamer
I should have included this in the basic tool kit because I cannot tell you how often I use this tool. It is indispensable. It is a round file and it will enlarge the inside of a bead hole. Often gemstone beads will have an opening on one end that is smaller than the other. This tool makes quick work of a sticky situation! You may be in the middle of creating a fancy stone necklace when you discover that the last bead you need has a hole that is too small to put your string material through. This is the time you will reach for this tool.
Beading Needles
Working with pearls is quite different from working with beads. Although you may choose to string your beads on silk thread it is more often than not you will reserve this material for pearls. You will need a beading needle to be able to string your delicate pearls with their especially tiny holes. You will need to choose a needle size based on the hole in your beads so it is best to keep an assortment in your toolbox. You may choose to use flexible-beading needles instead, and these come in fine, medium and heavy gauges. These will often have silk cord attached and their eyes will collapse when pulled through a bead.
Bead Mat
You might think that a bead mat is not a tool but it is handy for spreading your beads out and preventing them from rolling away. If you choose to use seed beads you will discover that seed beads will land with the hole side up when you pour them on the mat, and this makes those tiny beauties easier to pick up! I use both a bead mat and a bead board when I am creating handmade jewelry. It doesn’t matter if you are creating a handmade turquoise necklace, a bracelet or earrings the bead mat will be your best friend.
Tweezers
You will be working with many tiny objects and tweezers make picking up and holding tiny objects much easier. They are inexpensive and worth their weight in gold.
Bead Scoop
This is a handy device when you are trying to place beads into the channels of your bead tray. It has an oval end and a pointed end. The pointed end will let you place the beads onto the bead tray easily while the oval end allows you to pick up many beads at once.
Now that you know about the many advanced tools to choose from be sure to read my post on how to be a jewelry designer for more tips to make you bead like a pro. Now is the time to begin to create your own custom jewelry designs!
I look forward to hearing your comments on what your favorite tool is for jewelry making.
Bead Happy!
Till next time,
Quirky Girl
http://www.QuirkyGirlz.com

