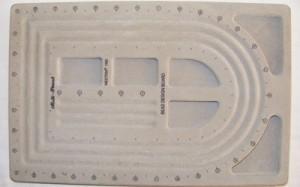
A beading board is a quirky girl’s best friend when she wants to put together a handmade jewelry design. Whether you are thinking of making a beaded necklace or quirky bracelet, a beading board is a must have essential.

Beading board
A beading board could be called the ultimate timesaver! Planning on the board it makes it possible to easily change your idea. If you choose to begin without it, you may find yourself unstringing a piece, not having enough beads, or discovering that you left out a matching component late in the game!
The beading board has grooves where you may choose to lay out a one strand or multiple strand necklaces. It allows you the opportunity to see what your necklace will look like before you actually begin stringing it. It will also save you great heartache when you realize that you didn’t purchase enough beads or semi-precious gemstones to complete the design.
Follow this link for an example of a one strand necklace that was made using a beading board:
http://www.quirkygirlz.com/catalog/index.php?main_page=product_info&cPath=76_102&products_id=189&zenid=6fe59eec49fc46a6a1923831c9089ddd
The board contains wells where you are able to store beads that you think you may want to use in the piece you are currently designing. Around the edges of the board you will find measurements, this allows you to gauge the length of the necklace as you lay it out for optimal planning. At the front of the board you will find a straight channel that is perfect for bracelet designs.
Follow this link for an example of a bracelet design that was made using a beading board:
http://www.quirkygirlz.com/catalog/index.php?main_page=product_info&cPath=74&products_id=330
Having your materials placed around the board in the channels, and bead choices within the wells allows you to move your patterns around, change your mind (a woman’s prerogative!) and add repeat beads as you see fit. Remember to start at “0”, this will be the center of your necklace. Then place your beads on each side; this will help you to create a balanced design.
The soft surface of the beading board will help to keep your beads in place. There is nothing worse than having to crawl around on the floor to locate an important missing bead! There is also something to be said for having all of your materials located in one place, it helps the creativity to flow!
Remember to have your stringing material ready. It is easy to begin to string your beads directly off of the board because it helps to keep them in place and in correct order. So when you think you have your design exactly where you want it you are ready to begin.
You will not want to create handmade jewelry without a beading board once you find out how easy they are to use and how helpful they can be to your design.
What are your secrets and tips to best use a beading board? I look forward to your comments!
Until next time,
Quirky Girl
http:/www.QuirkyGirlz.com

