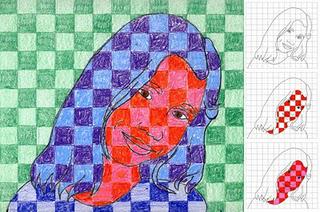
 This project takes a bit of prep work and digital photography, but I love the results so much that it all seems worth it.1. I started by shooting large head shots of students against a white wall. The photos were opened in Photoshop, saved with a lot of brightness added (to lighten the image) and then printed in b/w out on plain letter-size paper. I also printed a 3/4" grid paper on 9" x 12" drawing paper.
2. Each student takes their face print, puts it on top of a sheet of carbon paper, centers that on the grid paper and lightly tapes all together. To make a simple drawing, the students are to trace just the edges of their hair, shoulders and then the inside of their face. No details are needed inside the hair and clothes. When the drawing is complete, the top papers are removed to reveal the drawing on the grid paper. They carbon lines are then traced with a black colored pencil.
3. To color, the students should think of their portraits as four sections: the face, the hair, the clothes and the background. Starting with the face, they need to choose two colored pencils to work with. My sample shows red colored in first, stopping at the edges of the face. When complete, the other squares are colored (my sample shows pink). I think the eyes look best colored with their natural color.
4. Repeat the coloring process for the hair and clothes and background.
CA Visual Art Standard: Creative Expression, Grade Five
2.4 Create an expressive abstract composition based on real objects.
