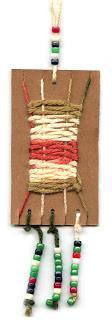
 I saw this project in Pinterest thanks to the Artrageous Afternoon blog, and loved it immediately. It’s a great way to make a little weaving project have more life than just sitting on a shelf or wall somewhere.
1. Cut chipboard to 2.5" x 4.5" or so. Four notches are cut in the top and bottom. Use a hole punch to make holes as shown. I bought a heavy duty punch from Michaels to work on thick cardboard.
2. Students wind one strip of yarn around the cardboard, sliding in notches as shown. The beginning and end is taped to the back side.
3. Yarn is woven back and forth, tying off the ends and trimming when complete.
4. Beads are strung up on more yarn and tied to the bottom of the weaving.
5. A long strand of yarn is cut, strung through the top hole, filled with a few more beads, and tied to a good necklace length. I love how thrifty this project is. For the cost of a little yarn and container of beads, you have a great weaving project for an entire class.
