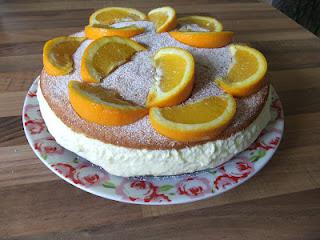
I felt a little sad that this was to be my last cheesecake from the Baking Bible. I'm a sucker for a buttery biscuit base with a generous helping of smooth creamy cheesecake piled on top. The mere thought is enough to send my taste buds into overdrive! However, my longing for a biscuit base was on this occasion to be unfulfilled. It was time to attempt something different; the cheesecake would be sandwiched between two layers of fatless sponge. I confess I wasn't entirely convinced by this prospect (how would I live without my beloved biscuit base) but I was of course willing to give it a try. I felt sure it would still be very tasty!!
My greedy enthusiasm meant that I entered the kitchen with a spring in my step. The instructions for the recipe looked rather lengthy, so I resigned myself that this cheesecake was going to take a while to make. However, the first stage looked very straightforward. I just needed to make the small fatless sponge. I say small purely because it's half the quantity Mary uses for her Swiss roll recipe! It seemed to take ages to whisk the eggs and sugar to the correct thick mousse like consistency. I wondered if this was due to the small quantity; perhaps there wasn't much for the electric whisk to 'get hold of'! Finally I had a mixture which had more than doubled in size and was ready for the sifted self-raising flour. Since beginning this challenge I've made a fair amount of fatless sponges. At the start I'd spend ages gently folding in the flour. Over time I've become quite heavy handed as the flour always refuses to intermingle with the egg and sugar mixture! Now I was ready to pour the voluminous mixture into the awaiting tin. Mary says not to worry if it appears you don't have enough for the size of the tin. I'm so glad she added that little detail as it barely covered the base of mine! I whacked the sponge into the oven and started to get all the ingredients for the cheesecake ready.
After about five minutes I started to notice the oven smelt very hot. I peered through the glass door and noted that my sponge was already on a rapid rise. Something smelt fishy (not literally) so I went back to the Baking Bible to check the cooking temperature and time. It didn't take long to work out that, instead of having my oven set to gas mark 4, it was in fact set to its highest temperature of gas mark 9 – ARGH!! A few choice words were uttered as I quickly adjusted the heat. For the remainder of the cooking time I kept throwing the oven anxious glances as I feared the high heat would cause the sponge to sink. The heavens must have been smiling on me as the cake survived its ordeal and exited the oven unscathed and well risen – phew!
While the cake cooled on a wire rack I was instructed to wash and dry the cake tin. Well, as I'm sure you are already aware; I am an inherently lazy cook. It didn't look bad to me, so I just wiped the tin with a sheet of kitchen towel. As it turned out I had to line the base and sides with greaseproof paper so it would all be covered up anyway! I gingerly cut the by now stone cold cake in half. As it was so thin, I was delighted to slice it successfully and not be left with a pile of crumbs! I laid one half into the lined cake tin before turning my attention to the cheesecake filling.
It felt as though I was embarking on another cake as I had to cream together a helping of butter and sugar. Once the mixture was suitably soft and fluffy I moved onto separating the eggs. This was when it suddenly dawned on me that I'd be unable to eat the cheesecake. Raw eggs are a big No No for a pregnant lady! I was on the brink of tears as I REALLY fancied cheesecake and felt so disappointed. I unceremoniously dropped the egg yolks into the bowl with a heavy heart. I reluctantly grated the zest from two oranges and squeezed in the juice. Everything suddenly felt like too much effort and I very much wanted to go and sit down – yes I was sulking!!!
I retrieved the cream cheese from the fridge and beat a fairly small quantity into the mixture. Neil kindly whisked the double cream by hand using a balloon whisk whilst I lazily used my electric version to transform the egg whites into voluminous puffs of cloud. The thick whipped cream and fluffy egg whites could then be folded into the unattractive (slightly curdled) mixture. There was such a lot that I couldn't see how it would fit into the tin, but it did...JUST! There was a sliver of space left for the remaining sponge half to squeeze on top. I placed a piece of cling film across the tin as instructed and put the heavy cheesecake into the fridge to chill and set for the suggested four hours.
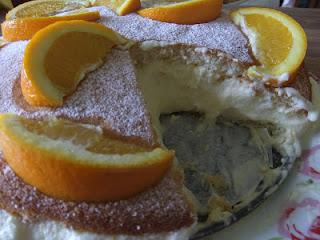
Once the time had passed it was early evening and Neil was hankering for a slice of cheesecake. Isaac was enjoying his tea as I did the unveiling. I removed the sides of the tin and watched aghast as the cheesecake subsided and the filling gently oozed over the edges of the sponge. Oh dear, that really wasn't supposed to happen!! I made the mistake of saying “urgh” so had to listen to Isaac's repeated exclamations of “URGH” as I hurriedly dusted icing sugar and covered the surface of the sponge with orange wedges! As expected it was a nightmare to slice as the filling was so very soft. It ended up looking extremely messy and I felt in need of a bath.
Neil was chief taste taster on this occasion; he reported back that the filling was delicious, very orangey, light and moussey. He wasn't sure about the sponge; as he said that there was so much filling he couldn't really notice it. It would appear that four hours wasn't anywhere near long enough in the fridge, as the next day the cheesecake filling had firmed up considerably and was much easier to cut. Neil confirmed that it was also much easier to eat!

Not sure about my orange decoration!!

I promise the cheesecake firmed up after longer in the fridge!

