Not all athletic shoes are created equal. This is fairly obvious when comparing, say, a basketball shoe to a soccer cleat. Or a golf shoe to a cycling shoe. Shoes for different sports will have unique factors about them that cater to that specific sport. Which is probably why you don’t see many people wearing hiking boots on the tennis court. That’d be sure to warrant some awkward stares from folks. Not only would it look strange, but hiking boots just wouldn’t be able to perform to the same standards as tennis shoes, and that’s because hiking boots were designed for hiking only. The rest can be said about any other athletic shoe. So, what makes one pair of shoes different from another? We decided to dissect a whole bunch of different ones to see for ourselves. With that being said, let’s find out the anatomy of an athletic shoe.
Anatomy of an Athletic Shoe
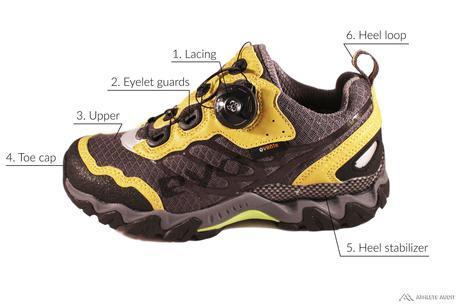
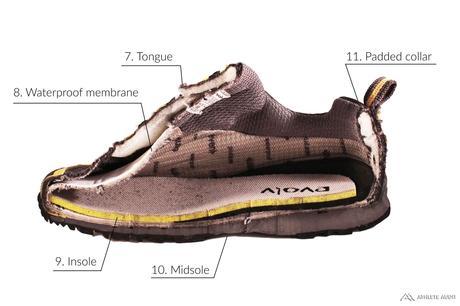
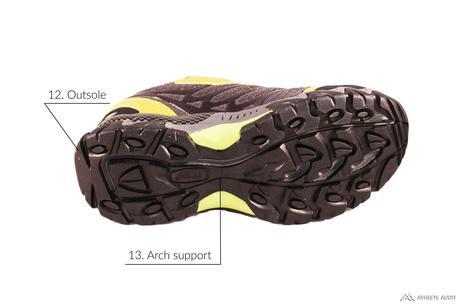
Anatomy of an Approach Shoe
 <>
<>
- Lacing – Most approach shoes have durable, rounded laces for easy closure. Some, like this particular pair, use BOA lacing for quick and efficient tightening
- Eyelet guards – Ensures that the laces won’t rip from brushing against rocks, brush, or the like
- Upper – Often breathable, lightweight, and resilient to abrasion. Leathers, synthetics, canvas, and mesh are the most popular materials
- Toe cap – Important for scrambling/climbing and for those who drag their toes
- Heel stabilizer – Keeps your heel stable and secure
- Heel loop – For clipping your shoes on a carabiner to carry or for ease when slipping them on
- Tongue – Padded and breathable for comfort
- Waterproof membrane – Some approach shoes may have a waterproof membrane to prevent excess moisture from soaking your feet
- Insole – Basically a pillow for your feet providing comfort and support, some insoles may be removable
- Midsole – Lies between the insole and outsole, provides cushioning and is often thicker in the heel
- Padded collar – Wraps around your ankle for added comfort and ankle support
- Outsole – The most important part of an approach shoe, it should have flat tread and sticky rubber for scrambling and talus-hopping
- Arch support – For added comfort when hiking
Learn how to choose approach shoes here
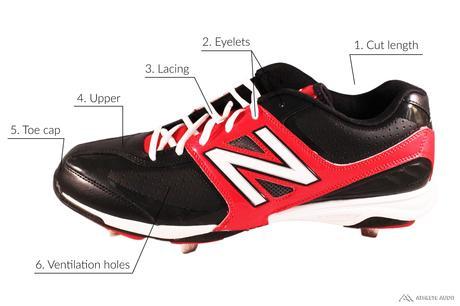
Anatomy of a Baseball Cleat
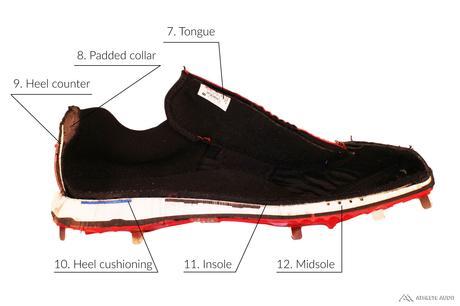
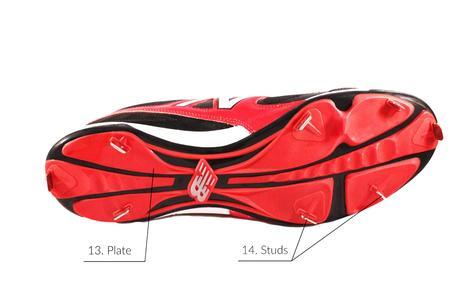 <>
<>
- Cut length – Cleats come in either low-cuts or mid-cuts. Low-cuts allow more mobility while mid-cuts offer more ankle support
- Eyelets – Holes on the eyestay keeps the laces in place
- Lacing – Laces are ubiquitous as they allow the most adjustment, although mid-tops may have ankle straps
- Upper – Very tough and rugged upper, most often made of leather or synthetic leather
- Toe cap – Prevents wear on the toe while running and pivoting
- Ventilation holes – Provides some breathability
- Tongue – Thin but slightly padded for comfort
- Padded collar – For comfort and ankle support
- Heel counter – Plastic insert behind the heel that reinforces the heel cup and increases support; helps lock in the foot
- Heel cushioning – Some cleats may have additional heel cushioning for added comfort
- Insole – What your feet will rest on, provides comfort and orthotic support. Some may be removable
- Midsole – What lies between the insole and outsole, provides cushioning and is thicker in the heel for running
- Plate – Often made of a hard, durable TPU plastic, keeps studs in place and is highly resistant to wear from running on dirt
- Studs – Most cleats will use metal studs to help dig into the ground, although molded plastic studs are also used (more often in youth leagues)
Learn how to choose baseball cleats here
Anatomy of a Basketball Shoe
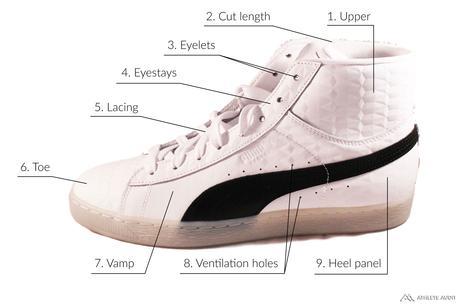
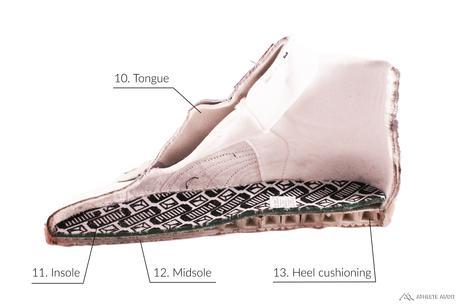
 <>
<>
- Upper – Can be made out of a variety of materials, such as leather, synthetic mesh, synthetic leather, canvas, etc.
- Cut length – Basketball shoes come in low-cuts, mid-tops, and high-tops, each offering differing levels of mobility and ankle support
- Eyelets – Small holes in the eyestay keeps laces in place
- Eyestays – Keeps laces and eyestays in place
- Lacing – Laces are very common although straps, velcro, zippers, and hook-and-loop closure systems can also used
- Toe – The very end of the shoe, some basketball shoes make use of a toe guard for added durability
- Vamp – The part of the shoe behind the toe that covers the forefoot and midfoot, should be flexible
- Ventilation holes – Provides some breathability to eliminate excess moisture
- Heel panel – Covers the heel portion of the shoe
- Tongue – Often thin but padded for comfort
- Insole – Essentially a bed for your feet, provides comfort and support. Some are removable so you can add your own
- Midsole – Fits in-between the insole and outsole. Is often thinner in the forefoot and thicker in the heel
- Heel cushioning – Many basketball shoes have some form of heel cushioning for shock absorption, such as air bubbles, gel cushioning, etc.
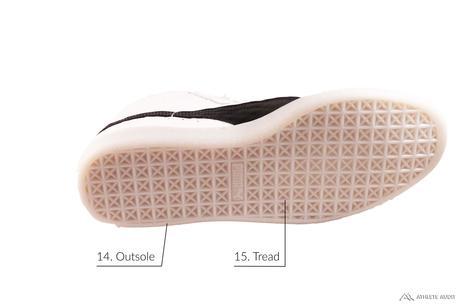
- Outsole – The rubber sole of a basketball shoe. It’s very durable and provides superior traction on slick indoor courts
- Tread – Most use herringbone tread that is flat and non-protruding for the most contact on indoor courts. May have flex grooves for flexibility
Anatomy of a Bowling Shoe
 <>
<>
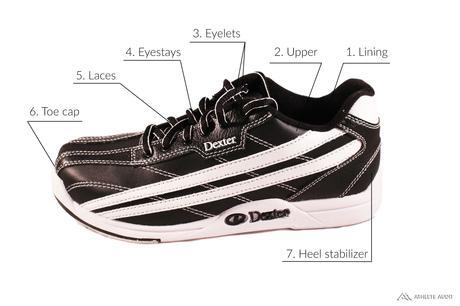
- Lining – A sock-like lining on the inside of the shoe, vamp, and quarter provides added comfort
- Upper – Most bowling shoe have leather or synthetic leather uppers, although more breathable materials can also be used. Some shoe uppers can also have perforations in them for added breathability
- Eyelets – Holes near the top of the upper guides the laces in place
- Eyestays – Houses the eyelets and laces
- Laces – Laces are commonly used, although shoes with velcro straps can also be found
- Toe cap – Helps to prevent wear on the toe when pivoting
- Heel stabilizer – Keeps heel stable and secure
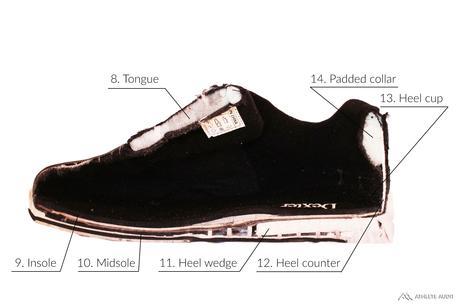
- Tongue – A padded tongue provides comfort (and possibly some protection in any case you drop a bowling ball on your foot. Ouch!)
- Insole – A footbed for your feet for comfort and support. Often thin and some can be removed to add your own
- Midsole – Located between the insole and outsole, provides cushioning
- Heel wedge – Helps to keep your feet in a position ready for pivoting. Less ankle flexion is required
- Heel counter – A tough plastic insert provides structure and support for the heel
- Heel cup – Locks the heel in place
- Padded collar – A heavily padded collar provides comfort and ankle support, keeping your feet secure in the shoe
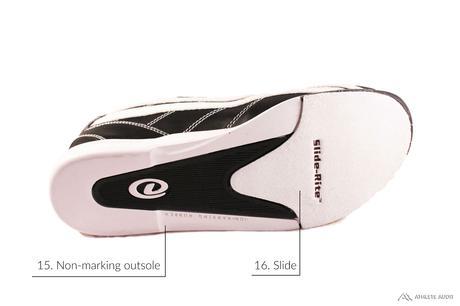
- Non-marking outsole – A flat, non-marking outsole provides traction on smooth lanes but doesn’t mark up the floors
- Slide – A very important part of a bowling shoe that should be given a lot of consideration. Lets you slide and brake on floors when throwing the ball
Anatomy of a Boxing Shoe
 <>
<>
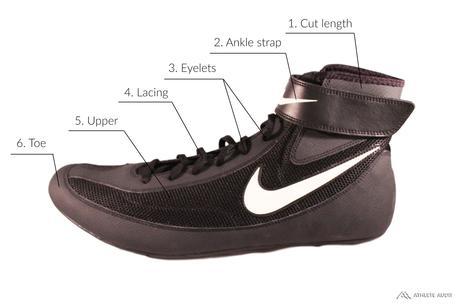
- Cut length – Boxing shoes come in either mid-cut or high-top lengths, with varying degrees of ankle support and mobility
- Ankle strap – Not all boxing shoes will have ankle straps, but if they do, they’re for added ankle support and locking your foot in
- Eyelets – Holes in the upper keeps laces in place
- Lacing – Laces are the most popular option as they allow minute adjustments in tension
- Upper – Usually made of a lightweight leather, synthetic, or mesh
- Toe – A toe cap helps to improve durability when pivoting and staying on your toes
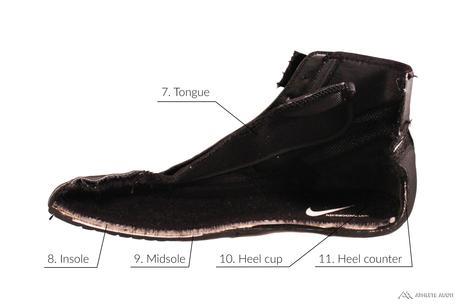
- Tongue – A thin and breathable tongue comes standard in most boxing shoes
- Insole – Essentially the footbed for your feet, can be removable in some cases. Provides comfort and support
- Midsole – A thin midsole provides some cushioning without compromising sensitivity
- Heel cup – Keeps your heel in place
- Heel counter – A plastic insert in the heel that keeps the structural integrity of the heel
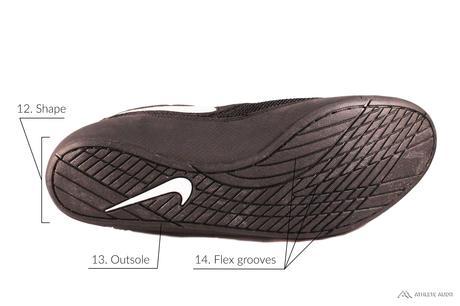
- Shape – Most boxing shoes feature a narrow shape to ensure a snug fit
- Outsole – A thin and highly grippy outsole will prevent you from losing your footing on the mat
- Flex grooves – Helps increase the flexibility of the sole for dynamic movements
Learn how to choose boxing shoes here
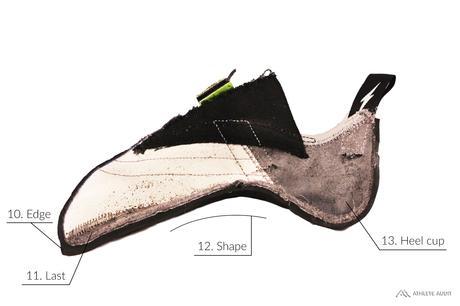
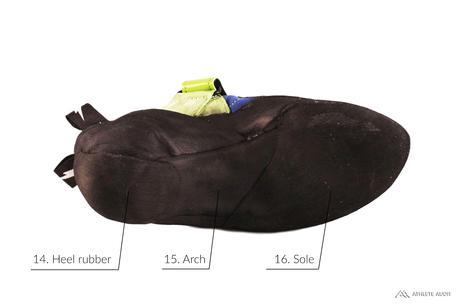
Anatomy of a Climbing Shoe
 <>
<>
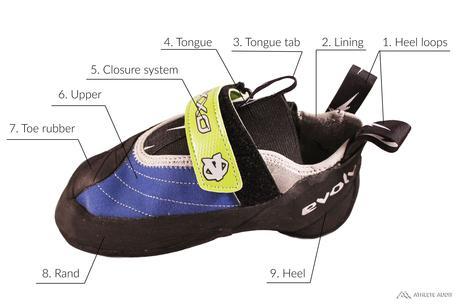
- Heel loops – Use them to slip on climbing shoes with ease or clip them to a carabiner for easy carrying
- Lining – Since you’re supposed to wear climbing shoes barefoot, a lining is added for comfort
- Tongue tab – Found on slippers and velcro shoes, used for opening the shoe’s mouth for easy foot insertion
- Tongue – Thin and sometimes padded for improved comfort
- Closure system – Slipper, velcro, or laces, choose what you prefer. Some closure systems are good for specific styles of climbing
- Upper – Almost all climbing shoe uppers are made of either unlined leather, lined leather, or synthetic leather, each with their own pros and cons
- Toe rubber – Higher performance climbing shoes have rubber on top of the toe for toe scumming and hooking
- Rand – Refers to the rubber covering the toe of a climbing shoe
- Heel – Most climbing shoes make use of a slingshot heel (introduced by Five Ten in 1991)
- Edge – The prominent end of a climbing shoe that allows you to stand on small edges
- Last – What a climbing shoe is built around. Determines the shape and width of a shoe
- Shape – Refers to the curvature of a climbing shoe. Flat-soled shoes offer more comfort, down-turned shoes offer more performance
- Heel cup – Locks in the heel to prevent any movement or slipping
- Heel rubber – The patch of rubber covering the heel that is crucial for heel hooking
- Arch – Many down-turned shoes lack a midsole in the arch to improve performance
- Sole – Refers to the rubber underneath your forefoot, which is primarily what you climb on
Learn how to choose climbing shoes here
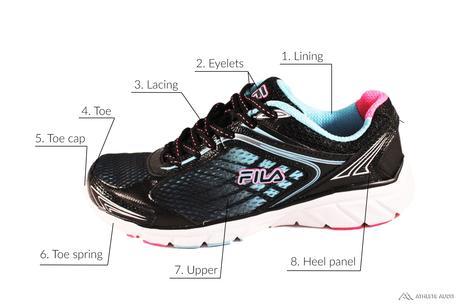
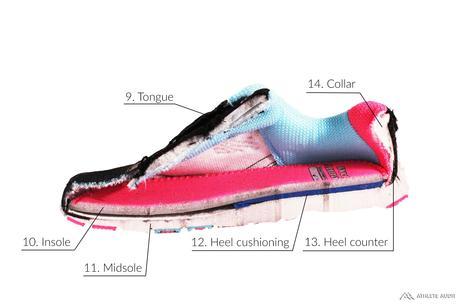
Anatomy of a Cross Training Shoe
 <>
<>
- Lining – A sock-like fabric in the inside of the shoe helps to add comfort
- Eyelets – Small holes toward the top of the upper keeps laces in place
- Lacing – Most cross trainers either use traditional laces or velcro for tightening
- Toe – The end of a shoe that is often reinforced for improved durability
- Toe cap – A patch of rubber at the very end of the toe improves durability and helps with dynamic movements
- Toe spring – The rise or upward curve in the forefoot that helps the foot roll forward
- Upper – Often made of lightweight, breathable materials such as mesh or synthetics
- Heel panel – The part of the shoe that covers the heel
- Tongue – Well padded and breathable for comfort
- Insole – A soft footbed helps to add comfort and support for your feet
- Midsole – Built similarly to a running shoe, the midsole will be thinner in the forefoot and thicker in the heel
- Heel cushioning – Some cross trainers will have additional heel cushioning for shock absorption
- Heel counter – A rigid, plastic insert behind the heel keeps the structural integrity of the heel
- Collar – A padded collar adds comfort and ankle support
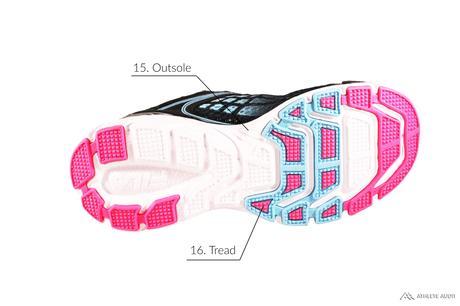
- Outsole – The rubber used on the bottom of a shoe provides traction
- Tread – Compared to running shoes, cross training shoes will have flatter tread that works for a variety of sports
Anatomy of a Cycling Shoe
 <>
<>
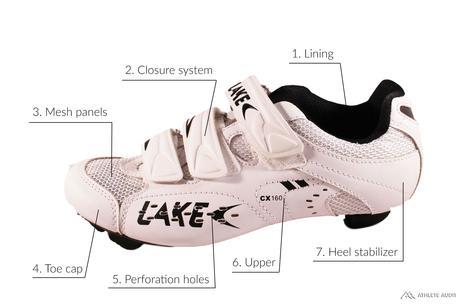
- Lining – A soft lining on the inside of the shoe helps to improve comfort
- Closure system – The most popular lacing options include velcro, ratchets, and BOA lacing, although traditional laces can also be found
- Mesh panels – Some cycling shoes have mesh panels that increase ventilation throughout the shoe
- Toe cap – A reinforced toe cap is sometimes added for increased durability
- Perforation holes – Keeps the shoe breathable while cycling, some shoes have strategically placed holes for maximum ventilation
- Upper – Often made of lightweight materials such as mesh, plastic, composites, or synthetics
- Heel stabilizer – Used to keep the heel stable and secure
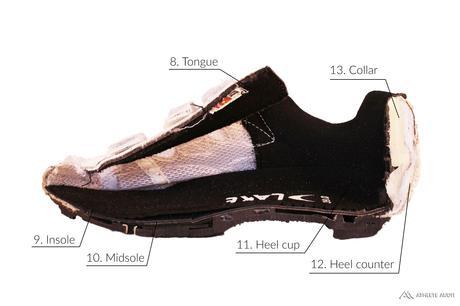
- Tongue – Often thin yet breathable for optimal comfort
- Insole – A footbed for your feet that improves comfort and support
- Midsole – A thin midsole helps to keep the shape of the shoe
- Heel cup – A narrow heel cup ensures that no heel lift is experienced while cycling
- Heel counter – A rigid plastic insert located behind the heel that keeps the structure of the heel from collapsing
- Collar – A padded collar helps to improve ankle support and overall comfort
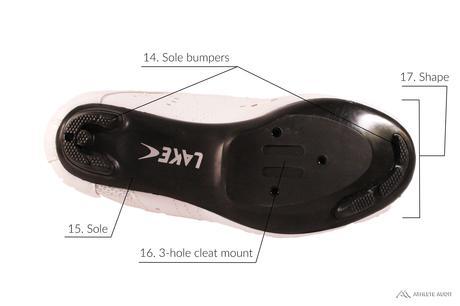
- Sole bumpers – Bumpers on the heel and toe help you walk when not cycling (and also to prevent damage to the sole)
- Sole – The sole of a cycling shoe is extremely stiff to maximize power transfer; made of either plastic, carbon fiber, or a combination of both
- 3-hole cleat mount – This is where your cleat attaches to your shoe via bolts. Uses Look-style cleats
- Shape – A narrow shape ensures a snug fit in the heel, arch, and forefoot
Learn how to choose cycling shoes here
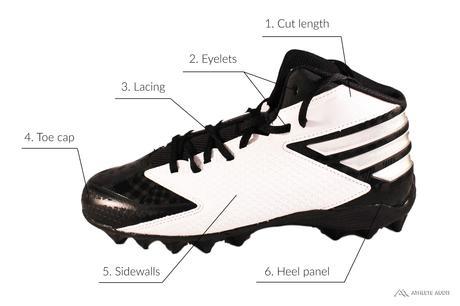
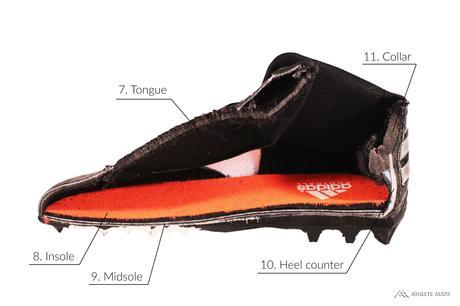
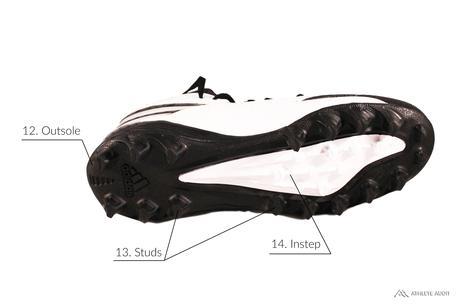
Anatomy of a Football Cleat
 <>
<>
- Cut length – Football cleats can come in low-cut, mid-cut, and high-tops, each with varying levels of mobility and ankle support
- Eyelets – Holes near the top of the upper keeps laces in place
- Lacing – Traditional laces are most common although some cleats may have ankle straps for support
- Toe cap – A tough toe cap helps to increase durability and provide additional protection
- Sidewalls – The sidewalls of football cleats are very rigid to provide lateral support and protection
- Heel panel – The section of the shoe that covers the heel
- Tongue – Padded and comfortable
- Insole – The footbed of a shoe that helps to provide comfort and support and can sometimes be removable
- Midsole – A thin but stiff midsole allows you to feel the ground without pressure points from the studs
- Heel counter – A hard plastic insert located behind the heel that keeps the heel from collapsing
- Collar – A padded collar helps to keep your foot in place while increasing comfort
- Outsole – Often made of molded plastic or rubber, the outsole houses the studs
- Studs – Strategically placed studs provide traction on football fields; can be made of either hard plastic or rubber
- Instep – The arched middle area of the shoe
Learn how to choose football cleats here
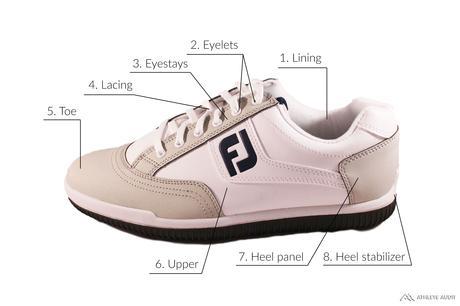
Anatomy of a Golf Shoe
 <>
<>
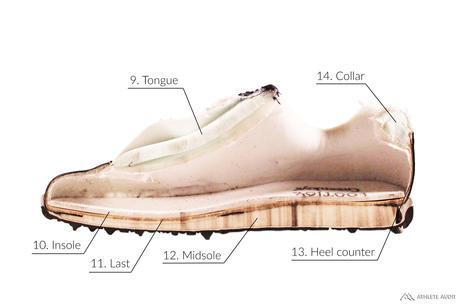
- Lining – Provides added comfort on the inside of the shoe in the form of a sock-like lining
- Eyelets – Small holes in the eyestay guides the laces in place
- Eyestays – Houses the eyelets and laces
- Lacing – Traditional laces offer the most adjustability in tension although velcro can also be found
- Toe – The end of a golf shoe, oftentimes clean and unembellished
- Upper – Traditional golf shoes use real leather for the upper although modern golf shoes often feature synthetic leather, Gore-tex, mesh, or polyester
- Heel panel – The piece of fabric that covers the heel of the shoe
- Heel stabilizer – Keeps the heel stable and secure
- Tongue – A padded tongue helps to improve comfort and fit
- Insole – The footbed of a shoe that provides comfort and support, can sometimes be removed so you can add your own orthotic insoles. Many golf shoes use memory foam insoles
- Last – The piece underneath the insole that a shoe is built around; largely affects the shape of the shoe
- Midsole – Lies between the last and outsole, golf shoe midsoles resemble walking shoes in that they are thin in the forefoot and thicker in the heel area
- Heel counter – The hard plastic insert located behind the heel that provides structural integrity for the heel
- Collar – A padded collar helps to provide ankle support, comfort, and keeps your foot in place
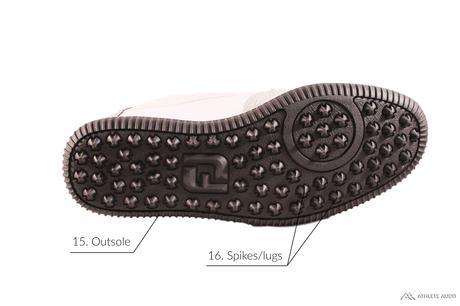
- Outsole – A durable rubber outsole can be found on the bottom of a golf shoe
- Spikes/lugs – Golf shoes feature either plastic spikes or rubber lugs that help to provide traction on different lengths of grass, hills, and even sand
Learn how to choose golf shoes here
Anatomy of a Hiking Boot
 <>
<>
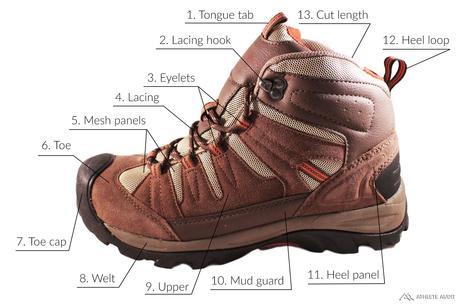
- Tongue tab – Helps to lift up the tongue for easy foot insertion
- Lacing hook – An open lace hook makes it easier to tighten/loosen boots
- Eyelets – Holes near the top of the upper guides laces into place
- Lacing – Durable, rounded laces stand up against the abuse of mother nature
- Mesh panels – Some hiking boots feature mesh panels that add ventilation
- Toe – The end of a hiking boot, oftentimes reinforced for added durability
- Toe cap – A rubber toe cap helps to improve durability as well as scrambling on rocks
- Welt – A strip of leather or rubber around the perimeter of the outsole, helps attach the outsole to the upper
- Upper – Usually made of tough materials such as leather or synthetic leather
- Mud guard – Helps to keep mud from plastering the upper
- Heel panel – The piece of fabric that covers the heel
- Heel loop – Can be used to make slipping on the boot easier or attaching to a carabiner for carrying
- Cut length – Hiking boots often refer to mid-tops or high-tops, while hiking shoes are often low-cut for added mobility
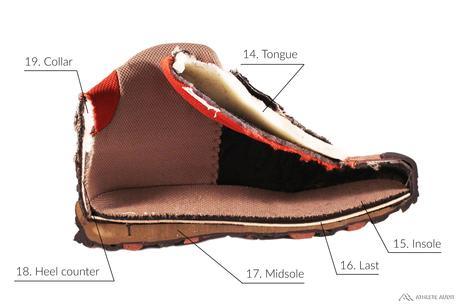
- Tongue – Heavily padded for increased comfort and protection
- Insole – The footbed of the boot, provides comfort and support for the feet
- Last – What a boot is built around; affects the shape and width of the boot
- Midsole – The cushioning located between the insole and outsole, is thick and firm
- Heel counter – The plastic insert behind the heel that provides structure and support for the heel
- Collar – A padded collar provides comfort and ankle support
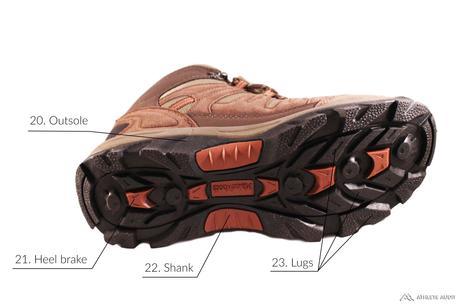
- Outsole – A durable rubber outsole can be found on the bottom of a hiking boot
- Heel brake – Specific lug pattern helps to provide extra traction when braking with the heel
- Shank – Some hiking boots have a shank between the insole and outsole to provide support and structure. Helps to relieve load on hiker’s feet and calves
- Lugs – Deep, protruding rubber lugs help to provide traction on a variety of terrain
Anatomy of a Lacrosse Cleat
 <>
<>
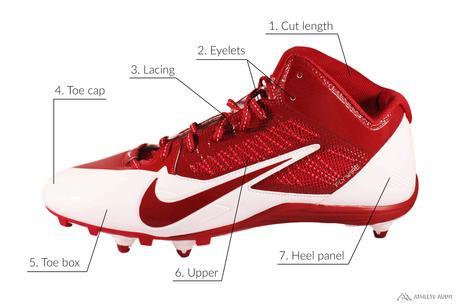
- Cut length – Lacrosse cleats come in either mid-top or high-top options, each with varying levels of mobility and ankle support
- Eyelets – Small holes toward the top of the upper help to guide the laces in place
- Lacing – Traditional laces are most common although some lacrosse cleats can have ankle straps
- Toe cap – A reinforced toe cap helps to improves durability
- Toe box – A flexible toe box is necessary for dynamic movements
- Upper – Uppers are made of tough materials such as leather or synthetic leather
- Heel panel – The piece of fabric that covers the heel portion of the cleat
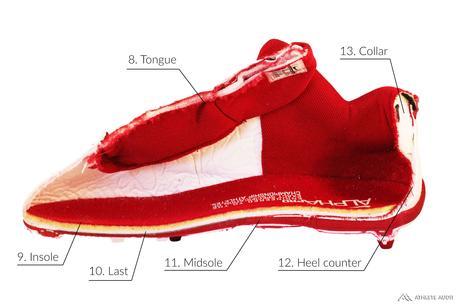
- Tongue – A padded tongue helps to provide comfort and a snug fit
- Insole – The footbed that your feet rests on, helps to provide comfort and orthotic support
- Last – Lies underneath the insole and is what a shoe is built around. Determines the shape of the shoe
- Midsole – A thin midsole allows you to feel the ground underneath you without pain from pressure points
- Heel counter – A sturdy plastic insert behind the heel that provides structural support for the heel
- Collar – A padded collar provides comfort and ankle support
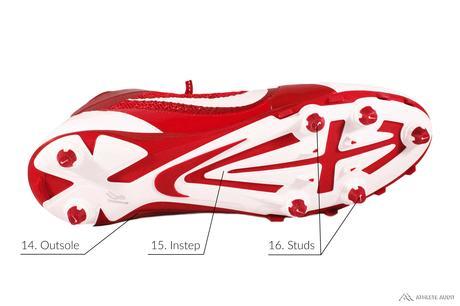
- Outsole – Often made of molded plastic or rubber, the outsole houses the studs
- Instep – The arched middle area of the cleat
- Studs – Plastic or rubber studs are strategically placed to provide optimal traction on fields. Many cleats feature removable studs
Anatomy of a Mountain Biking Shoe
 <>
<>
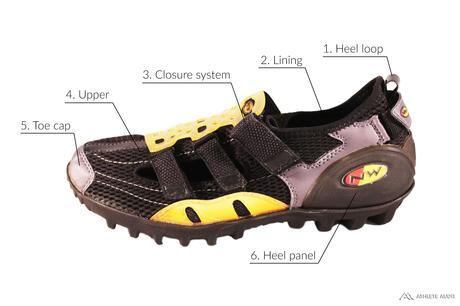
- Heel loop – Helps to make putting on the shoe easier
- Lining – The sock-like fabric on the inside of the shoe; increases comfort
- Closure system – Mountain bike shoes either use traditional laces, velcro, ratchets, or BOA lacing
- Upper – Uppers can be made of a variety of materials, such as mesh, leather, synthetics, microfibers, or Gore-tex. Mountain bike shoes are usually either made to be very breathable or very resistant to water
- Toe cap – Increases the durability of the shoe and helps to make walking easier
- Heel panel – Covers the heel portion of the shoe
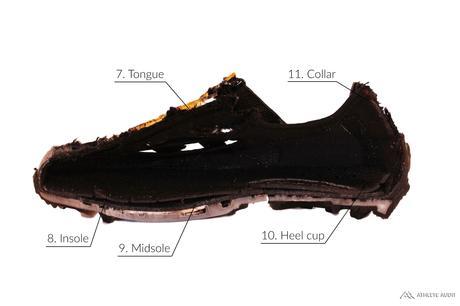
- Tongue – Can either be thin and breathable or padded for protection
- Insole – Essentially pillows for your feet; increases comfort and support
- Midsole – A thin midsole helps to keep the structure of the shoe and prevents pressure points
- Heel cup – Helps lock in the heel for pedaling efficiency
- Collar – A padded collar helps to increase comfort and provide extra protection for more aggressive biking disciplines
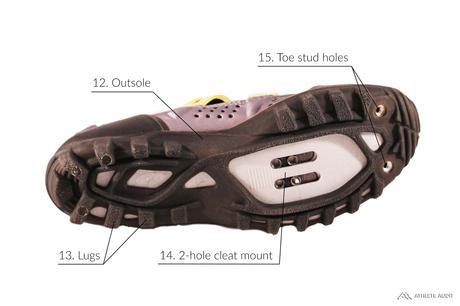
- Outsole – Often made of rubber, carbon fiber, nylon, vinyl, or plastic. The outsole should be stiff enough for pedaling efficiency while having a certain degree of flexibility for off-the-bike comfort
- Lugs – Deep, protruding lugs help provide traction for hike-a-bike action
- 2-hole cleat mount – The area where your cleat attaches to the shoe via bolts. Uses SPD cleats
- Toe stud holes – Additional studs for traction can be attached via the toe stud holes
Learn how to choose mountain biking shoes here
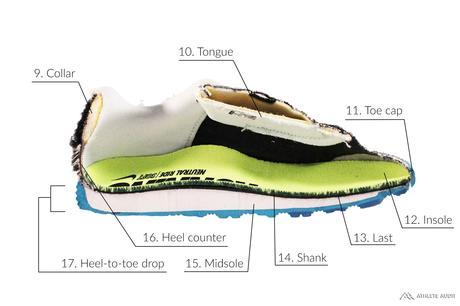
Anatomy of a Running Shoe
 <>
<>
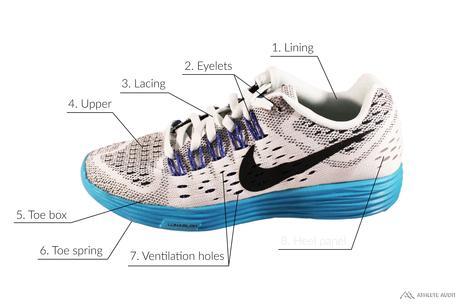
- Lining – The lining consists of a sock-like fabric that increases overall comfort
- Eyelets – Holes near the top of the shoe help to guide laces in place
- Lacing – Traditional laces are most common although you can also find velcro as well
- Upper – Lightweight and breathable, lots of running shoes feature mesh or thin synthetic leather uppers
- Toe spring – The rise or upward curve toward the front of the shoe that help the foot roll forward
- Toe box – Flexible to allow full range of motion of a gait
- Ventilation holes – Helps to make the shoe breathable so that moisture doesn’t build up
- Heel panel – The section of the shoe that covers the heel
- Collar – A padded collar improves comfort and ankle support
- Tongue – Fairly thin and breathable, also very comfortable
- Toe cap – Improves the durability of a running shoe and helps when lifting off the toe
- Insole – The footbed of a shoe. Very comfortable and offers orthotic support
- Last – Beneath the insole lies the last, which determines the overall shape of the shoe
- Shank – Some running shoes may incorporate a shank, which sits between the insole and midsole and provides rigidity for the sole
- Midsole – Essentially the main cushioning of a running shoe (usually foam-based). Thicker in the arch and heel area for more comfort and shock absorption
- Heel-to-toe drop – Refers to the difference between the height of the heel to the height of the toe, which affects how your foot strikes the ground
- Heel counter – A rigid plastic insert behind the heel that provides structural support for the heel
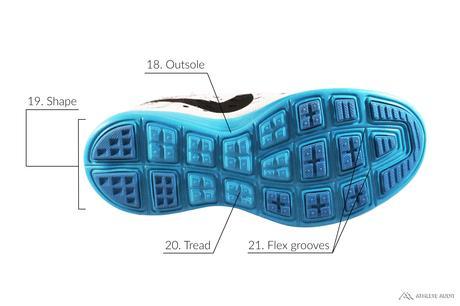
- Outsole – Refers to the rubber bottom of a running shoe. The outsole pattern can differ between road and trail runners
- Shape – Shaped by the last and determines how a shoe will fit in the heel, arch, and forefoot
- Tread – A unique tread pattern provides traction on a variety of surfaces
- Flex grooves – Helps to increase the flexibility of a shoe for full range of motion
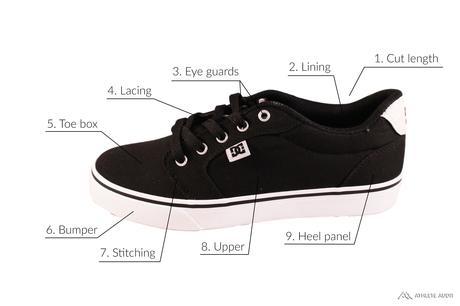
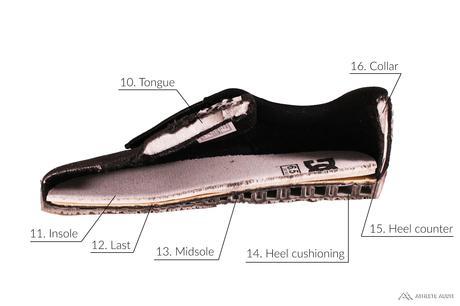
Anatomy of a Skate Shoe
 <>
<>
- Cut length – Skate shoes come in low-cuts, mid-tops, or high-tops, each with differing levels of mobility and ankle support
- Lining – The sock-like fabric inside the shoe helps to increase overall comfort
- Eye guards – Metal eye guards help to protect laces from ripping on grip tape
- Lacing – The majority of skate shoes will feature traditional laces, although some may have velcro straps or zippers
- Toe box – A flexible toe box helps to increase range of motion when bending the forefoot
- Bumper – Vulcanized skate shoes will feature a rubber bumper that wraps around the front of the outsole, providing extra durability and grip
- Stitching – Many skate shoes feature double or triple stitches for added durability against grip tape
- Upper – The most popular materials for skate shoe uppers are suede, pig suede, and synthetics. However, there are leather and canvas skate shoes as well but offer less performance
- Heel panel – The piece of fabric that covers the heel area of the shoe
- Tongue – A well-padded tongue helps to increase comfort and protection
- Insole – The footbed of the feet, extremely important for providing shock absorption and comfort. Most skate shoes will have a removable insole to add your own or even an additional one
- Last – Sits beneath the insole, determines the overall shape of the skate shoe
- Midsole – The midsole is located between the insole and outsole. Provides extra cushioning and is often made of EVA or foam
- Heel cushioning – Some skate shoes feature additional heel cushioning for harsh landings
- Heel counter – A rigid plastic insert sits behind the heel and provides structural support and protection
- Collar – A padded collar increases comfort and ankle support
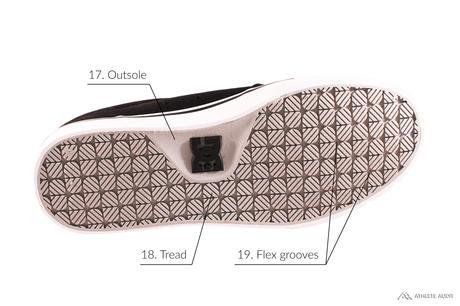
- Outsole – A grippy rubber outsole provides friction against grip tape for staying on your board
- Tread – Most skate shoes feature a herringbone tread pattern for maximum grip
- Flex grooves – Adds flexibility to a skate shoe when bending the forefoot
Learn how to choose skate shoes here
Anatomy of a Snowboard Boot
 <>
<>
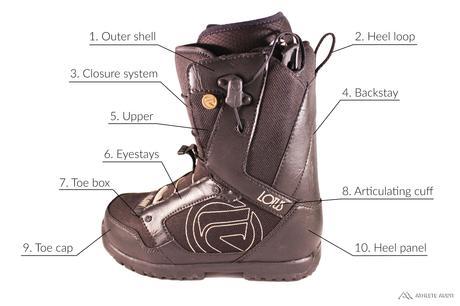
- Outer shell – The outer portion of a snowboard boot
- Heel loop – Helps to make slipping on the boot easier
- Closure system – You have three lacing options: traditional laces, quick lacing, or BOA lacing. Each has their own pros and cons
- Backstay – A stiff support on the back of the boot provides reinforcement. Prevents the boots from flexing backwards
- Upper – Often made of leather or synthetics, usually rugged and waterproof
- Eyestays – Boots with traditional laces will have eyestays to guide laces in place
- Toe box – A flexible toe box helps when bending the forefoot
- Articulating cuff – A flexible cuff helps to increase flexibility between the lower and upper sections of the boot
- Toe cap – Helps to increase durability as well as improves comfort when walking
- Heel panel – The fabric that covers the heel portion of a boot
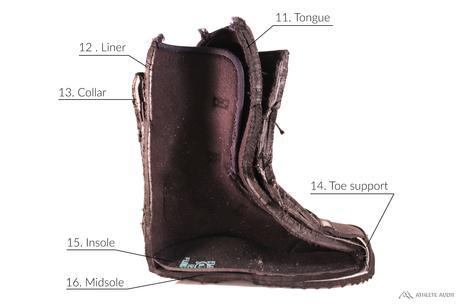
- Tongue – A well-padded tongue helps to increase comfort and fit. Stiffer boots will have stiffer tongues
- Liner – Refers to the inside of a snowboard boot, which provides insulation, comfort, and can be removed
- Collar – A padded collar increases comfort and ankle support
- Toe support – A rigid plastic insert can be added in the toe for improved protection
- Insole – The footbed of a shoe, increases comfort and orthotic support
- Midsole – The cushioning between the insole and outsole, often foam-based
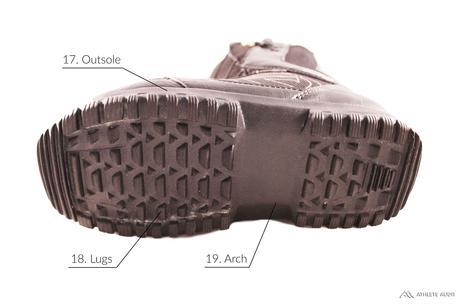
- Outsole – The rubber located on the bottom of the boot
- Lugs – Helps to provide traction when walking in snow, up hills, and other terrain
- Arch – The middle area of a snowboard boot. Sometimes additional arch support is present
Learn how to choose snowboard boots here
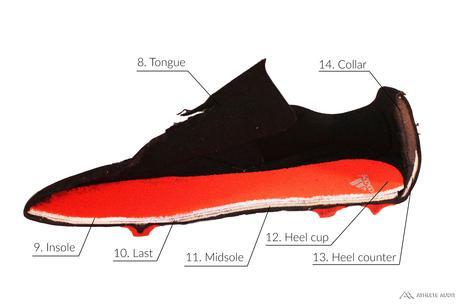
Anatomy of a Soccer Cleat
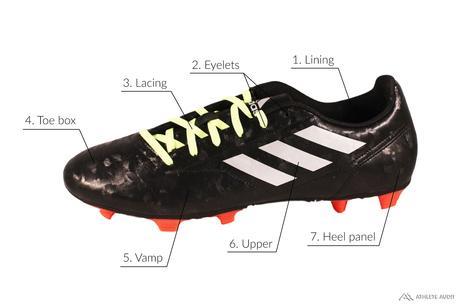
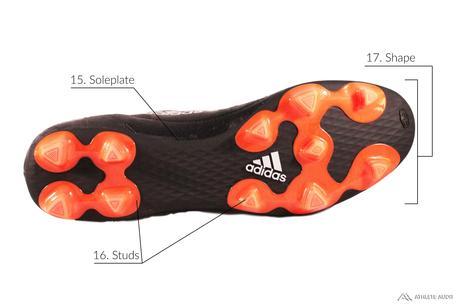 <>
<>
- Lining – The sock-like fabric on the inside of the shoe, improves comfort
- Eyelets – Holes in the upper help to keep the laces in place
- Lacing – Soccer cleats use traditional laces allowing for the most adjustment in fit
- Toe box – A flexible toe box allows for efficient running and dynamic movements
- Vamp – Covers the forepart of the cleat, provides excellent feel
- Upper – Thin, lightweight material such as leather, kangaroo leather, or synthetics is often used for a better feel
- Heel panel – The piece of fabric covering the heel
- Tongue – A thin tongue with minimal padding helps to improve feel
- Insole – The footbed of the cleat, provides comfort and support
- Last – Underneath the insole lies the last, which determines the shape of the cleat
- Midsole – The cushioning in-between the insole and outsole, thin which allows you to feel the ground more
- Heel cup – A snug heel cup helps to lock down the heel
- Heel counter – The rigid plastic insert behind the shoe that keeps the structural integrity of the heel
- Collar – A padded collar helps to improve comfort and fit
- Soleplate – A stiff, lightweight soleplate houses the studs
- Studs – Often made of molded plastic, provides traction on soccer fields
- Shape – Determined by the last, the shape of a cleat will affect the fit in the heel, arch, and forefoot
Learn how to choose soccer cleats here
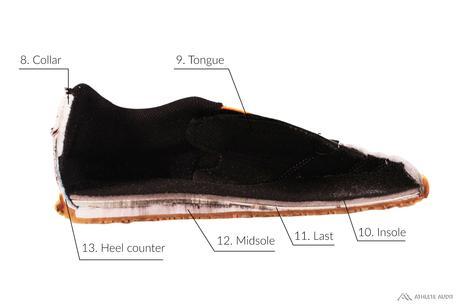
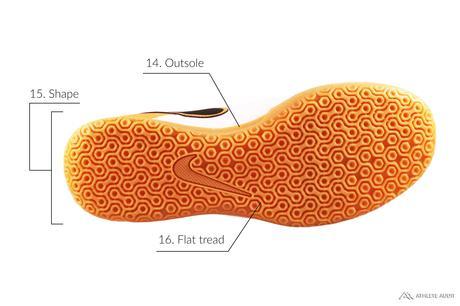
Anatomy of an Indoor Soccer Shoe
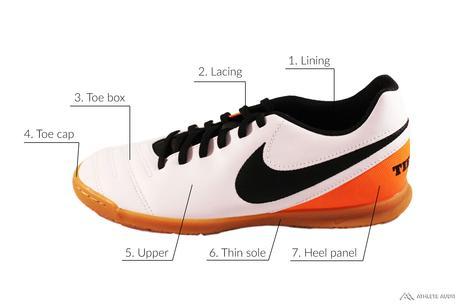
 <>
<>
- Lining – A sock-like fabric in the inside of the shoe helps to improve comfort
- Lacing – Traditional laces allow the most adjustment in fit
- Toe box – A flexible toe box allows for efficient running and dynamic movements
- Toe cap – Improves the durability of the toe and helps with the full motion of a gait
- Upper – Lightweight uppers are usually made of leather, kangaroo leather, or synthetic leather for superior feel
- Thin sole – Helps to increase how much you feel the ground underneath you
- Heel panel – The piece of fabric that covers the heel area of the shoe
- Collar – A padded collar helps to improve comfort and fit
- Tongue – A thin tongue with minimal padding helps to improve feel for the ball
- Insole – The footbed of the shoe, provides comfort and support. Some may be removable
- Last – Lies underneath the insole, determines the shape of the shoe
- Midsole – Located between the insole and outsole, provides cushioning throughout the foot. Relatively thin
- Heel counter – A tough plastic insert in the back of the shoe provides structural support for the heel
- Outsole – The rubber outsole on the bottom of the shoe that provides traction on smooth indoor courts
- Shape – Determined by the last, the shape affects how the shoe fits in the heel, arch, and forefoot
- Flat tread – Provides superior traction and optimal feel on indoor courts
Learn how to choose indoor soccer shoes here
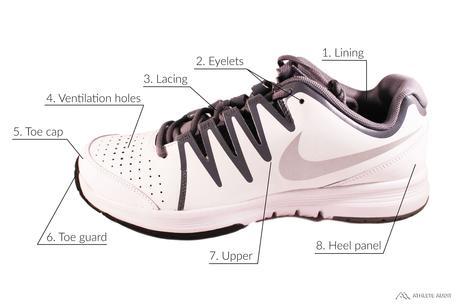
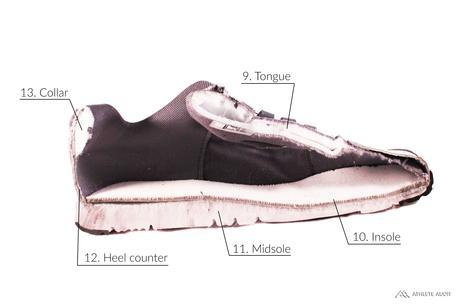
Anatomy of a Tennis Shoe
 <>
<>
- Lining – The fabric inside of a shoe. Very soft and meant to improve comfort
- Eyelets – Holes near the top of the upper guides shoelaces in place
- Lacing – Traditional shoelaces allow for the most adjustment in fit
- Ventilation holes – Helps to add breathability to a shoe
- Toe cap – Often reinforced for improved durability
- Toe guard – Protects the toe from abrasion to increase durability. Also helps your form when keeping on your toes
- Upper – Often made of leather, synthetic, or mesh that will allow full freedom of movement
- Heel panel – The piece of fabric covering the heel portion of the shoe
- Tongue – A lightweight, padded tongue helps to increase comfort and fit
- Insole – The footbed for your feet. Some can be removed to add your own orthotic insole
- Midsole – The cushioning in-between the insole and outsole. Often foam-based and thicker in the heel for optimal running
- Heel counter – A tough plastic insert in the back of the shoe that helps to support the heel
- Collar – A padded collar helps to improve comfort and fit
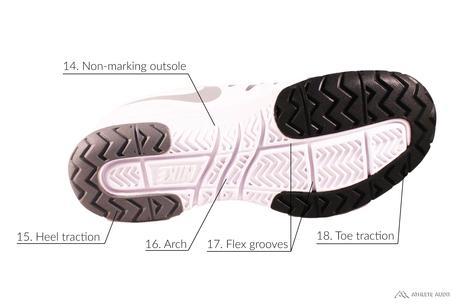
- Non-marking outsole – The bottom of the shoe that provides traction. A special non-marking rubber keeps courts streak-free
- Heel traction – Some tennis shoes have additional traction in the heel area for braking
- Arch – The middle area of a tennis shoe, could have arch support depending on model and insole type
- Flex grooves – Helps to increase the flexibility of the overall shoe when bending the forefoot
- Toe traction – Some tennis shoes have additional traction in the toe area for better grip when pivoting and staying on your toes
Learn how to choose tennis shoes here
Anatomy of a Track Spike
 <>
<>
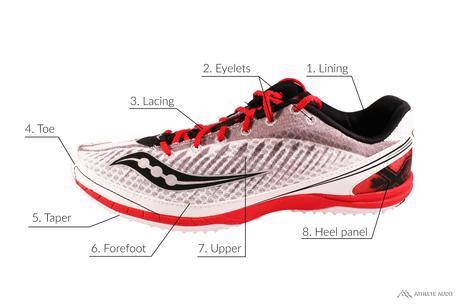
- Lining – The soft fabric on the inside of the shoe that helps to increase overall comfort
- Eyelets – Holes in the upper helps to keep the laces in place
- Lacing – Track spikes use traditional lacing for minute adjustments in tension
- Toe – The end of a shoe, often reinforced for added durability
- Taper – The rise or upward curve toward the front of the spike that helps the foot roll forward. Encourages “running on the toes”
- Forefoot – The area of the shoe that sits right below the toes. Must be flexible to allow full range of motion
- Upper – An extremely lightweight and thin upper is achieved through mesh, canvas, etc.
- Heel panel – The fabric that covers the heel portion of the shoe
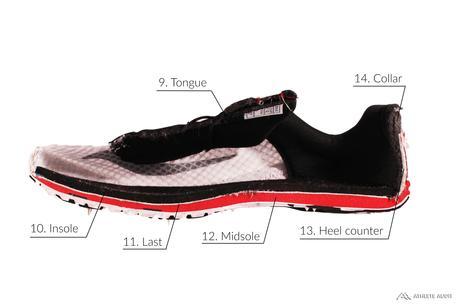
- Tongue – A thin and breathable tongue helps to improve comfort without adding superfluous weight
- Insole – The footbed of the track spike that provides comfort and support. Some can be removable
- Last – Sits beneath the insole. The last is what a track spike is built around and affects the overall shape
- Midsole – Located between the insole and outsole, provides cushioning via a foam-based material. Minimal midsole material is used to cut down on weight
- Heel counter – A rigid plastic insert in the back of the shoe that helps to provide structural integrity for the heel
- Collar – A thinly padded collar helps to add some comfort
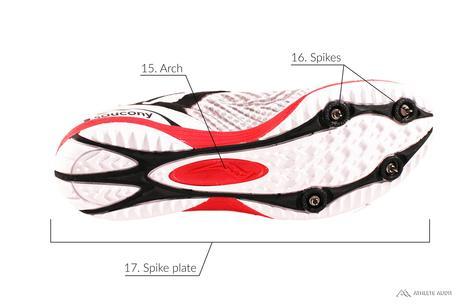
- Arch – The middle area of the track spike
- Spikes – The strategically placed pointed tips that provide traction on the track field. Can be made of metal, ceramic, or plastic
- Spike plate – The front of the sole contains a stiff spike plate that houses the spikes
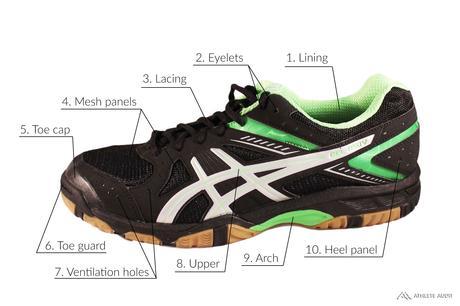
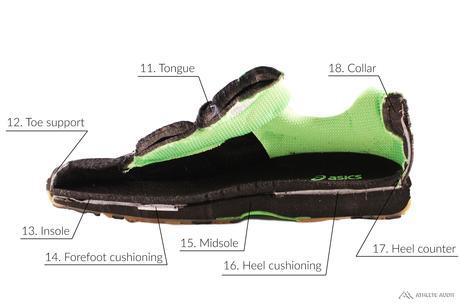
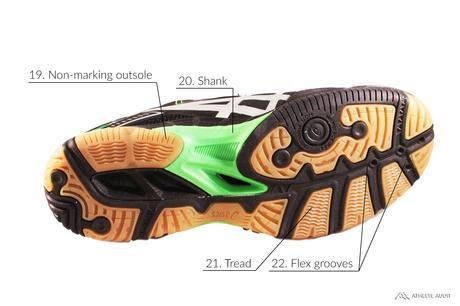
Anatomy of a Volleyball Shoe
 <>
<>
- Lining – A comfortable sock-like fabric sits on the inside of the shoe, covering the foot
- Eyelets – Holes on either side of the tongue that guides the laces in place
- Lacing – Traditional laces help provide the most adjustment in fit
- Mesh panels – Some volleyball shoes feature mesh panels that make the shoe more breathable
- Toe cap – Often reinforced for added durability, since most of the sport is played on the toes
- Toe guard – A rubber toe guard helps to improve durability while making it easier to stay on the toes
- Ventilation holes – Helps to add ventilation to get rid of moisture
- Upper – Often made of a tough material such as leather or synthetic leather for lateral stability
- Arch – The middle area of the shoe. Some volleyball shoes offer arch support
- Heel panel – The fabric covering the heel of the shoe
- Tongue – A well-padded tongue helps to increase comfort, fit, and protection
- Toe support – Some volleyball shoes have additional toe support in the form of a plastic insert
- Insole – The footbed of the shoe, adds comfort and orthotic support. Some can be removed
- Forefoot cushioning – Some shoes make use of forefoot cushioning for harsh landings on the forefoot
- Midsole – Lies between the insole and outsole, provides cushioning and shock absorption. Thicker in the heel like a running shoe
- Heel cushioning – Cushioning in the heel can be added for harsh landings on the heel area
- Heel counter – A rigid plastic insert in the back of the shoe that provides structural support for the heel
- Collar – A nicely padded collar helps to improve comfort and fit
- Non-marking outsole – The bottom of the shoe that provides traction. A special non-marking rubber helps to provide superior traction without streaking the court
- Shank – Some volleyball shoes make use of a shank, which is an insert between the insole and outsole that provides support
- Tread – A herringbone tread pattern provides a ton of grip on slick volleyball courts
- Flex grooves – Helps to add flexibility to the shoe, which is very important since volleyball is such a dynamic sport
Learn how to choose volleyball shoes here
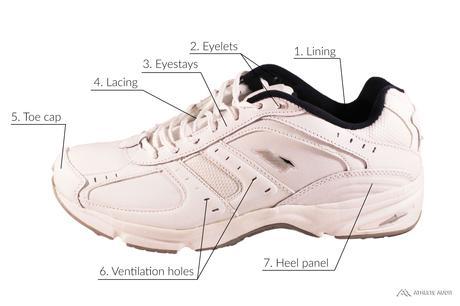
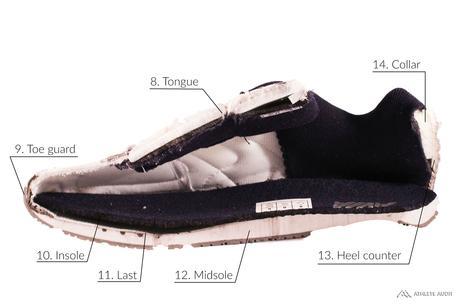
Anatomy of a Walking Shoe
 <>
<>
- Lining – The soft fabric located inside of the shoe. Improves overall comfort
- Eyelets – Small holes on either side of the tongue that guides the shoelaces in place
- Eyestays – The strips of fabric that houses the eyelets and laces
- Lacing – Most walking shoes will use either traditional laces or velcro
- Toe cap – The end of the shoe. Often reinforced for added durability
- Ventilation holes – Helps to make the shoe more breathable and eliminate moisture
- Heel panel – Fabric that covers the heel portion of the shoe
- Tongue – A well-padded tongue helps to improve comfort and overall fit
- Toe guard – A rubber toe guard that rises above the outsole helps to increase durability and makes walking easier
- Insole – The footbed on which the feet rest on. Provides comfort and orthotic support
- Last – Sits below the insole, the last is what the rest of the shoe is built around. Determines the shape of the shoe as well
- Midsole – The abundant cushioning found in-between the insole and outsole. Often foam-based and thicker in the heel
- Heel counter – The rigid plastic insert in the back of the heel that helps provide structural support for the heel
- Collar – A well-padded collar helps to improve comfort and ankle support
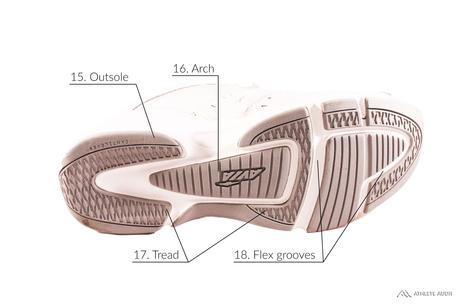
- Outsole – The bottom of the walking shoe that provides traction
- Arch – The middle area of the shoe. Often has arch support for more comfortable walking
- Tread – A herringbone tread pattern helps provide superior traction on a variety of surfaces
- Flex grooves – Improves the flexibility of the shoe for full range of motion
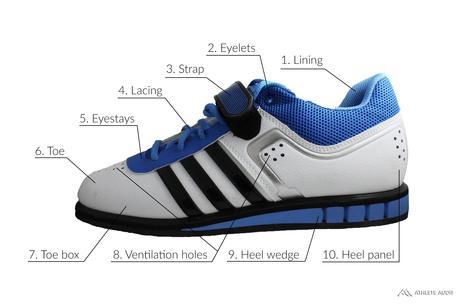
Anatomy of a Weightlifting Shoe
 <>
<>
- Lining – The sock-like fabric on the inside of the shoe that increases overall comfort
- Eyelets – Small holes in the eyestay guide the shoelaces in place
- Strap – Many weightlifting shoes have ankle straps for increased comfort and foot lockdown
- Lacing – Traditional laces are the most common lacing option, although velcro is also available
- Eyestays – Keeps the eyelets and laces in place
- Toe – The very end of the shoe
- Toe box – Should be fairly flexible and slightly roomy to allow full flexion
- Ventilation holes – Helps to make the shoe more breathable and eliminate excess moisture
- Heel wedge – The raised heel of a weightlifting shoe, which reduces the amount of dorsiflexion needed from the ankle when lifting
- Heel panel – The fabric covering the heel portion of the shoe
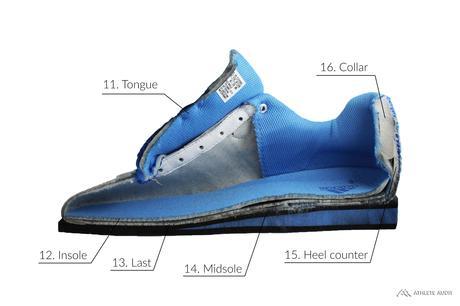
- Tongue – A thin and comfortable tongue helps to improve fit
- Insole – The footbed of the shoe, provides comfort and orthotic support
- Last – Sits below the insole and is what a weightlifting shoe is built around. Determines the shape of the shoe
- Midsole – The cushioning located between the insole and outsole, in this case incorporating the heel wedge
- Heel counter – The rigid plastic insert in the back of the shoe that provides additional support for the heel
- Collar – A well-padded collar helps to improve ankle support and ensures that the foot is locked in
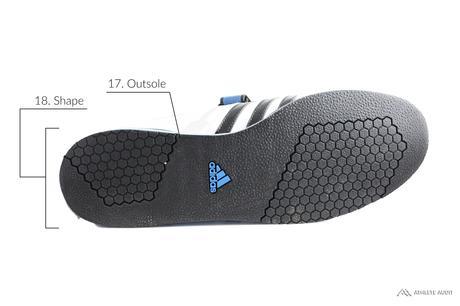
- Outsole – A flat, extremely stiff outsole provides a good platform on which to lift from
- Shape – Determined by the last, weightlifting shoes will fit more snugly in the heel and arch
Learn how to choose weightlifting shoes here
Anatomy of a Wrestling Shoe
 <>
<>
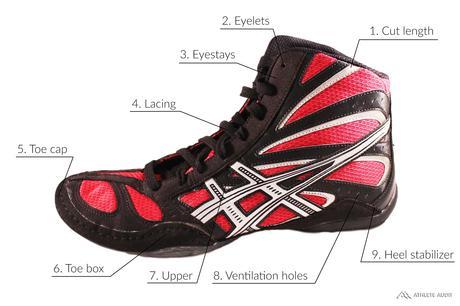
- Cut length – Wrestling shoes come in either mid-cut or high-tops for additional ankle support. Mid-cuts allow for a little more freedom of movement with less ankle support and vice versa
- Eyelets – Small holes in the eyestay helps to guide the shoelaces in place
- Eyestays – Strips of material on either side of the top of the upper houses the eyelets and laces
- Lacing – Traditional laces allow the most adjustment in fit in different zones of the shoe
- Toe cap – A reinforced toe cap improves durability
- Toe box – A fairly flexible toe box allows for dynamic movements and positions
- Upper – Often made of a combination of materials, including leather, synthetics, and mesh
- Ventilation holes – Keeps the shoe breathable while eliminating excess moisture
- Heel stabilizer – Keeps the heel from moving around too much
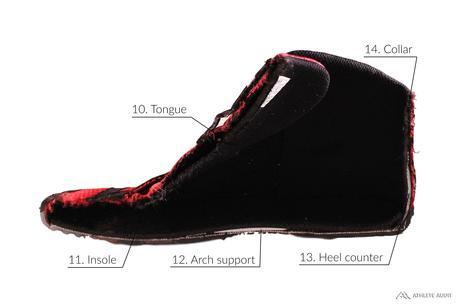
- Tongue – A thinly padded tongue allows for more movement
- Insole – The footbed of the shoe that improves comfort and support. Some can be removed for you to add your own
- Arch support – Some wrestling shoes can have arch support for more comfort
- Heel counter – A firm plastic insert in the back of the shoe that provides structural integrity for the heel
- Collar – A thinly padded collar helps to increase freedom of movement
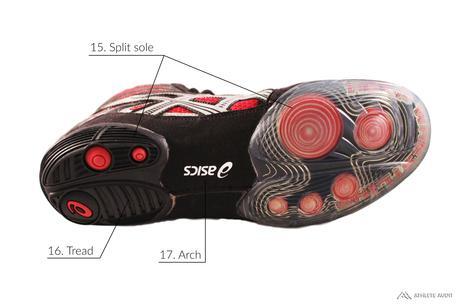
- Split sole – Wrestling shoes either have a split sole or a unisole, each with its own pros and cons. Split soles allow more flexibility while unisoles provide more stability and durability
- Tread – Helps to provide traction on the wrestling mat
- Arch – The middle area of the shoe. Will be bare on split sole shoes
Learn how to choose wrestling shoes here

