This calming pose is a great way to stretch your inner legs, the backs of your legs, your buttocks, and you back muscles, as well as to tone and strengthen the muscles at the on the fronts of your hips and legs. Because it is a partial inversion, this pose is very calming and can trigger the relaxation response if you hold the pose for several minutes.
The tripod head/hand positioning in the classic version of this pose can be a good preparation for arm balances, especially like Crane (Bakasana) and Side Crane (Parsva Bakasana) where you balance with arms bent, as well as for working towards the tripod version of Headstand, Sirsasana 2.
Baxter prescribes this pose for:
- Tight inner thigh muscles
- Tight hamstrings
- Tight hips
- Tension in the back muscles that line the spine
- Weak legs
- Quieting the nervous system
Cautions: Those with tight hips or lower back pain should avoid the classic version and try versions 2, 3 or 4. Those with untreated high blood pressure, do version 3 with the torso and head parallel to floor or hold the other versions for only four breaths. Those with osteoporosis, do versions 3 and 4 only.
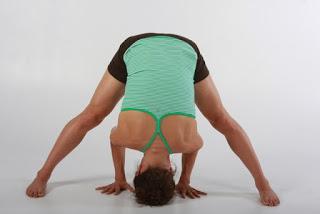
Version 1: Classic Pose

Now tuck your chin and release the crown of your head down to or near the floor, and bring your hands and head in a tripod arrangement, with your hands well behind your head and bend your elbows so there is a 90-degree angle between upper arms and forearms.
While in the pose, keep your legs active, press your hands into the floor, firm your elbows in toward each other, and lift your shoulder blades away from the floor, maintaining a smooth and even breath.
To move out of the pose, lift your head and chest up a bit and walk your hands forward to a straight arm position with hands under shoulders. Then, with firm legs, bring your hands to your hips as you swing your torso up to vertical. Finally, step your feet back together into Mountain pose.
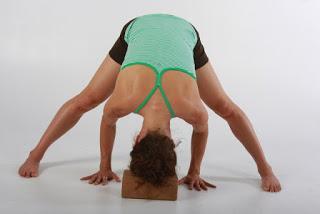
Version 2: Head Support
Stand in Mountain pose and place a block on its highest height about one foot in front of your feet. From there, follow the steps for the classic version, bringing the crown of your head onto the block instead near or onto the floor. If needed, adjust the block to the better height for you, one that allows you to lightly and easily rest your head on it.
While in the pose, keep your legs active, press your hands into the floor, firm your elbows in toward each other, and lift your shoulder blades away from the floor, maintaining a smooth and even breath.
To move out of the pose, follow the steps for the classic version.
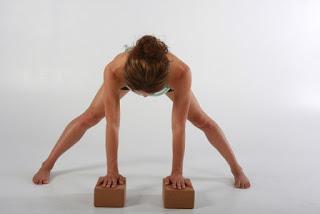
Version 3: Neutral Spine
To come into the pose, follow the steps for the classic version. But as you tip forward from your hips, only come down halfway until your torso is parallel with the floor. Place your hands on the floor under your shoulders.
While in the pose, press your hands firmly down into the floor, while lifting your breastbone up away from it. Lengthen from your tailbone to the crown of your head while keeping your legs straight and strong, maintaining a smooth and even breath.
To move out of the pose, follow the steps for the classic version.
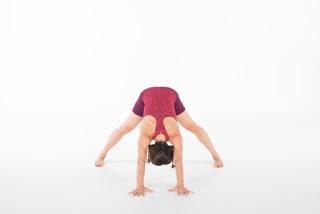
Version 4: Downward-Facing Dog Arms
To come into the pose, follow the steps for version 3. Then, keeping your hips directly over the line of your heels, walk your hands 4-6 inches forward as you tip your hips forward over your legs. If your shoulders are still above the line between your hips and hands, walk your hands forward a few more inches until there is a straight line from hips to hands. Float your head evenly between arms arms.
While in the pose, lengthen from your hands back towards your hips while keeping your legs straight and strong, maintaining a smooth and even breath.
To move out of the pose, walk your hands back about 6-12 towards your feet about, with chest lifted. When back to version 3 of the pose, follow the steps for the classic version. P.S. Thanks to Melina Meza for the photographs!
Subscribe to Yoga for Healthy Aging by Email ° Follow Yoga for Healthy Aging on Facebook ° Join this site with Google Friend Connect
