Probably you know it.
It is one of the best WordPress form builder plugin available in the market. We are using the same plugin here on our blog and always recommend it to our readers. With the WPForms WordPress plugin, you will be able to create any type of form you want.
From simple contact forms to payment forms!
If you are an active customer of WPForms or planning to purchase WPForms, we have got something for you. In this tutorial, we are going to show you WPForms tutorials to create 12 types of forms. These 12 are basic types of forms you could create.
However, the form is not restricted to create only these types of forms.
WPForms
WPForms is one of the popular WordPress form builder plugins out there. The folks from Awesome Motive, Inc created this plugin. They are the same company behind plugins like OptinMonster, MonsterInsights, SeedProd, etc.
Anyway, WPForms is a freemium WordPress plugin. The free version (WPForms Lite) can be purchased from the WordPress plugin repository. The free version is suitable for beginners.
But, when you need more powerful integration facilities and features, you might want to consider checking out the premium version plugin. Because, they have added so many advanced features like file upload, conditional logic, conversational forms, etc. in the plugin.
Plus, integration with popular email marketing services and payment gateways like PayPal and Stripe.
Both the free and premium version comes with a drag and drops form building wizard. So, you will be able to create forms without writing a single line of code. If you need to know more about WPForms, we do have an unbiased WPForms review here.
On top of that, WPForms is also optimized for Gutenberg. So if you are using the Gutenberg editor on your blog or website, you could easily use the WPForms block for embedding forms.
WPForms Tutorials
Here, we have collected 12 unique ways WPForms can help you to build better forms. I am pretty sure that you can create what you need by following this tutorial.
But, before getting started with those tutorials, we want you to install the Form Templates Addon.
By using it, you will get access to their pre-made WordPress forms. This will save you a lot of time.
The addon is available in premium versions only! We recommend you use it! If you haven’t got a WPForms membership yet, make use of our affiliate link.
Buy WPForms
$This is an affiliate link
How To Activate Form Templates Addon?
The first thing you need to do is, install, and activate the WPForms premium version in your blog. Plus, verify the plugin with your license key. It can be done from your WPForms settings page.
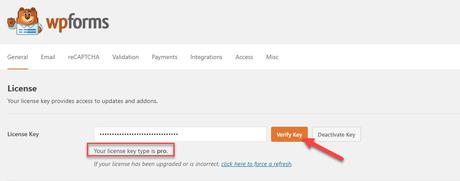
Now, you will get future updates and access to all their add-ons. Under the WPForms plugin settings, you could see the add-on’s settings.
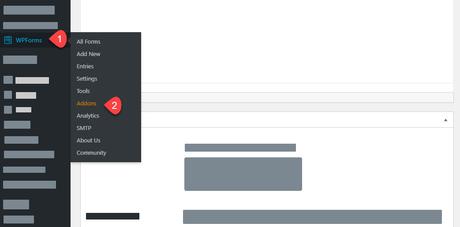
Select the option, and you could see all the available add-ons according to your current plan.
In the search bar, search for Form Templates.
Then you can see the add-on on the results page. Simply install it on your WordPress blog.
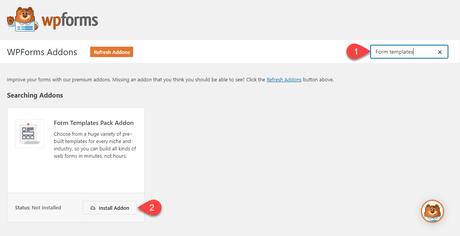
Once this add-on got installed, it will be activated automatically.
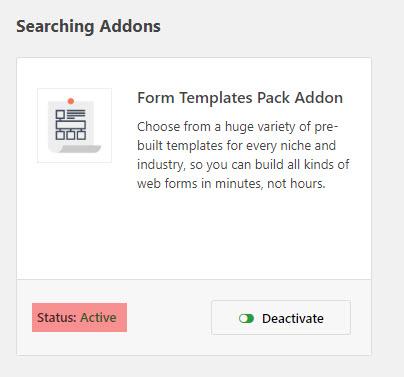
That’s it.
This is how you can install and activate the form templates add-on on your blog. So when you need to create a form, you could choose a pre-made template from the builder!
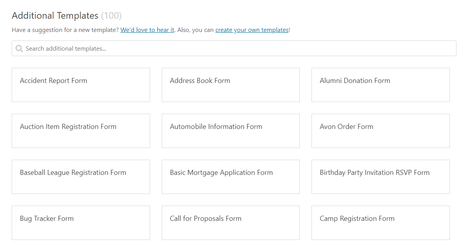
You can use the search bar for finding out the pre-made forms. Then you can insert it to your form building wizard.
Choose the form you want to create
The rest of the guide is going to be very lengthy. So we recommend you to choose the form you want to create from this list.

Contact Form

Feedback Form

Post Submission Form

User Registration Form

Login Form

Appointment Form

Job Application Form

Order Form

Donation Form

Email Subscription Form

File Upload Form

Multi-Page Form
How To Create A Contact Form In WordPress?

Let’s start with a basic contact form.
Usually, we need to use HTML for creating the form fields we need, style the form with CSS. Anyway, if you are a beginner, you probably want to hire a freelancer for doing it. If you think you can learn it first and create your form, it’s possible.
But it would take some time.
As you running a live business, you need to save your time. And that’s where WPForms is going to help you. With WPForms, you can create any type of contact form in just 3 minutes or less.
Here in this section, we are going to show you how you can create a sample contact form in your WordPress blog. Go to the form builder. And, name your contact form.
In our case, we are keeping it as a sample contact form.
Since we have installed and activated the form templates add-on, we have got hundreds of pre-made templates in our blog. We can choose one from there or start with a blank template.
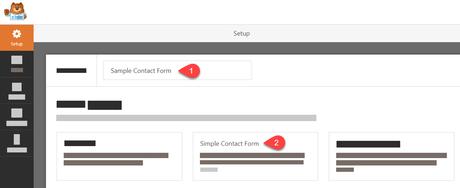
In a general contact form, you just need fields like:
- Name.
- Email.
- Message.
Etc.
In the pre-made form, you will get these fields.
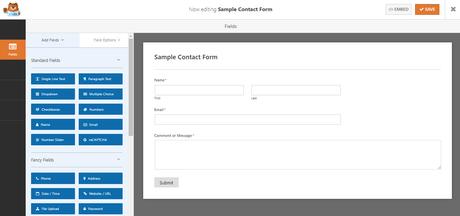
On the left side, you can see all the available fields. In our case, we are using the Pro version of WPForms. So, we will get access to most WPForms fields. If you are using the free version, you will get some limitations in the fields, email marketing integration, payment gateway, etc.
The right side will show you a live preview of the form. Every change you make will be reflected in the preview mode instantly.
You can always add new fields to the form, remove fields from the form. In this demo, the fields are good enough for a typical contact form.
The next configuration is with the notification settings.
You can add multiple to emails in the field. Using comma, you can do it. Just keeping the admin email would be great. So the emails will be delivered to the email associated with your WordPress blog.
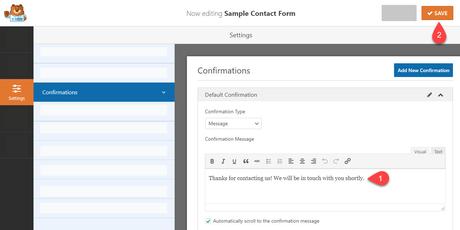
Once the submission got successful, you need to display a message to the sender and let him know we have received the email. From the WPForms confirmation settings, we can do it.
You can add a personalized message in the form. Or, you can redirect the visitor to a page you have on your website or to a custom URL. Make the necessary changes.
We are good. So ahead and save it.
We have saved the form to our database. It’s time to embed it into a page. No matter you are using the Gutenberg editor or the old classic editor. As I mentioned in the beginning, WPForms is optimized for both Gutenberg and the classic editor.
So, you can use the Gutenberg block or the form’s shortcode to embed the form to a page/ post or custom post type. In our website, we have added the Classic Editor plugin and allowing authors to shift editors.
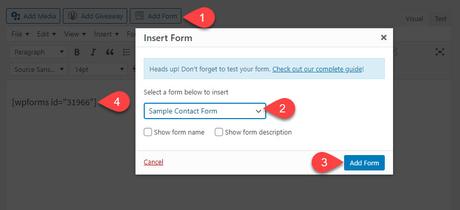
Go to the page where you need to display the form. Here, we have created a test page for demo purposes. There, you could see a button called add form.
From the dropdown, choose the contact form we just created. Plus, there are options available for displaying the form name and description. We don’t need to do that. After choosing the right form, insert it to the page.
A shortcode would appear on the page.
You don’t need to make changes to the shortcode. But, you can add content to that page in a new paragraph or before the shortcode, just like you adding content to the contact page.
Once you have done that, publish or update the page.
Check the page from the frontend.
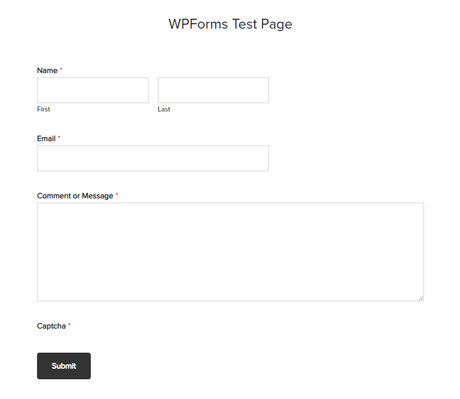
It’s working.
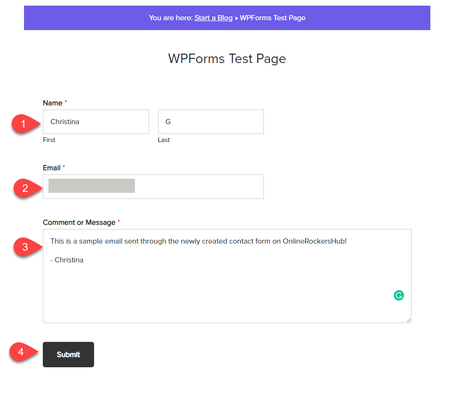
If you want to test the form, just send a sample email through the form.
Soon, you will see the success message.

The email will be delivered to the admin email. Plus, with the form entries feature, we can view all the emails we got from the WordPress dashboard.
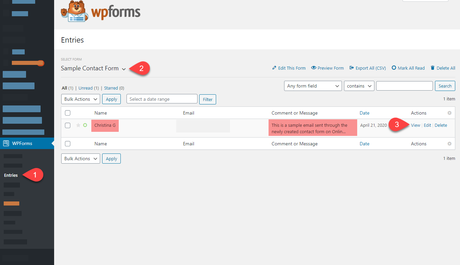
You can click on the view link for the whole email submission.
Everything is working fine!
Replying to the conversation is not possible from this section. For that, you need to login to your email address, reply to the discussion.
This way, you can create as many contact forms as you need. There are no limitations in that!
Create a Contact Form with WPForms
$This is an affiliate link

Did you find the article useful?
Then pin me to your Pinterest Board, so that more people will find me
(Remember: The more you give to the Universe, the more you will get from the Universe)
How To Create A Feedback Form In WordPress?

Adding a customer feedback form to your WordPress blog is a good idea. When you are selling something products or offering services to people, you must add a feedback form and collect user feedback.
This way, you can know where and how you can improve your overall performance. With the WPForms plugin, you will be able to create a feedback form.
For doing that, we can use a pre-made template they have called suggestion form. Go to the form builder, name your form, and choose the suggestion form template.
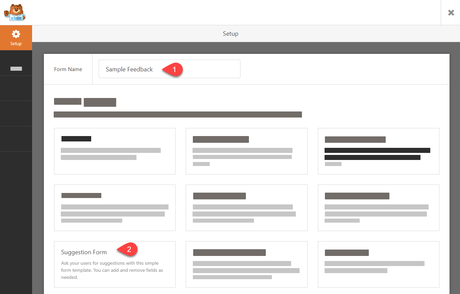
A sample form will be opened with fields like:
- Name.
- Email.
- Multiple Choice.
- Single-Line Text.
- Paragraph.
Etc.
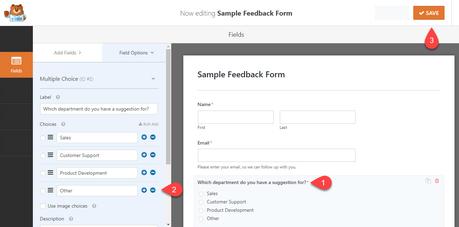
Let’s say that you are offering a WordPress maintenance service agency. So your agency might have multiple departments like billing, technical, support, general, etc. You can click on the multiple-choice field, edit it.
Plus, you can always add or remove fields.
If you have done customizing, save the form.
Just like we embedded the other forms, you can use the Gutenberg block or using the form specific shortcode.
And you will see the form in the frontend.
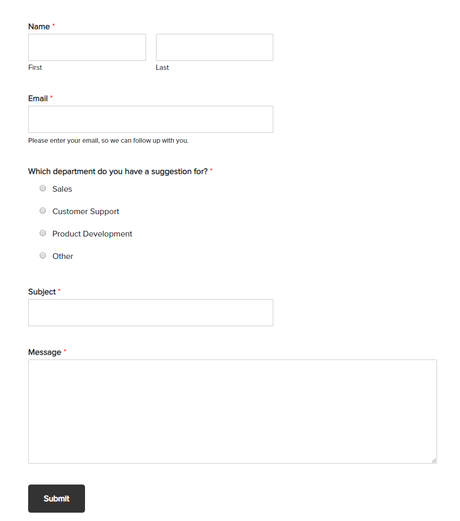
That’s it!
Create a Feedback Form with WPForms
$This is an affiliate link

Did you find the article useful?
Then pin me to your Pinterest Board, so that more people will find me
(Remember: The more you give to the Universe, the more you will get from the Universe)
How To Create A Post Submission Form in WordPress?

When we need to create a post in a WordPress blog, we probably need an author account, log in to the blog, create the post using the WordPress editor. Anyway, if you think you need to accept user-generated content without giving anyone access to your blog, that’s still possible!
In this section, we are going to show you how you can create a post from the frontend of you have WPForms premium installed!
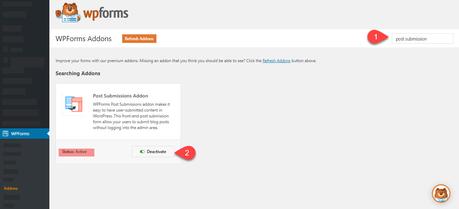
The first thing you need to do is, install, and activate the post submission addon. You could find the addon in the WPForms addons section.
After installation, the addon will get activated instantly.
Now, we can move forward and create a new form. Name your form.
After the activation of the post submission addon, we can see a pre-made template in the template library. You can choose that or create one from scratch manually. In this case, we are going to select the pre-made template.
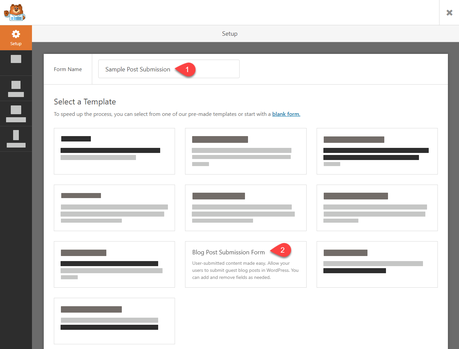
Soon, you will be redirected to the builder.
You’ll have the necessary fields for creating an author bio.
Plus, you will have enough fields for submitting your content.
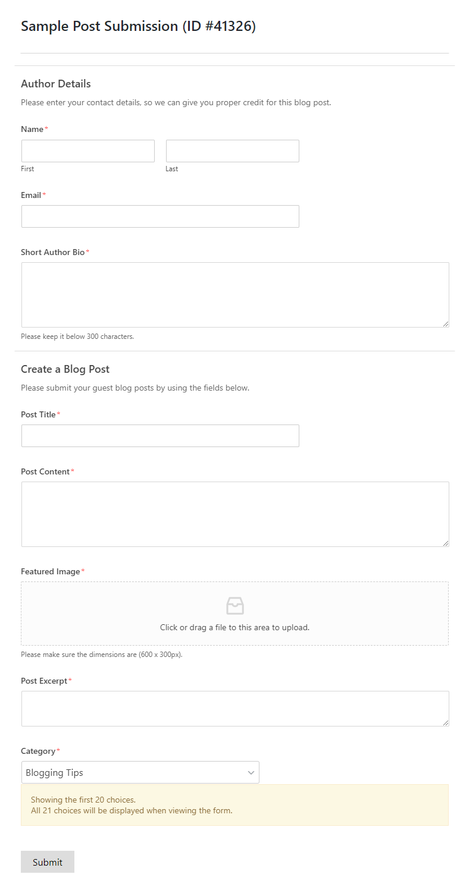
As you can see in the above image, the form comes with
- Post Title.
- Post Content.
- Featured Image.
- Post Excerpt.
- Category.
Etc.
Your website visitors need to type or copy-paste the article into the right fields. Every field is customizable. You can make changes to it just by clicking on it. And then, a configuration page would be on the left side.
It is essential to mark the post title, content, featured image as required. From the settings, you will be able to do it! Anyway, they have given us a dropdown field for selecting the category of our post.
You don’t need to add any new categories to the form. Thankfully, the form would fetch the categories we have on our website from the categories taxonomy.
Save the post submission form if you are good with the configuration.
Now, you are ready to embed the form to your page. Go to a page where you want to show this form. And click on the add form button.
From the dropdown, choose the form we just created.
A shortcode will appear on the page.
Now, publish the page or update it. When you check the page from the frontend, you can see the active form!
So this is how you can create a post submission form in WordPress using WPForms. When someone submits the form, you will get the content on your admin email address, or you can also see the same from the WPForms entries section.
You will have total control over the article. Saying that you can remove/ edit the article as you needed.
Create a Post Submission Form with WPForms
$This is an affiliate link
NOTE: We have seen that folks are using a form where visitors can upload the document version of the posts. Well, that’s called a file upload form. We will be sharing the idea below.

Did you find the article useful?
Then pin me to your Pinterest Board, so that more people will find me
(Remember: The more you give to the Universe, the more you will get from the Universe)
How To Create A User Registration Form In WordPress?
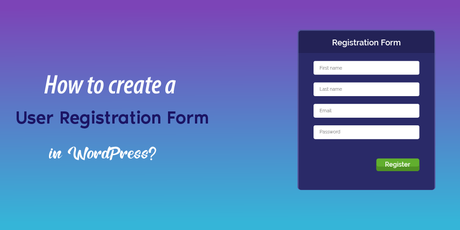
While you are running a subscription website, you probably need to turn on the user registration. Thankfully, WordPress allows us to turn on user registrations from the settings.

Plus, a membership plugin will take care of your subscriptions, payments, etc. Anyway, if you need to create a custom user registration form inside WordPress, you can do it with WPForms!
You need to turn on the user registration add-on on your blog.
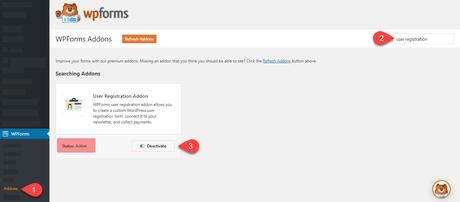
Now, go to the form builder, name your form.
From the pre-made templates, you can choose the user registration form.
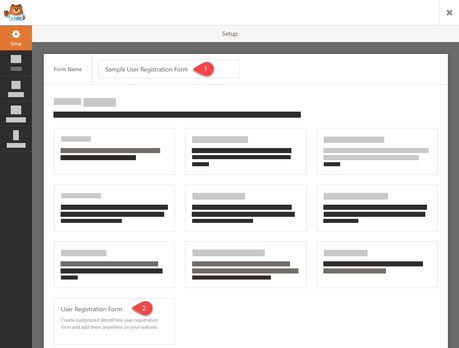
A form would be there in the WPForms builder.
Fields like
- Name.
- Username.
- Email.
- Password.
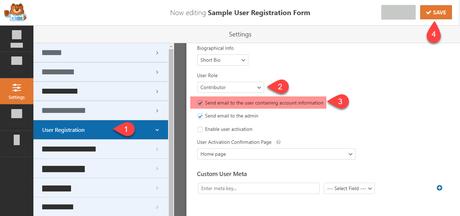
Are mandatory. The field marked as a short bio can be excluded while you submit the form. As you know, we have installed and activated the user registration add-on in the blog. So, we can get the add-on configuration from the form settings page.
The main configuration you need to check on the page is the user role.
Do not select the role of the administrator. So, the registered users will have full control over your website/ blog. You can leave it according to your use.
Plus, make sure you will send the user an email with your account credentials.
After configuring these settings, save the form.
Now, you are ready to embed it on your website. Go to a page where you need to show this form. In our case, we will recommend you create a page with URL like /register/ or something similar.
Choose the form from the dropdown, insert it.
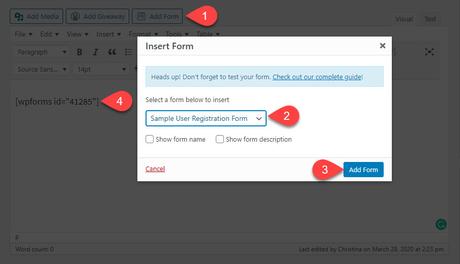
Once you have done that, publish or update the page. Check the page from the frontend, and you can see the new user registration form there.
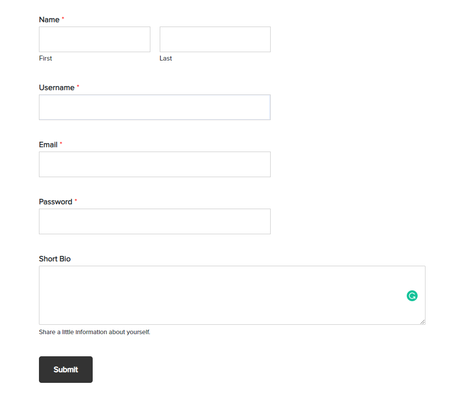
That’s it!
So, when someone submits the form, they will get the user credentials in their registered email address. On top of that, they will be assigned to the role you mentioned while you created the form.
Create a User Registration Form with WPForms
$This is an affiliate link
Did you find the article useful?
Then pin me to your Pinterest Board, so that more people will find me
(Remember: The more you give to the Universe, the more you will get from the Universe)
How To Create A Login Form In WordPress?

You probably know how to log in to your WordPress blog. Just by adding wp-admin at the end of your WordPress installation directory, you can see the login page.
Anyway, when you are running an online store or membership website, you probably need to create a custom login page than the normal one. With WPForms, you can do it.
WPForms comes with an add-on called user registration. By enabling it, we can manage our user registrations, etc. Under add-ons section search for the user registration add-on. Also, install it.
The add-on will get activated almost instantly.
Go to the form builder, name your form. In the templates section, you could see the custom user login form.
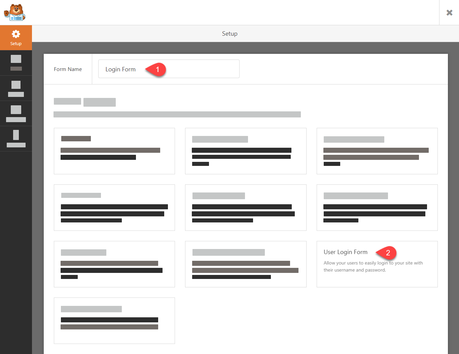
All you need are two fields.
- Username/ Email.
- Password.
If you check the login form of any website, there will be a link to reset the account password. It is a great option to add the same to your blog. So, the forgotten passwords can be reset right from the login form. We can enable the feature in WPForms.
So, select the password field, add the following to the description.
“Can’t remember your password? <a href={url_lost_password} >Click here</a> to reset.”
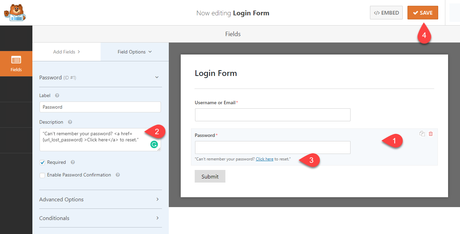
In the preview mode, you can see a link to reset the password that got added!
A typical login form just needs this configuration, Save the form.
You can add the form to a page, add a link to the page in your navigation menu or something. The better way is, adding the form to a widget area. You can easily add the form to your sidebar, and it will get better viewability.
In our case, we are about to add this form to a page.
The form would be visible in the frontend. Note that if you are already logged in to your WordPress blog, the form won’t be visible.
This way, you can create a custom login form inside WordPress!
Create a Login Form with WPForms
$This is an affiliate link

Did you find the article useful?
Then pin me to your Pinterest Board, so that more people will find me
(Remember: The more you give to the Universe, the more you will get from the Universe)
How To Create an Appointment Booking Form In WordPress?

Are you running a hotel or anything that needs a booking or reservation?
Most businesses these days got implemented a booking system to their website. Even hospitals are doing this to ease their work and schedule. And in this section, we are going to show you how you can create a booking or appointment form in WordPress.
Name your form as you like.
We can start with the blank template.
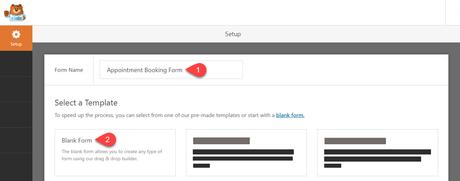
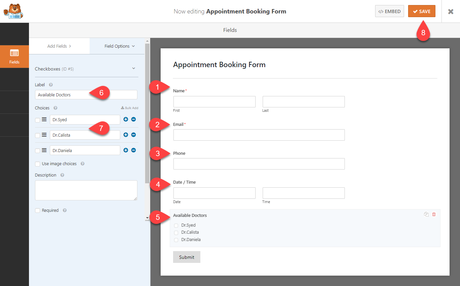
Fields like name, email, phone are mandatory. So, add those.
Alright.
If we add an option to pick the time and date of the appointment, that would be great. So, from the fancy fields, drag and drop the Date/ Time field to the form.
Plus, you can add a checkbox field to the form. This way, you can make the form even better. For example, le’s say that you are managing a website for a hospital. So, probably the visitors need to pick a doctor for consultation.
With the checkbox/ dropdown field, this is possible.
Every field we added to this form is required. So, mark the necessary option in the form, save it.
Add the form to a page.
Check the page from the frontend, and you can see the live-action.
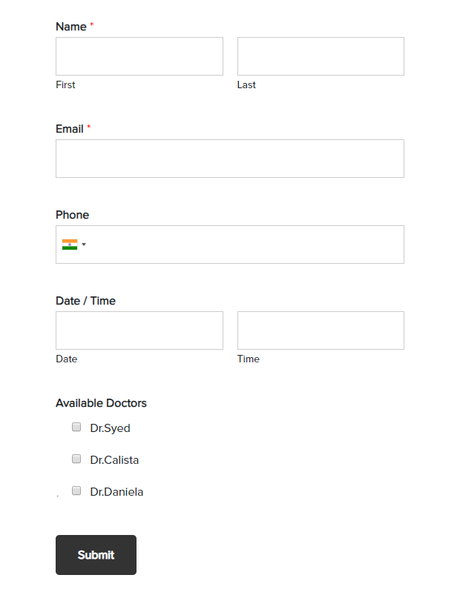
Pretty good, isn’t it?
When someone sends you an email, you will get it in the admin email. Plus, you can also check all the submissions from the WPForms entries section.
Create an Appointment Booking Form with WPForms
$This is an affiliate link

Did you find the article useful?
Then pin me to your Pinterest Board, so that more people will find me
(Remember: The more you give to the Universe, the more you will get from the Universe)
How To Create A Job Application Form In WordPress?

Most companies are having their website these days. Through the site, they are sharing industry news, their advantages, features of their product or service, etc.
Anyway, for recruiting new employees, we could always use our website!
By adding a job application form or career form, we can accept new trainees or employees to our company. A career form might want a file upload field for uploading the CV, paragraph text for a short intro, choices field, etc.
Creating this with HTML and CSS would take so much time. And with the WPForms premium WordPress plugin, you would be able to start creating and embedding the form in some minutes.
Let’s see how we can create a career form in WordPress.
Under WPForms settings, go to add new forms section. Since we have installed the Form Templates add-on, search for the Job Application form.
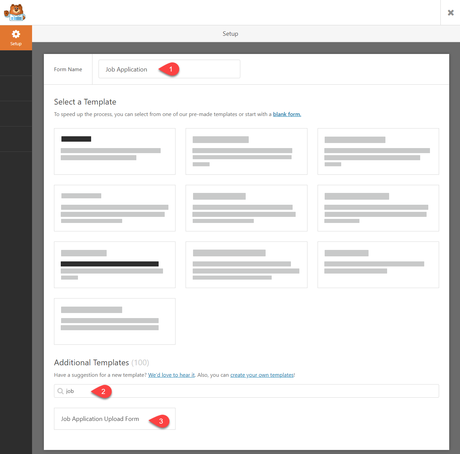
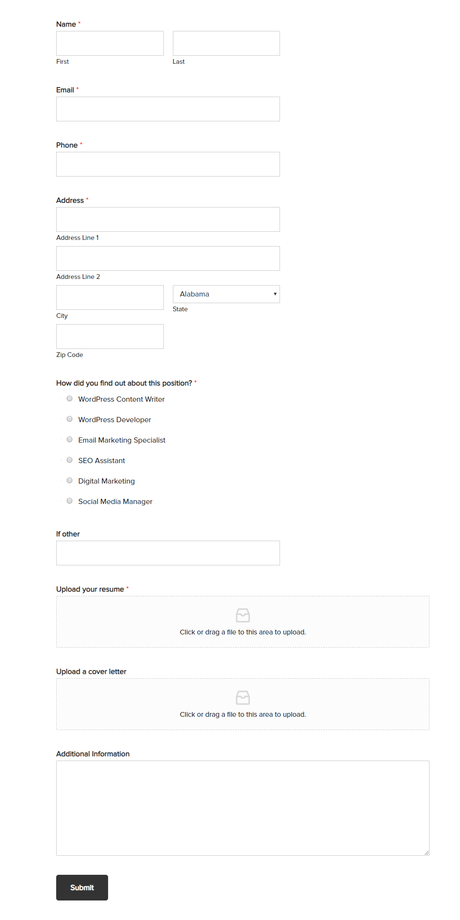
You need to insert the template to your form builder. The form comes with fields like:
- Name.
- Email.
- Phone.
- Address.
- Multiple Choice.
- 2 File Upload.
- Paragraph Text.
If you want, you can avoid the multiple choice field.
Plus, as I mentioned above, you will get two file upload fields in this form.
- Resume Upload.
- CV Upload.
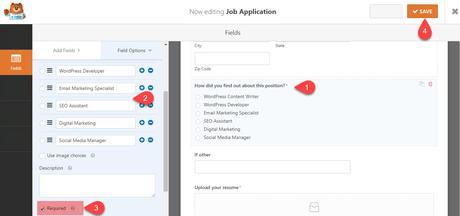
If you just need the CV, not resume, you could remove the field. On the other hand, you can add a checkbox field to the form, list your positions like this:
Also, mark the field as required.
So, the applicant must choose his desired position while applying.
Anyway, if you have done configuring the form, save it.
It’s time to embed the form. Go to your careers page and paste the WPForms shortcode there. If you check it from the frontend, the form would be visible.
So when someone uses that form, the email will be delivered to the admin’s email address. Plus, the CV would be uploaded to your WordPress content folder.
That’s it!
BONUS: It’s better to integrate your career form with your email marketing service and a dedicated list. So, when you have an opening in the future, you could always send a newsletter to the list, hire someone from there!Create a Job Application Form with WPForms
$This is an affiliate link

Did you find the article useful?
Then pin me to your Pinterest Board, so that more people will find me
(Remember: The more you give to the Universe, the more you will get from the Universe)
How To Create An Order Form In WordPress?

Do you want to create a billing or order form inside WordPress?
With WPForms, you could create one without writing a single line of code. If you are selling a product or service through your blog/ website, a billing form is mandatory.
However, while you are selling physical products, you can rely on plugins like WooCommerce. This will take care of the payments and everything. The billing form is mainly used while you offer some personal service to your clients.
And let’s see how we can create a form.
Name your form and choose the billing/ order form template.
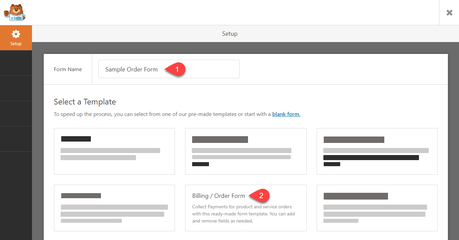
By default, billing forms comes with fields like:
- Name.
- Email.
- Phone.
- Address.
- Multiple Items.
- Total.
- Paragraph Text.
Etc.
If you are selling a service, you could exclude the Address field. If you plan to contact them via phone, the number is mandatory. Anyway, in the multiple items field, add your package name and cost.
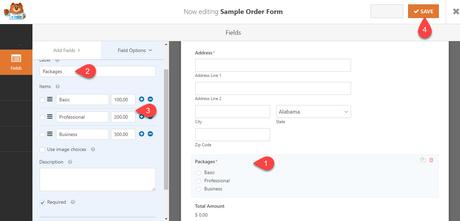
By clicking on it, you can configure it.
After adding the required fields, move to the payments tab.
In our case, we will always use PayPal to accept payments. So, enable it and configure it.
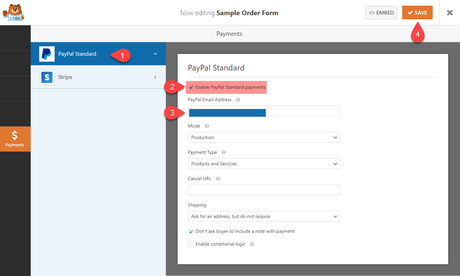
Then, publish the form. Embedding is accessible by using the shortcode or via the Gutenberg block. Once you got inserted into a page, you need to check the page from the frontend.
The form will be visible.
According to your selected item, the price would be updated in the total field.
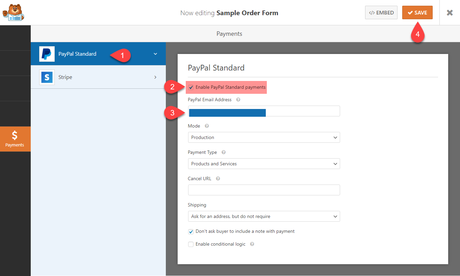
So when someone sends you a payment for a product or service, it will reflect on the assigned PayPal account! Almost instantly.
Create an Order Form with WPForms
$This is an affiliate link

Did you find the article useful?
Then pin me to your Pinterest Board, so that more people will find me
(Remember: The more you give to the Universe, the more you will get from the Universe)
How To Create A Donation Form In WordPress?

When you are running a non-profit organization, you probably want to accept donations from the community. Since most organizations are using their website, integrating a donation form to your blog is a pretty good idea.
This way, you can directly get every payment right in your PayPal or Stripe account. If you are using WordPress as the CMS, you could rely on WPForms for creating a donation form.
And here, we are going to show you how you can do that.
Go to your WPForms builder, and choose the template for the donation form.
Apart from the basic template, there are three additional donation templates available on the page.
- Alumni Donation Form.
- Church Donation Form.
- General Donation Form.
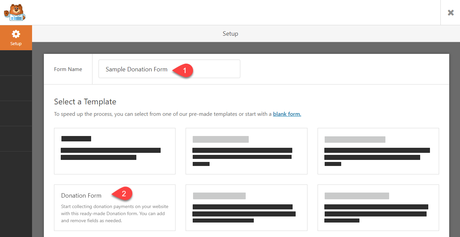
In the donation form, we could see fields like:
- Name.
- Donation Amount.
- Email.
- Checkbox.
- Paragraph Test.
Etc.
If you don’t want the checkbox, you can remove it. Plus, also you can add the Google reCAPTCHA for protecting the form from automated submissions.
After adding the fields, you might want to integrate it with your payment gateway. Let’s say that you are planning to receive funds via PayPal. Then you need to connect the form to your PayPal account. So when someone sends you a payment, it will be reflected right in your PayPal account.
In the WPForms payments tab, you could see the PayPal Standard add-on.
Enable it.
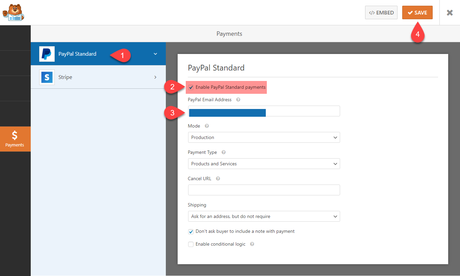
Now, we are ready to configure the PayPal settings and accept payments.
Make sure that you have enabled the PayPal standard payments. In the email address field, enter the email address in which you got assigned to your PayPal account. Put the integration in production mode. Since you are accepting payments as a donation, you don’t need to know their shipping address.
Once you have got completed it, you are ready to accept payments through the form. Add the form to a page where you need to display it.
It will be visible in the frontend. You can verify the form by putting the PayPal integration into test mode. Anyway, if you have configured everything correctly, you will start receiving funds immediately in your PayPal account.
Stripe got better pricing than PayPal.
So if you prefer Stripe for accepting payments, you can move forward with it! For a more detailed article, please check out our article regarding how to integrate Stripe with WPForms. We have added a comprehensive guide there.
Create a Donation Form with WPForms
$This is an affiliate link

Did you find the article useful?
Then pin me to your Pinterest Board, so that more people will find me
(Remember: The more you give to the Universe, the more you will get from the Universe)
How To Create An Email Subscription Form In WordPress?
Lead generation is essential while you are running an online business.
Lead generation plugins like OptinMonster, Bloom by Elegant Themes are already ruling the market. In our blog, we are using the Bloom WordPress plugin for the lead magnets, you see.
Anyway, WPForms can also be used for lead generation. I have already mentioned that the plugin can be integrated with so many popular email marketing services. Most folks are using MailChimp for email marketing. Some are using AWeber, and some go to ConvertKit.
Anyway, creating a lead generation form in WordPress is simple with the WPForms plugin.
Go to the form builder and name your new form. Also, they have a newsletter signup form sample in the pre-made templates.
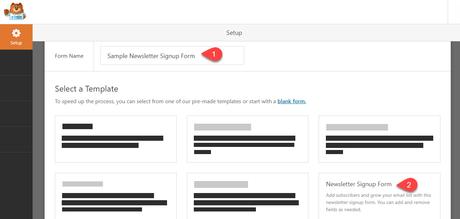
There, you will have two main fields.
- Name.
- Email Address.
These two fields are mandatory for every lead generation forms. Just saving this form and embedding it on your blog doesn’t work. You need to integrate this form with the email marketing service you use. For example, let’s say that these two fields are good enough for me.
And I am using MailChimp for email marketing.
Go to the Marketing tab.
You can see the MailChimp add-on there. Click on it, and you can install the add-on from that page.
And within a few minutes, the add-on will get installed and activated.
You need to save and refresh the form.
Once the page got refreshed, click on the add new connection button.
Give a nickname for your connection. This won’t be visible for your website visitors.
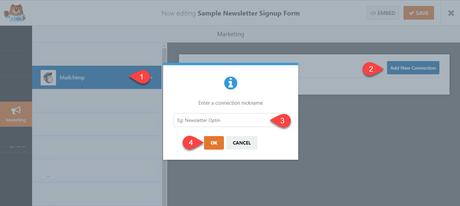
Now, you are ready to integrate. All you need is the MailChimp API key.
You can get your API key from your MailChimp account. Log in to your account and go to the profile section. Under extras, you can see the API keys option.
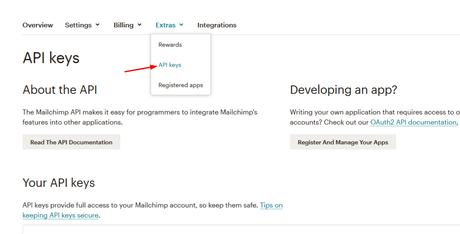
By default, you wouldn’t have any API keys. You need to create one yourself.

After clicking the button, you just wait. Within seconds, the key will be created.

You need to label it. You can add anything in the label field. It is just for identifying the keys if you have multiple ones. And copy the API key from the page, get back to your WordPress blog, paste the API key with an account nickname.

Click on connect.
The integration would be successful. You could see your account name on the page. Plus, If you already have multiple lists, select the right list from the dropdown.
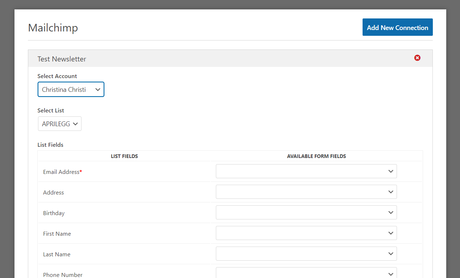
Plus, assign the form fields with the list fields.
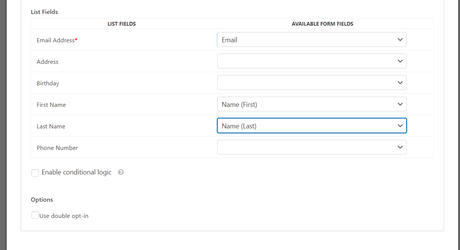
You can use the conditional logic to make the forms even more powerful. Also, the double opt-in forms are available for email marketing integrations.
By default, the email address will be saved to your MailChimp list when someone fills this form, submit it. No additional verification needed. But with the double opt-in, you can add a verification system to your forms.
Once they have submitted the form, verification will be ended to their email address. They might want to click on the verification email for adding the email address to the list. It’s that simple.
Once you are done, save the form.
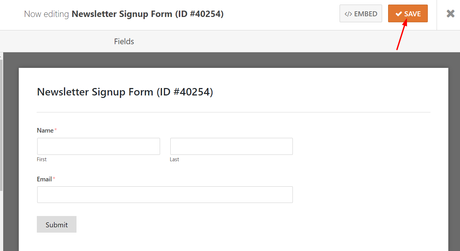
After embedding the form on your page, check it from the frontend.
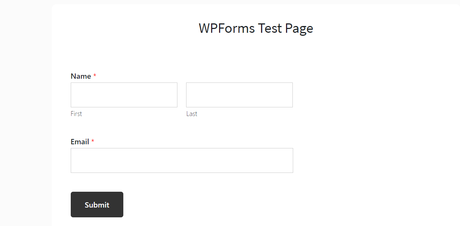
We can verify the integration by testing the form. Just fill the form and submit it.
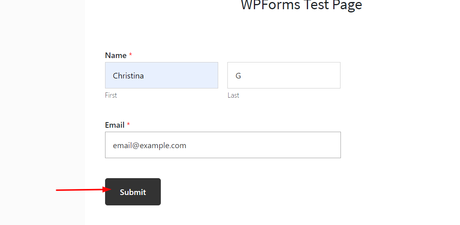
If the integration is working, the email address, the name will be saved to the email marketing service. Plus, you can see the same from the WPForms entires section.
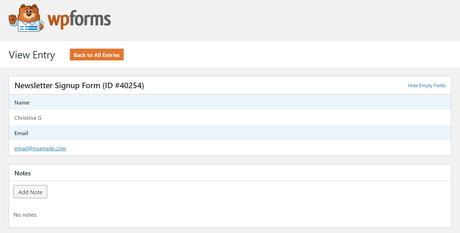
Simple!
The lead generation forms created this way don’t look that much fancy. Or, you could add custom CSS class to the elements, page, and add additional CSS to style it. By using this method, you can have a clean looking email lead generation form.
On the other hand, you can look for a lead generation plugin. They have suitable looking forms with custom CSS codes and fancy fields.
Create an Email Subscription Form with WPForms
$This is an affiliate link

Did you find the article useful?
Then pin me to your Pinterest Board, so that more people will find me
(Remember: The more you give to the Universe, the more you will get from the Universe)
How To Create a File Upload Form In WordPress?

Let’s say that you are running a troubleshooting business or something related to customer support—for example, a WordPress troubleshooting business or something similar.
So, clients will contact you when they have an issue on their blog. As an example, let’s say that their blog is not sending out emails like password reset, other emails like comments, etc.
So, if they are using an SMTP WordPress plugin like WP Mail SMTP, there might be some issue with it. So, you need to check the configuration of it.
There are two ways of checking it.
- Via Their Login Credentials.
- A Screenshot.
I’d always pick option 2 for a quick look.
So, when they need to send you some images or any files through your forms, first, they need to upload it to cloud storage like Dropbox, Google Drive. Then, generate a shareable link, send it over.
This will take some more time for the process.
However, what if you have an option to accept incoming files through the forms?
WPForms comes with the file upload feature by default. So, accepting files through forms made very simple! We will show you how you can do that.
Create a new form. Just like we did before, search for the file upload form.
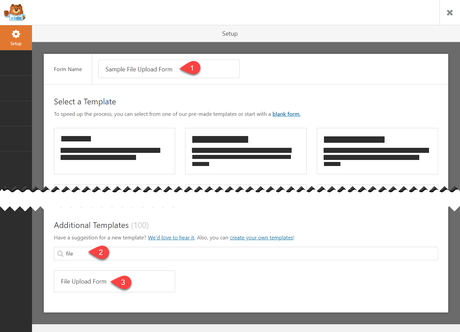
So in the builder, you could see a file upload form.
By default, the form comes with fields like:
- Name.
- Email.
- Phone.
- File Upload.
- Comments.
Etc.
You can add/ remove fields. For example, I am going to remove the phone field.
If you need to add a website URL field for making the job easy for references, you could drag the website URL field from the left side, drop it on the right side.
The file upload field is highly customizable. If you click on the field, you can see its configuration in the left section.
You can choose the
- Allowed File Extensions.
- Max File Size.
- Max File Number.
Etc.
And also, you can add a custom CSS class for the field so you can style it additionally using custom CSS. Anyway, most folks don’t need to use it. Just configuring the rest will do the job.
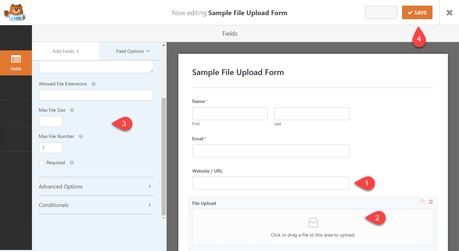
In the allowed extension types, add the file extensions separated by a comma. If your main goal is to accept images, then add .jpg, .png, .gif, .jpeg as the file types. So when someone tries to send any other files, they won’t be able to.
Save the file upload form if you have done it with configuration.
Go to a page where you need to show the form. In our case, we are about to embed it on our demo page. Add the form’s shortcode to the page and save it.
If you check it from the frontend, you will see the live-action.
So the form is visible in the frontend. Anyway, let’s test it is working or not. Simply send a sample email with some attachment.
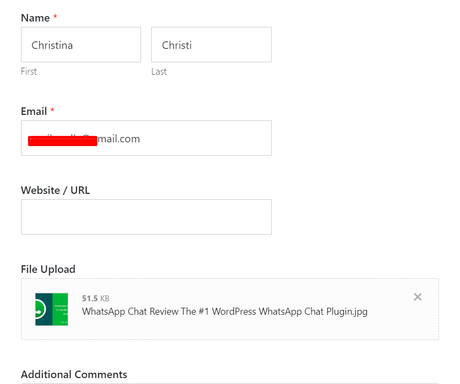
If the configuration is fair enough, the message will be sent.
You can check the form entries/ the admin email address. If you got the email with the attachment, everything is working fine!
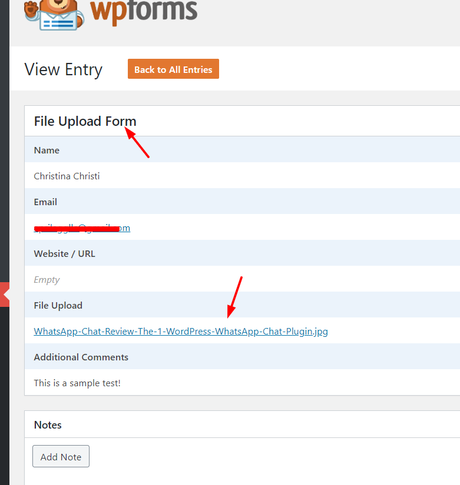
Also, please note that every attachment will be saved on your WordPress contents directory.
We do have a dedicated guide on creating a file upload form inside WordPress. You can check the manual for a better understanding.
Create a File Upload Form with WPForms
$This is an affiliate link

Did you find the article useful?
Then pin me to your Pinterest Board, so that more people will find me
(Remember: The more you give to the Universe, the more you will get from the Universe)
How To Create A Multi-Page Form In WordPress?

If you have a long WordPress form, it is better to break into different pages. Usually, before when someone fills out a form, he will probably check the fields added there, length of it.
So, if your form is a lengthy one, you are going to lose customers. As a business owner or blogger, this is not good for you. Thankfully, WPForms got a solution for this.
We are going to show you the power of multi-page forms, aka multi-part forms.
You could create a new form or edit an existing form. In our case, we are going to create a new form here on the website. So, go to the form builder, name your form.
We are not going to use any pre-made template right now. We can create a form from scratch. Soon, you will be redirected to the form building wizard.
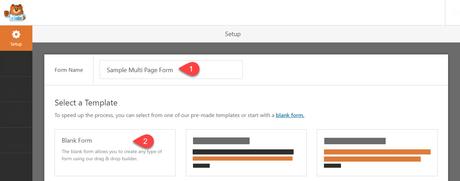
So, I am going to add three fields to this form.
- Name.
- Email.
- Phone.
Now, let’s break the form. Under the fancy fields, you could see a field called page break.
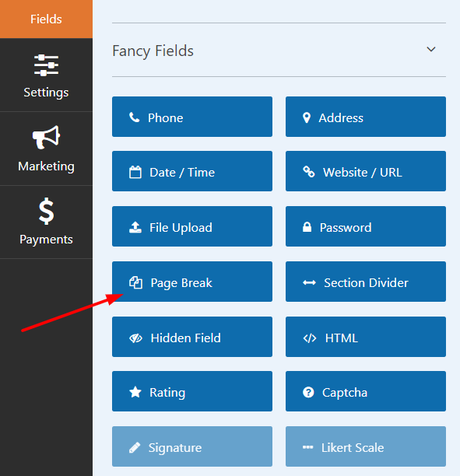
Drag it and drop it in the builder, right below your lastly added field.
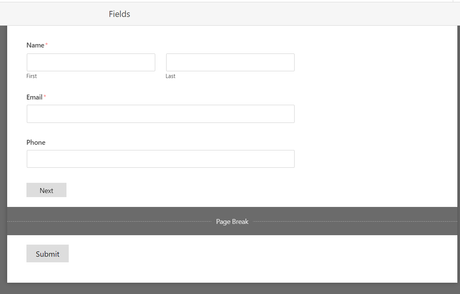
As you can see in the above image, the page break got divided the single page. Now, we have two pages. Just like we did before, drag some fields from the left section, drop it in your second page.
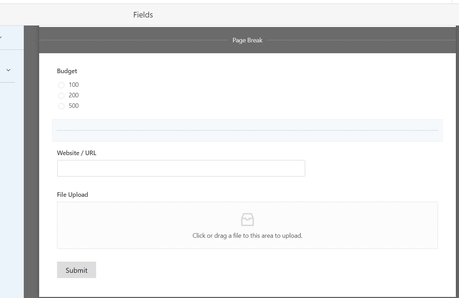
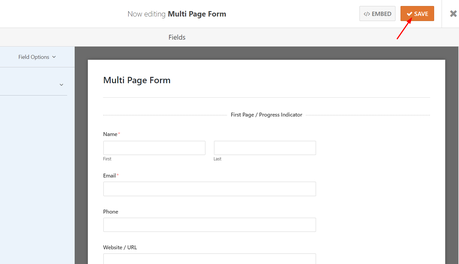
Now, we have two pages in our form. We just divided it with a page break field. Save the form.
Go to a page and paste the shortcode and publish/ update the page.
Check the page from the frontend, and you can see the form.
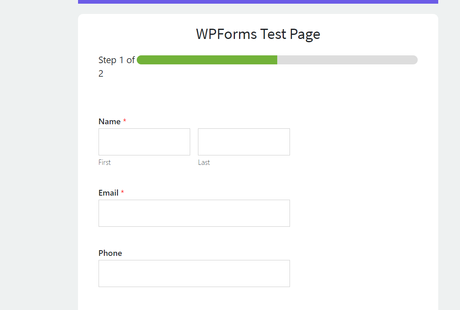
From there, you can fill out the form, test it. Emails will be sent to the default admin contact. You can verify it by sending a test email through the form.
Create a Multi-Page Form with WPForms
$This is an affiliate link

Did you find the article useful?
Then pin me to your Pinterest Board, so that more people will find me
(Remember: The more you give to the Universe, the more you will get from the Universe)
Get Started With WPForms
So these are the famous 12 basic forms most folks need to create. If anything else comes up, we will add the idea as a section in this post. As you can see above, WPForms is the best form builder plugin in the market for creating forms without writing a single line of code.
So, we highly recommend it to our website visitors.
You can get the premium version of WPForms from below!
Get WPForms
$This is an affiliate link
Have you found these WPForms tutorials helpful? If you did, please consider sharing this article with your friends and fellow bloggers on social media. It will help someone to configure the forms correctly.
Also, for more WordPress tutorials, theme reviews, and plugin reviews, check out our WordPress archive.
Related Articles You Might Like:
- WPForms vs. Ninja Forms: We Have a Clear Winner!
- WPForms vs. Contact Form 7: Which Option Is Best?
- Is WPForms Is The Best Alternative For TypeForm?
- WPForms or Gravity Forms: Here’s Our Pick!
