Welcome to day number 5 of starting a blog. You are nearly on your way to owning and operating a fully functional blog. Yesterday, WordPress should have been installed, and you should have a pretty good idea on what static pages you are going to include as well as written the content for those pages. Remember, these pages do not need to be in tip-top shape right now. As time goes along, you can edit these pages to reflect any possible changes that you need to make in the future.
Today is the day that we configure the necessary settings of your WordPress installation to ensure that you are getting the most out of this fantastic blogging platform. We will do our best to take you through this process step-by-step, so just follow along and refer to the screenshot images for further clarification. Let’s get started.
WordPress General Settings
Log into your WordPress Dashboard using the login information that was emailed to you when WordPress was installed.
In your dashboard, you’ll see a tab titled “Settings.” Hover your mouse over this tab and click on “General.”
Settings >> General
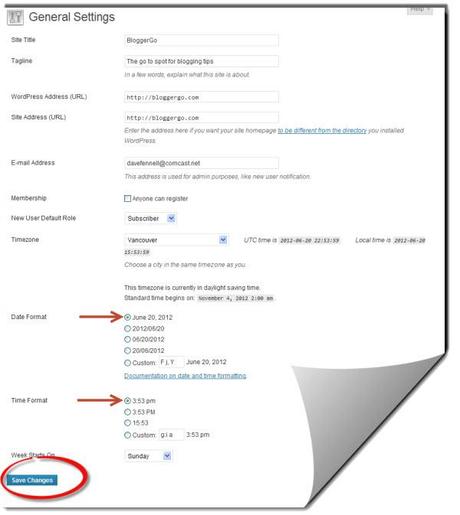
Much of this information should already be defaulted, but double check each field for accuracy.
Site Title:
- Enter your site title the way that you would like it to appear to visitors. The title is case sensitive.
Tagline:
- This is essentially your site slogan if you wish to include one. Come up with something catchy, short, and related to your blog.
WordPress Address (URL):
- Should already be defaulted, but enter your domain name. (http://yoursitename.com)
Site Address (URL):
- Should already be defaulted, but enter your domain name. (http://yoursitename.com)
Email Address:
- Enter the email address that you want WordPress to send alerts regarding your blog.
Membership:
- Whether or not you want to allow members to register. Leave unchecked if not.
New User Default Role:
- If you are allowing members to register, “Subscriber” is the most popular choice.
Timezone:
- Try to select a city or part of the world that is closest to you. At the very least, select an area that is in your same timezone.
Date Format:
- Select the date format that you wish to show on the front end when you publish new content.
Time Format:
- This is not all that important, but select your preferred time format.
Week Starts On:
- For some reason, this is usually defaulted to Monday. But for us normal people, our week usually starts on Sunday.
Click on “Save Changes”
WordPress Writing Settings
Now click on “Writing.”
Settings >> Writing
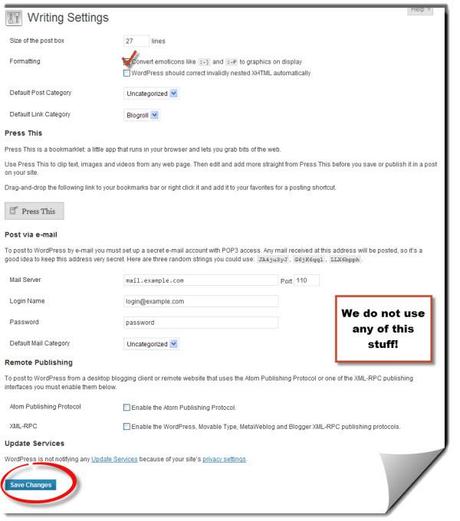
Size of the post box:
- This setting changes the size of your post/page editor box. This will depend on the size of your browser and your personal preference. We have chosen 27 lines.
Formatting:
- Check the box “Convert emoticons like and
 to graphics on display”
- Don’t check “WordPress should correct invalidly nested XHTML automatically.”
Default Post Category:
- At this point, you probably have not added any categories. Just leave this as is for now. Later when you add categories, you can change this option.
Default Link Category:
- Blogroll is defaulted, but i don’t use this functionality, and you most likely will not either.
We do not use the rest of the settings on this page. This stuff is not important.
Click on “Save Changes”
WordPress Reading Settings
Now click on “Reading.”
Settings >> Reading
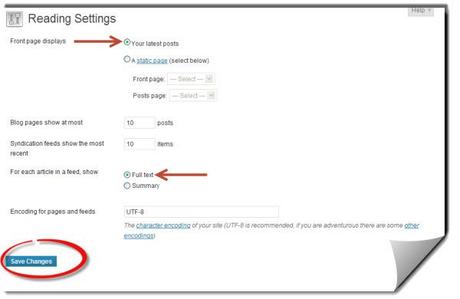
Front Page Displays:
- This depends on personal preference and what you are going to choose to display on your blog. Selecting “Your latest posts” is the most common. But if you want your homepage to be a static page, select that option and select the static page that you intend to use.
Blog pages show at most:
- Again, this is up to personal preference, but the most common selection is 10 posts.
Syndication feeds show the most recent:
- This controls the amount of results that are returned in your blog feed. Again 10 items is the most common.
For each article in a feed, show:
- This again applies to your feed results. We like to show full text to our feed subscribers.
Encoding for pages and feeds:
- This should be defaulted to UTF-8. If not, input UTF-8.
Click on “Save Changes”
WordPress Discussion Settings
Now click on “Discussion.”
Settings >> Discussion
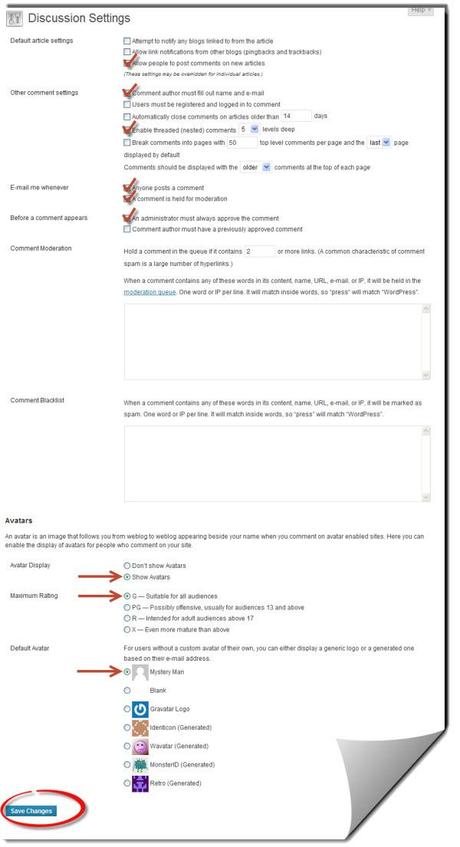
Most settings on this page are up to your personal preference.
Default article settings:
- “Attempt to notify any blogs linked to from the article” We leave this unchecked.
- “Allow link notifications from other blogs (pingbacks and trackbacks)” We leave this unchecked.
- “Allow people to post comments on new articles” We want visitors to comment on new articles, so we check this option.
Other comment settings:
- “Comment author must fill out name and e-mail” We check this option.
- “Users must be registered and logged in to comment” We leave this unchecked.
- “Automatically close comments on articles older than__days.” We leave this unchecked.
- “Enable threaded (nested) comments__levels deep.” We check this option, and selected 5 levels deep.
- “Break comments into pages with__top level comments per page and the__page displayed by default.” We leave this unchecked.
- “Comments should be displayed with the__comments at the top of each page” This is up to personal preference, but we like to show my older comments first, followed by each newer comment.
E-mail me whenever:
- “Anyone posts a comment” We check this option.
- “A comment is held for moderation” We check this option.
Before a comment appears:
- “An administrator must always approve the comment” We check this option.
- “Comment author must have a previously approved comment” We leave this unchecked.
Comment Moderation:
- This option does a great job of filtering out the spam comments. We are very conservative and select “2″ or more links.
- Don’t worry about the two boxes that follow.
Scroll down the page to Avatars.
Avatar Display:
- We select “Show Avatars.”
Maximum Rating:
- We select “G — Suitable for all audiences”
Default Avatar:
- Choose your preferred Avatar. We use “Mystery Man.
Click on “Save Changes”
WordPress Media Settings
Now, click on “Media.”
Settings >> Media
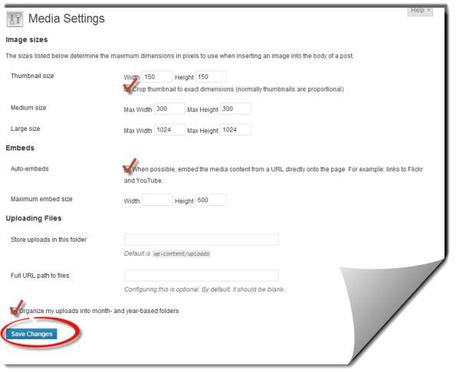
Again, much of these settings are up to personal preference, and as you get to know your theme a little better, you may or may not need to change these.
Thumbnail size:
- We use the default. Width 150, Height 150.
Medium Size:
- We use the default. Max Width 300, Max Height 300.
Large Size:
- We use the default. Max Width 1024, Max Height 1024.
Embeds:
- This is typically used if you are planning on featuring YouTube videos on your blog. Select the size that you wish your videos to appear as. If you are not planning to feature videos, this will not apply.
Store uploads in this folder:
- We leave this field blank.
Full URL path to files:
- We leave this field blank.
- We select the box “Organize my uploads into month- and year-based folders.”
Click on “Save Changes”
WordPress Privacy Settings
Now, click on “Privacy.”
Settings >> Privacy

Site Visibility:
- Right now, the “Ask search engines not to index this site.” field should be checked.
When your blog is ready for its official launch, selecting the “Allow search engines to index this site.” will be the magic button to make that happen.
Click on “Save Changes”
WordPress Permalink Settings
Now click on “Permalinks.”
Settings >> Permalinks
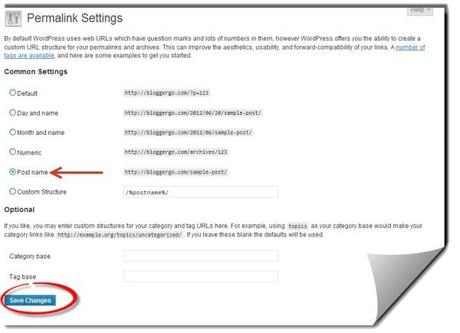
This is where you select the permalink (URL) structure of every post and page on your blog.
- For the optimal SEO value, select the “Post Name” option (http://yoursite.com/sample-post/)
Category Base:
- We leave this field blank. On a side note, we use a plugin to strip the word “category” from our permalinks.
Tag Base:
- We leave this field blank. We do not use tags on this blog. You might think about doing the same because tags are absolutely worthless and a waste of time.
Click on “Save Settings”
We are finally done. Not so bad right? You now have the settings to allow you to get the most out of WordPress and your blog.
Since this whole process took you probably 20 minutes to complete and it took me 5 hours to write this post, it is now time for you to write another blog post to have ready for when you officially launch. Again, you will be loading all of the posts that you have written so far into WordPress in a couple of days.
Day number 5 of starting a blog is now complete. I know that there is a lot to this “starting a blog” business, but hang in there. There is an end in sight, I promise you. Be prepared for tomorrow when we finally install your WordPress theme to add the look and feel to your blog. We’ll catch up with you tomorrow.
Starting a Blog Day 5 – Configuring WordPress Settings is a post from: BloggerGo


