Navigation menus are arguably the most important component of any website, and serve as your blog’s backbone for providing easy navigation and usability to assist visitors in finding relevant content and pages on your website. One of the many benefits of utilizing WordPress as a blogging platform is the ability to easily create your navigation menus right in the dashboard.
Setting up navigation menus is relatively simple, but for a new blogger who has never gone through this process before, the setup can be quite daunting.
For this reason, we are providing this short tutorial to walk you through a step-by-step process to create and properly setup your navigation menus in WordPress. The good news is that once you do this the first time, setting up your navigation menus in the future will be a snap.
Before we begin, it is important to note that every theme is going to treat navigation menus differently with regards to placement, appearance, functionality as well as the number of navigation menus your theme will support. Most themes provide two navigation menus, one for your primary navigation, which typically includes your blog’s static pages, and the other for your category navigation. More sophisticated themes will also provide a menu in the footer. So depending on the number of menus your theme supports, this is what we will be creating in WordPress.
Navigation Menus Setup
To begin, hover your mouse over “Appearance” and click on “Menus”
Appearance >> Menus
Below is a screenshot of the settings page:
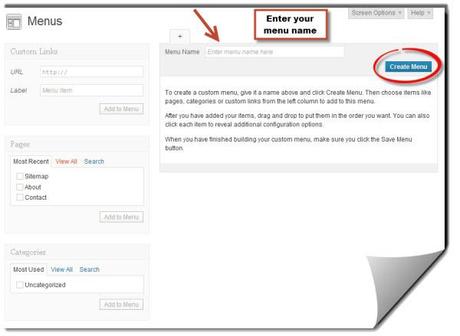
Choose a menu name
We will now create your first navigation menu. This will be the menu for any static pages that you want to display to your visitors such as a Home page, About, Contact, Advertising, or any other applicable pages that apply to your blog.
Name this Navigation Menu anything that you like. Only yourself and other site administrators will see these navigation menu names in the backend. Common names include Primary, Page, Header, etc. Give it a name that will differentiate this menu from any others that we are going to create today.
Enter this name into the “Menu Name” field in the upper right-hand corner of the menu settings page.
Click on the blue “Create Menu” button.
Next, if your theme supports a second navigation menu, we will create it now.
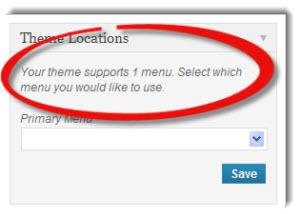
Finding out how many menus your theme will support
This settings page will let you know how many menus your theme will support. If your theme supports one menu, that is all we are going to be creating today. If your theme allows for more, than we will create those as well.
The 2nd menu is typically your category navigation which will include certain blog categories that you want your visitors to easily access and navigate.
Although, WordPress does give you the option to mix and match pages with categories and vice versa in each of your menus. But in most cases, pages will go in your top navigation and categories will go in your category navigation. But the flexibility is there if you need it.
If your theme supports a 2nd menu, click on the + button highlighted in the screenshot below.

Click on the + button
Enter the name of your new navigation menu. Since this menu is related to category navigation, I just simply title mine “Category”
Click on the blue “Create Menu” button.
You will now see tabs to toggle back and forth for each menu that you have created.

Select a tab to continue working with each menu
Ensure that the correct menu tab (illustrated above) is selected for the menu that you are going to be working on.
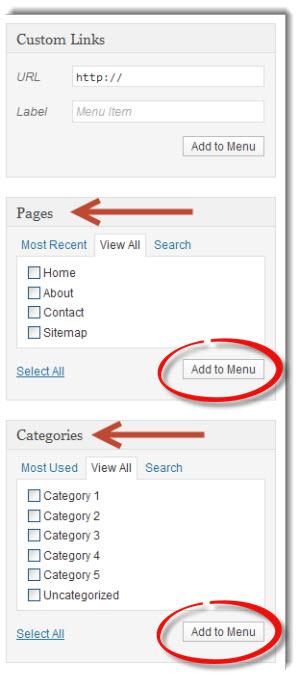
Before we go further, you first need to ensure that you have in fact published static pages and defined your categories. If you have already done so, you’ll see these pages and categories populated in the applicable fields. If not, these fields will be empty except for a couple of defaults that came with your theme or WordPress install.
The first window that you will notice is “Custom Links.” This is where you can enter a URL of a website outside of your blog if you want to direct your visitors to another site. This is not common with new bloggers, but again, the flexibility is available if you need it in the future.
The next field is Pages. If you are building your Primary navigation menu, select and put a check mark next to any applicable static pages that you want to include.
Click on “Add to Menu”
Lastly, is your Categories. If you are building your Category navigation menu, select and put a check mark next to any applicable categories that you want to include. Just ensure that you have selected the correct menu in the tabs mentioned above.
Click on “Add to Menu”
If you happen to make a mistake, and you need to delete an item from your new menu, just click on the small downward arrow to the far right of the corresponding menu item and click on the red “remove” link.
After you have added the applicable pages or categories to your menus, click on that same downward arrow to the far right of each menu item. When you do this, the field will expand and you will notice some information that you can add:
1. Navigation Label:
This is where you can change the name of your category or page. For example, if your category or page name is too long, you can give it a shorter label. What you enter here will be the name that appears in your navigation menu in the front-end.
2. Title Attribute:
This field is very similar to adding an alt tag to an image. What you enter here will be the attribute that appears when a visitor hovers over the menu item. This is a good opportunity to add a name that better explains what the item is about to entice the visitor to click on it. This feature will provide better usability to the visitor, and I recommend that you fill these out for each and every menu item that you add to your navigation menus.
WordPress gives you the ability to drag and drop your menu items in any order that you please as illustrated in the screenshot below.
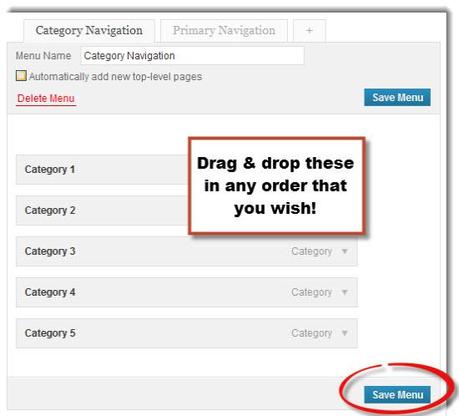
Move your items in any order you wish
The order that is displayed from top to bottom is the order that your menu items will be displayed in your navigation menus. Go ahead and place your categories or pages in any order that you see fit.
You can organize each one as either parent or child categories/pages by just simply positioning them in the way that fits your blog’s structure. Play around with this feature to get a feel for what you are doing.
Installing each navigation menu
Once all of the above steps are completed, it is time to physically select the navigation menu for each location that your theme supports.
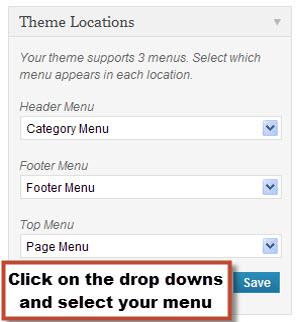
Click on the blue “Save” button.
You are done. Check the front-end of your site to ensure that you have selected the correct navigation menus for each location. Make any changes if necessary, and your menu bars should be in place.
If you own a more sophisticated theme that allows for a footer menu, just simply go through the same steps above to create your third menu. In most cases, a footer menu will contain very specific static pages. Many times, you will see a site’s legal pages such as disclosures and privacy policies. For the time being, we only use the same static pages that we have in our Primary navigation.
But again, you can add anything that you wish down there. WordPress is fantastic for the flexibility that it offers; especially in setting up navigation menus.
That is all there is to creating and installing your navigation menus. If you have any questions or have anything that you would add to this process, we would love to hear from you.
Setting up Navigation Menus in WordPress is a post from: BloggerGo

