A little while ago I posted an amazing-looking cake on my facebook page. Kathy, my “aunt-in-law” (or whatever one calls one’s husband’s aunt), noticed this post–and soon began posting pictures of her own takes on this cake to her facebook page. When I saw what an amazing array of rose cakes she was turning out, I asked if she could explain how she does it, and she wrote Three Clever Sisters’ very first guest post!
Thanks Kathy–this is the next best thing to having a slice myself!
Every once in a while, you see something and you just have to try it. That’s how I felt when Three Clever Sisters posted a photo of the gorgeous Neapolitan Rose Cake from i am baker. It turns out Rose Cakes are easy to make. All you need are some 1M (very large star) decorating tips (you only need one tip if you want all your roses to be the same color) and a batch of buttercream. If you would like to make a basket of roses, such as the one pictured above, you will also need a number 47 tip. And it helps to have a turntable to set your cake on and a small step stool to set your turntable on, so that when you pipe your roses, the cake is raised about a foot off the table. You can cover a cake with roses in ten minutes. If you have a more time (30 minutes or so) and would like your cake to be a little less icing- intense, pipe a basket weave onto the sides of it and just pipe roses on top.
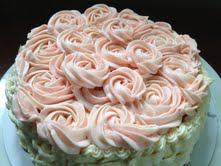
Any layer cake recipe will work. I made a chocolate cake and filled it with chocolate ganache, but of course, you just ice your center layer with buttercream and save even more time.
Here is a great recipe for buttercream that pipes well. Change the flavor by replacing vanilla with other extracts (it usually takes a little more extract for other flavors to come through, for instance, orange buttercream takes 3 – 4 T of orange extract to taste orangey). If you want to make chocolate buttercream (which is also nice for a basket weave pattern), replace a cup of sugar with a cup of cocoa (Hershey’s is fine) and increase the salt to ¾ tsp.
Vanilla Buttercream (Yes, this makes a lot, and yes, you need a lot!)
- 2 cups of butter (room temperature)
- 6 – 8 cups confectioners’ sugar
- ½ teaspoon of salt
- 2 T vanilla
- 4 T heavy cream or more
Beat butter with paddle on medium speed. Add 6 cups of sugar and mix on low speed so it doesn’t blow all over the place. Increase speed of mixer and add vanilla and cream. Test consistency (icing should hold its shape – kind of like the “stiff peaks” stage of beating egg whites) and keep adding sugar or cream until you get there.
To ice the cake:
First, spread a crumb coat. Cover the entire cake with a thin coat of icing. This both provides a nice background color for your decorating and helps the piped roses adhere.
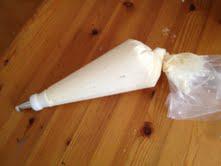
Next, pipe on your basket. (Skip this step if you would like to cover the entire cake with roses, a simpler techniques that brings very beautiful results.) This is not nearly as difficult as it might seem; you just need to keep your wits about you as you pipe. Using a coupler, fit a number 47 tip onto your pastry bag and fill the bag with about half your frosting. If you have never worked with a pastry bag before, fear not. Just snip the tip off the bottom of the bag, push the coupler through the hole in the bag, and fasten the tip on. Then fold over the sides of the bag, fill it with frosting, squeeze it down and twist the bag to make sure it is nice and tight.
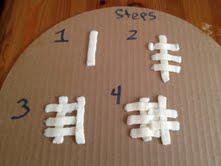
First, pipe a straight vertical line from the top to the bottom of side of your cake. (step 1) Then pipe three parallel horizontal lines across the vertical line, so that the vertical line bisects each line. (step 2) Then pipe another vertical line so that the right edge of each horizontal line is covered (step 3) Then, filling in the square spaces created by the intersection of the second vertical line with the horizontal lines, pipe horizontal lines across the second vertical line, so that that vertical line bisects the horizontal lines (step 4). Repeat process until the side of the cake is covered. If you like, you can pipe a straight line along the bottom edge of your cake to finish off your basket weave. I have done a simple shell pattern line here, but a basic line will do just fine.
Finally, pipe your roses! You can make roses all one color or split your buttercream into several bowls and add a few drops of food coloring to each for a multi-color bouquet. You don’t need a coupler for the large 1M tip; just cut ¾ inch off the tip of your pastry bag and push the 1M tip through. Fill your bag with icing and push it all the way to the tip, again, twisting together the top of the bag and applying pressure so there are no air holes. If you are covering the entire cake with roses, begin on the sides, at the bottom. Apply gentle pressure until you make a little blob of icing (step 1) and then just rotate your tip around the blob one (step 2) or two (step 3)complete rotations (depending on how big you want your rose to be). Voila! A rose has blossomed.
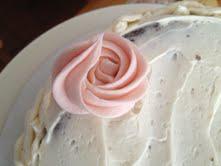
Pipe another rose next to the first one and continue around the cake. Then pipe a row of roses above the bottom one, spacing them so that you cover the side of the cake. Don’t worry, if you have any noticeable spaces between your roses, just pipe a little blobby swirl in any gap and no one will notice.
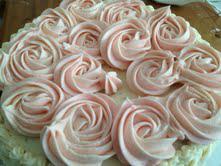
To cover the top of your cake with roses, begin at the outside edge (covering your basket edge) and work toward the center, using the technique described above.
Whether you just pipe roses
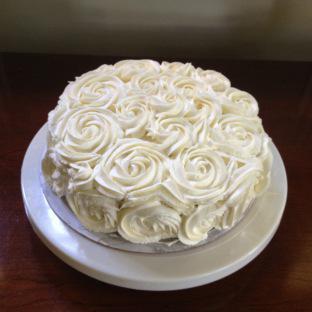
Or, you pipe the basket too…
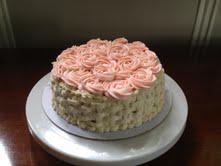
Your cake will be pretty! Happy piping!

