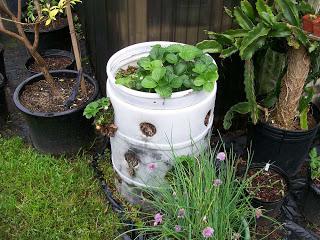
Anyway, I was doing one of my talks a couple of weeks ago and the topic of Strawberries came up. Let me pause here to remind my followers and let some of the new folks in on a piece of information, the majority of the plants I grow are in containers of some kind, this includes all my Citrus, Figs and other fruits. My Strawberries are no exception. They are grown in a plastic barrel. It looks like this:
 This was my first attempt at one, it has problems that we will discuss in a minute. Anyway, this was a lecture where I did not have the luxury of using a powerpoint presentation, so there were no pictures. I explained my barrels to the audience. There was one woman that was having problems understanding what I was talking about and how to go about doing one. Hence, the topic for today's article.
There are numerous places that I know of to get these. The one above was from a wholesale florist that I once worked at. The floralife liquid that we used to keep the flowers fresh came in it. That might be a good place to start if you have one close to you. Another starting point might be a local carwash. The soap comes in large barrels. My other barrel, the blue one below, came from a large landscaping company that used large amounts of liquid iron. I am sure there are other places to get them, just use your imagination. You will want to steer clear of ones that have contained harsh chemicals. The plastic will absorb them and could transfer it to your soil. My cost for each of these barrels? Zero
I mentioned that the one above has problems. Let's discuss them.
First, the holes are just a tad too big. I was actually doing it freehand with a jigsaw. I DO NOT recommend trying this at home. The soil tends to run out of the holes and sometimes the plants start to fall out. The best thing to use is a 2" drill bit, designed to cut nice round holes.
The next problem is, they are spread too far apart. There is a LOT of wasted space there. Now, what should the ideal spacing be? That will probably depend more on the look you want. If you want the plants to completely cover the barrel, maybe 2" apart.
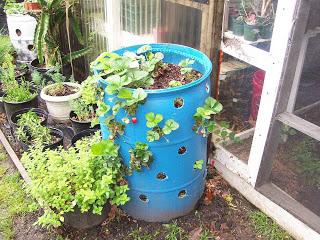
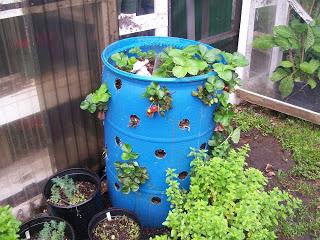
This is what my new and improved barrel looks like:

I only had a few plants to put in, it is still a work in progress.

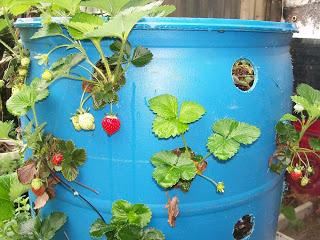
This is a little closer view of the holes. As you can see by the ripe fruit, it works pretty well.
I enjoy writing this blog so people can learn from my trials and mistakes. I wish I had more plants to put in when I was making it, but they are easy enough to put in, even after some die off or whatever happens.
I will walk you through the steps and show you how easy this all is.
I will assume you have your barrel and know what kind of look you want.
The first thing to do is cut off the top. This is where you can use the jigsaw. Create a hole with a 1/2" drill bit then jigsaw the top off. You will also want to drill a few small holes in the bottom for drainage.
Next, start drilling your side holes. Start at the bottom, go all the way around however far apart you want.
The next row up, stagger the holes in between the ones from the first row. Continue all the way to the top in this fashion.
So far, so good?
Now, the fun part. Learn from my mistakes. Count your holes and get that many plants, plus four or five more. You will also need LOTS of potting soil, compost or whatever other soil amendments you prefer. Just make sure that it drains very well, yet retains some moisture.
Starting at the bottom, fill the soil up to the first row of holes. Place the roots of the plants through each hole, make sure you don't bury the crown of the plant too deep, then fill with soil up to the next row. Repeat this process all the way to the top. Then use those four or five extra ones to plant into the top.

Pretty easy, right?
Depending on what part of the country you live in and when you want your Strawberries to be ripe will determine what variety to get.
Just to give you a little bit of an idea of what is out there, I will discuss a few here.
The main type of Strawberry suited for me here in my South Carolina garden is called a June-bearer. The name June-bearer is somewhat confusing since these varieties bear most of their crop in May. June-bearers produce a single crop in the Spring.
Then, there are 'Everbearing' or 'Day-Neutral' types which produce a crop in the Spring, another in late Summer and until frost in the Fall. All of the Everbearing strawberries advertised in nursery catalogs originated in the northern states; therefore, they succeed better for any of my followers up there.
There are some advantages and disadvantages to growing Strawberries in a barrel like this.
Watering can be tricky. This is where a very well draining, but does hold some moisture, soil is critical. As you can imagine, the plants at the top of the barrel will dry out faster than the ones in the bottom. I keep an eye on it and will stick my finger in some of the bottom holes. If it feels very wet, I will not water, if it is just slightly damp, I water. As long as the soil is good and you have enough drainage holes, there should not be a problem.
You also have to be careful when fertilizing. If you apply too much fertilizer, you will get excessive leaf growth and poor production. A water soluable food, given right after harvest is what works best for me.
The color of the barrel should also be considered. Strawberries need full sun, 6 hours minimum. I have never seen any, but avoid using a dark colored one. Black, dark blue or even a dark green can absorb the sunlight and get too hot. I like the white and light blue myself. If you want something that blends in a little more to your landscape, painting the barrel a light green or even beige will soften the appearance. You will need to consider this before planting.
Some of the advantages are things like space saving. As you can imagine, 35-40 plants that one of my barrels can hold, would take up a LOT of space in the garden. Having them "up" off the ground also keeps the fruit cleaner and easier to pick.
I will not sugar coat this, Strawberries are also one of the most problematic fruits that you can grow.
They are subject to many diseases, which I will not go into here: fruit rots (gray mold, anthracnose), leaf diseases (leaf spot, leaf scorch, leaf blight), crown diseases, root diseases (red stele, black rot) and viruses.
Some of the best pieces of advice I can give you when it comes to these problems is, plant only certified disease-free plants, look for resistant varieties and sanitation, sanitation, sanitation. Make sure you remove any diseased or dead foliage and ripe or rotten fruit.
Root weevils, aphids, mites, slugs and snails are among potential pests. Birds are also a huge problem. Netting is about the only sure fire way to foil them. The net will have to be anchored all the way around the barrel, otherwise the birds will walk under it.
Please don't get me wrong, I certainly do not want to dissuade you from growing your own Strawberries, I just wanted to give you all the information. Strawberries can and are one of the most rewarding food crops to grow in a small home garden. Homegrown berries taste far better than the store-bought ones and you can save some serious money by not having to pay supermarket prices. They are the first to ripen in the Spring, berries begin to ripen four to five weeks after the first flowers open and continue to ripen for about three weeks, they also bring a sigh of relieve after a long dreary Winter.
With some luck and good horticultural practices, these guys will even help you with replanting, which should be done every 3-4 years as the plants get older and non-productive. They will send out runners that root very easy and can be trained and held in place in the soil of different holes around the barrel.
Hopefully this will inspire you to try your hand at Strawberries and you will be able to find yourself a barrel (or two) and grow some healthy, tasty fruit.
As always, if you have any questions or comments, please feel free to contact me.
Happy Growing!
Darren

