With Thanksgiving right around the corner and all things pumpkin on your mind, I am sure you are going to love this project. We were inspired by pumpkin pie of course! That scrumptious, flaky pie crust, the sweet spice of pumpkin center, topped off with fluffy creamy whipped topping! Your mouth is watering isn’t it? Are you craving a slice of this tasty treat? You could head to the kitchen and get baking. Alternatively, you could save yourself some calories and make a candle instead. However, I will warn you, if you have company over, they will probably walk in, take one sniff, and expect the real thing. Our customers say Pumpkin Pie Spice Fragrance Oil smell just like a freshly baked pumpkin pie. We agree it is strong, authentic, and amazing!
Pumpkin Pie Candle Recipe Ingredients
Ingredients available at Natures Garden:
Joy Wax
Pillar of Bliss Wax
Pumpkin Pie Spice Fragrance Oil
Silicone Soap Mold – 24 Mini Pumpkins
Spectrum Liquid Candle Dye Brown
Spectrum Liquid Candle Dye Yellow
Spectrum Liquid Candle Dye Orange
CD 12 Candle Wicks – You will need two of these.
Pouring Pot
Thermometer
Other Ingredients You Will Need:
Scale
Hot Glue Gun
16 Ounce Apothecary Jar
Toothpicks
A Pot (For Double Boiler)
Stainless Steel Mixing Spoon
Working With Natures Garden’s Pillar of Bliss Candle Wax
We will start by preparing the embed for the top of the candle using our Pillar of Bliss Wax. Since it is a pillar wax, it will pop out of the mold nicely. Before beginning, we should go over the temperature recommendations for this pillar and tart wax. Heat the wax to 195 degrees Fahrenheit. Once it reaches this temperature, add your color, stir to incorporate the color. Then, allow the temperature to drop to 180 degrees Fahrenheit before adding the fragrance oil. Anytime you are melting candle wax use a double boiler. This means placing water in a pot on the stove, then placing your pouring pot the warm water. Also, remember to melt the wax on low heat. Using low heat will prevent the wax from burning.
Working With Natures Garden’s Joy Wax
For the majority of our Pumpkin Pie Candle Recipe, we will be using Joy Wax. Joy Wax is a container wax. What this means is it is made to adhere to whatever container you put it in. If we tried to use the same pillar wax we used earlier, it would not cling to the jar. So, since we want a nice glass adhesion, we chose a container wax. First, we will go over the temperature instructions for the Joy Wax. As always, you will want to melt the wax on low, and in a double boiler. Heat the Joy Wax to 200 Fahrenheit. Add the candle colorant at this temperature. Let the container wax cool to 175-170F. At this temperature, add fragrance oil. For the best results, we have found that pouring at 165-160F works well.
Pumpkin Pie Candle Recipe Step by Step Instructions
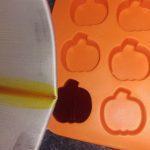 Pumpkin Pie Candle Recipe: How to Prepare the Wax Embed

Now, get the silicone pumpkin mold out, and we will start creating our wax melt embed. First, you will need your pouring pot and your scale. Place the pouring pot on the scale. Next, add 1 ounce of Pillar of Bliss Wax. Following the wax instructions above, melt your wax. Use a toothpick to add a bit of the orange candle colorant. Then, at the correct temperature, place your pouring pot on the scale, and add 0.1 ounces of Pumpkin Pie Spice Fragrance Oil. Stir with your stainless steel mixing spoon to fully incorporate all of the ingredients. Finally, pour the orange candle wax into one of the cavities of the pumpkin mold and let it set up. Once it has set up remove it from the mold, set it aside. You will not need it until we are finished making the pumpkin candle.
Pumpkin Pie Candle Recipe: How to Prepare Your Jar
We chose to use an apothecary jar for this recipe. Prior to creating your candle, you will need to have two CD 12 candle wicks. You will also want to plug in and heat up your hot glue gun. Place a dab of hot glue to the metal wick tab of each wick. Adhere the candle wick to the bottom of the jar. You want them to be equally spaced. Also, be sure they are centered.
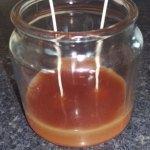 Pumpkin Pie Candle Recipe: How to Prepare the Pie Crust Layer

The next step will be preparing the bottom layer. Our goal here is to achieve the color of the pie crust. This layer will start at the bottom and go about one inch up. Again, using your scale, place four ounces of Joy Wax in the pouring pot. Melt the wax as described above.
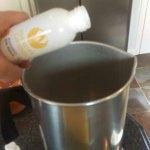
When your Joy Wax is at the correct temperature, add your candle colorant. You will need to add 1 drop brown liquid candle dye. Then, use a toothpick to add a bit of yellow. Stir to blend the color completely with the wax. Next, place the pouring pot on your scale. Add 0.4 ounces of Pumpkin Pie Spice Fragrance Oil. Once the wax reaches the correct temperature, pour it into the jar. Remember, this is a layered candle. Pay close attention to the sides of the jar. You do not want to splash the wax on the sides of the jar. I recommend pouring slowing, and also down the center of the jar. Place a pencil across the opening of your jar. Wrap your wick around the pencil. This will keep your wicks centered and straight. We allowed this layer to fully set up before moving to the next step.
Pumpkin Pie Candle Recipe: How to Prepare the Pumpkin Layer
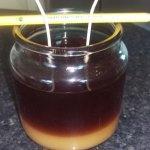
Next, to achieve the pumpkin pie color you will need three of our liquid candle dyes. We used orange, brown, and yellow candle colorant. Add 2 drops orange, one yellow, and one brown. Alternatively, you could use color blocks. However, you will need to play with the amounts a bit. You will use two parts orange and one part of each brown and yellow color blocks. Once you add your color, stir slowly, but thoroughly, to blend the color with the wax.
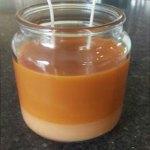
Pumpkin Pie Candle Recipe: How to Prepare the Whipped Topping Layer
The final layer will be a whipped cream topping layer. This layer also uses Joy Wax. However, we will use it a bit differently. We will be whipping the wax. This will give the candle wax a whipped cream appearance. You will prepare the wax as you have before. The only exception is we will not be pouring it at 165 degrees Fahrenheit.
Now, this time, instead of pouring, let the wax set up a little bit. You want your wax to be a slushy consistency. Once it gets to this state, use your stainless steel spoon to whip the wax. Whip the wax until it has a fluffy whipped cream texture. Now, remove the pencil, but as you begin adding your wax, remember you want the wicks to stay centered. Start adding your whipped wax to the top of the pumpkin layer. Use the spoon to create peaks in the wax. You will need to work pretty quickly. Move to the next step before your wax finishes hardening.
Pumpkin Pie Candle Recipe Finishing Touches
Remember that wax pumpkin embed you made earlier with our Pillar of Bliss Wax? This is where you will need it. Place that embed in front of your candle wicks. You want to sink it slightly into your whipped topping. Additionally, we looped the wick around the pencil before removing it. This created a decorative curled wick. However, it should be trimmed to 1/4 inches before burning. We should also note, the pumpkin embed is purely decorative. We recommend removing it prior to burning the candle. It is a wax melt that can be used in yours or your customer’s wax burner. It does, however, make for an adorable finishing touch on the candle. We recommend letting the candle cure for a couple days prior to burning it. But after that, light your candle and let the pumpkin aroma soar.
We hope that you enjoyed making our Pumpkin Pie Candle Recipe with us! Nature’s Garden feels it will make a wonderful centerpiece on your Thanksgiving table, or as a decoration in your home. Not only does it smell amazing, but it looks fabulous too! It has a strong scent and we are sure both you and you guests will love it this holiday season! Once you finishing making this candle recipe we would love to see your results. Take a picture of your finished candle! Then tag us on Facebook or Instagram! We can’t wait to see your homemade pumpkin pie candles!


