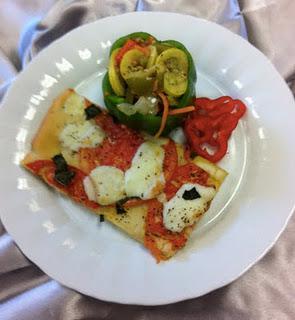
 The media has recently been obsessed with the pizza is schools - but they have gotten the story all wrong. There Are PLENTY of pizza veggies in schools - on top of pizzas (like the local tomatoes in this photo from Foster-Glocester High School in Rhode Island), as side dishes (summer squash, zucchini, green/red peppers, carrots, and onion here), and incredible varieties on salad bars.
Pizza at school us so much more than the inside-the-beltway food fight would have you believe! Check out the amazing pizzas being served from coast to coast on School Meals That Rock.
For at home treats, I heartily recommend pizza-on-the-grill. From much trial and error (uncooked, burnt-to-a-crisp, and everything in between), here’s what I have learned grilling pizza.
- Get well organized beforehand. Once things get cooking, you need to keep the pizza assembly line moving steadily while the grill is hot. (I generally save my wine to drink with the pizza.)
- Aim for a medium-hot grill with coals (heat) well-spaced underneath the cooking area. Too hot, you’ll have a burnt crust, too cold and nothing will melt on the top. You can put the crust directly on the grill or, as I prefer, use a metal pizza pan with holes.
- Go minimalist with toppings. This is not the place for your favorite man-cave, five-meat, four-cheese pizza recipe. If you load up the toppings, the heat will have trouble getting through to melt the flavors together.
- Make it a group effort. Actually, very little effort is required when many hands are involved. Guests and family can help chop and prepare toppings. Then, as the crusts come off their first round on the grill, folks can create their own unique and flavorful combinations.
BASIC PIZZA PROCESS:
- Prepare dough. Roll out smallish (1-2 person) pizzas that are thinner in the center and have a small rim around the edge.
- Grill crust on one side until golden brown. Time required may be as little as 5 minutes, depending on the temperature of the grill. Burst any dough bubbles that rise on the top of crust.
- Flip pizza and add sauce and toppings on the cooked side of the crust.
- Place uncooked side of pizza on grill; cover and cook until ingredients are heated throughout and bottom crust is golden. Cheese should melt but may not bubble as it would in oven.
- Remove from grill; let cool for a minute or two on a cutting board or counter top. Slice and serve with a tossed baby green salad, your favorite summer wine or ale, and fruit for dessert.
TOOLS OF THE TRADE:
- Grill
- Metal pizza pan with holes. While I always use a pizza stone in the oven, I find that they don’t get hot enough on a charcoal grill.
- Nice big spatula (for moving pizza around)
- Plenty of cutting boards or counter space (to cool and cut pizzas on)
- Rolling pizza cutter (easier than a knife)
ESSENTIAL INGREDIENTS:Crust:
- Use your favorite pizza dough recipe. Make certain that it can be rolled (or stretched) to be relatively thin so it can cook quickly.
- I let my bread machine do the kneading (so that I can take an afternoon walk). I use high-gluten bread flour and a simple recipe that includes olive oil and honey, adapted from Laura Werlin’s All-American Wine and Cheese Book (which also is the basis for one of my fav topping combos, noted below).
- Go lightly with sauce, if you use any at all. Since the heat is mostly below the pizza, too much sauce can make the crust soggy and keep the other ingredients from heating up nicely. Instead of sauce, brush crust lightly with olive oil, flavored if you like. Instead of plain tomato sauce, consider a thin layer of pesto or spicy BBQ.
- I favor light, local, fresh ingredients in unusual combinations. The combo that I love from Werlin’s book is Gruyere, wild mushrooms, and arugula (any tender green could be used). The mushrooms are drizzled with olive oil and lightly roasted in the oven or on the grill. The arugula is tossed with fresh lemon juice and olive oil; then placed on the fully cooked pizza.
- Other delicious options: leftover Thanksgiving turkey (!!), grilled chicken, salmon, sausages, vegetables (asparagus to zucchini) and/or fruit (think pineapple) cooked just prior to the pizza. For cheese, think beyond the typical pizza blend to Asiago, blue, Chevre, feta, Gouda, Pecorino, and Swiss.

