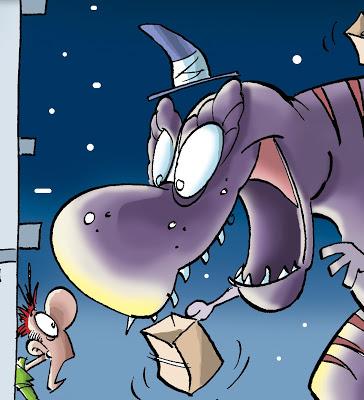
 I've been hard at it this week, producing the artwork for my first foray into the children's book market. The project has now past the half way post and is heading into the home straight.
Although at the moment its just a random selection of illustrations, it will soon coalesce into a book called Ryan's Dinosaur Dreams.
Originally it was a project I was going to do for my grandson on his birthday---and it still is--- but so many people have stated a desire to own a copy, I decided to offer it up as a print on demand (POD) book.
Of course the regular readers of my blog will already know this, but if you are new to our little corner of the web then please feel free to follow this link and catch up; don't worry we'll all just wait here for you.
Okay? All up to speed? Good, see I told you we'd wait; we were just sitting around, shooting the breeze and waiting for you to come back... we're good like that.
Anyway, I digress, as I'm wont to do on far too many occasions; let's move on to the purpose for this blog. This is another one of those 'behind-the-scenes' things I do from time to time; this one will deal with the Photoshop rendering of one of the cartoon illustrations from the Ryan's Dinosaur Dreams book...see, there is a connection. It's not just random stuff thrown up at the web...I'm digressing again aren't I?
Right, here we go. Ryan's Dinosaur Dreams--- a behind the scenes look at my Photoshop technique--- take one:
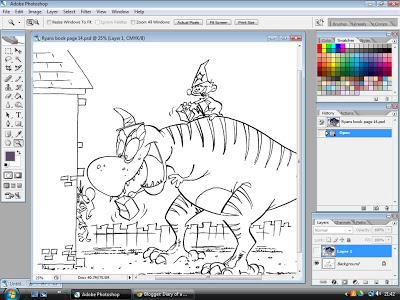 1. First off I scan my pencil and ink artwork into Photoshop as Black and White at 300dpi.
Once scanned I leave it as a Bitmap and clean up all the marks on the page.
I then click Image+mode+greyscale and thenclick Image+adjustments+levels and drag the dark cursor fully across and click ok and then do the same for the white.
Then I go back into Image+mode+CMYK; over in the layers box I click 'new layer' and select 'Multiply' from the drop down menu.
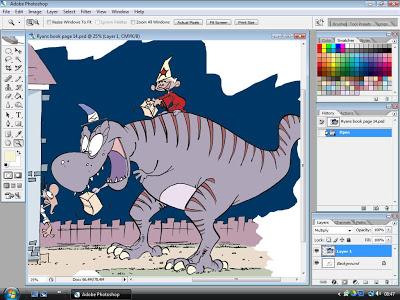
2. Next I chose my base colours and lay them flat using the 'paint bucket' tool.
Sometimes I work within the confines of a box or borders, but for these illustrations I wanted them to be soft edged and loose. I know the edges don't look very soft at present, but all will be explained in due course, my little pretties.
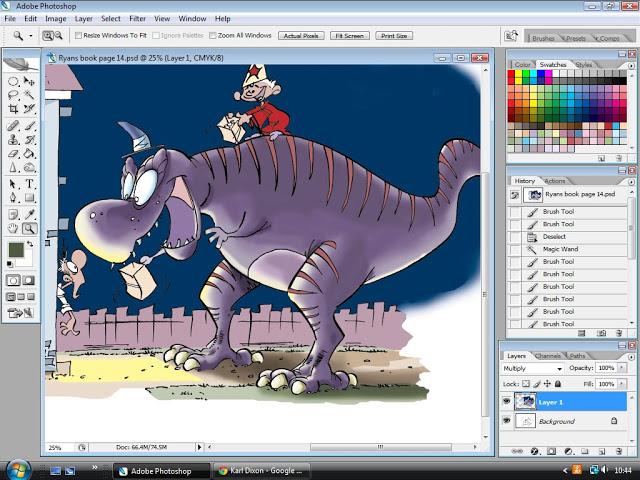
3. Now we come to the fun bit. This is where I give the characters a 3-Dimensional feel. I use a mix of the Air Brush tool; at around 65-100% and the pencil tool, usually at 19%. (These can be found on the left hand tower menu. It's the icon shaped like a pencil; the Air Brush tool is nested within the pencil icon box).
I select the area I'm going to be working on---in this case the dinosaur---clicked onto the mauve area with the magic want tool--- making sure that the 'contiguous' box is un-ticked. This means that when I airbrush in with darker colours it will only show on the selected area and not the other characters or objects around it. It's one of the very neat things about painting in Photoshop.
*Note: When you click the wand tool on your selected area a moving dotted line should highlight the area you've selected. If it selects an area outside of your chosen image it means you have a break in the line somewhere; deselect the magic wand (Ctrl+D), then connect up the broken area or areas and do it again. Also, those little dotted lines can be very distracting so to make them go away click Ctrl+H, this will hide the line but still leave your selected area selected.
I built up the layers of dark first, getting progressively heavier as I went on, while also thinking about the light source and how it would effect the dinosaur's muscle structure.
In this case, because its a night-time scene and its outside someone's house, the light coming out should be a soft yellow glow. Think where the light would hit and place it with the Air Brush tool, not the pen as the Air Brush has a softer edge to it and blends better. Also a good point to make: work with a lighter shade than you need, its always easier visually to darken it later.
Once you've worked on the main character apply the same 'magic wand' technique to all the other objects and characters in your picture; always thinking about where the light will fall giving the whole picture a 3-Dimensional feel.
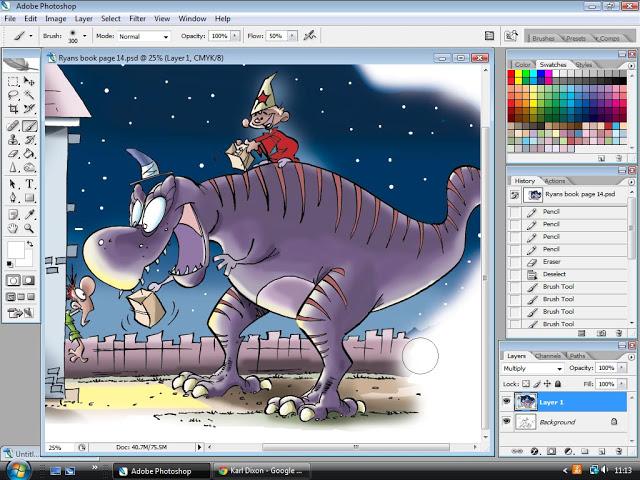
4. Once you've been around the whole picture, giving every character and object the same Air Brush and pencil treatment, its time to soften those edges.
This is really simple; all you do is make sure that you 'deselected' (Ctrl+D) the magic wand, select the Air Brush tool and select white as your color and run it at 300%. Then just go around the picture and the white will automatically remove the hard edges and blend whatever it touches into a soft, feathered look. You can see the Air Brush in the picture above; it's denoted by the large circle.
A word of warning though: always make sure you never let the Air Brush tool touch your main characters; they must remain crisp.
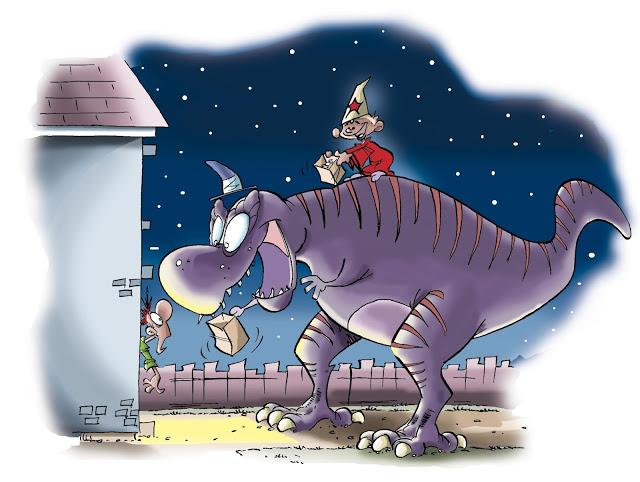
Okay, that's it. That's how I produce an Air Brush cartoon in Photoshop and here's the finished piece of art.
Next week I'll be posting about my first short humorous novel about a village full of idiots, which is hopefully to be published later next month, and if I have time I'll post about the cover for my Ryan's Dinosaur Dreams book, but it may not happen until the following week.
Either way, don't forget to come back every Friday for the next page from my Brabbles & Boggitt graphic novel
I hope you enjoyed this tutorial? If you did and you've like to see more, including video tutorials, then click here and let the learning continue!
If you like my blog and the things that I say and do, please tell your friends; mention me on Facebook, Twitter and any of the other fine social media networking sites you use. I would love to have my work reach a much larger audience and although I could no doubt eventually get there under my own steam, I'll get there a lot quicker with your help, so please, please spread the word.Thank you
