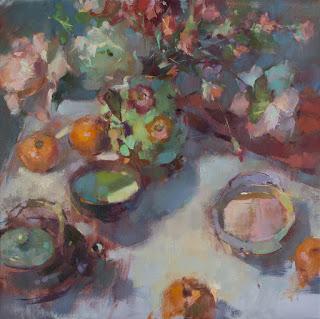
30 x 30 in progress
Brushes are great, but they can feel a bit obvious: we've all seen (and made) paintings in which you can tell exactly which type of brush was used and what width it was; flats are particularly distinctive in a painting. While I do try to vary the type of brush that I use: flats, filberts, and rounds, and the type of bristle: synthetic or natural; soft or stiff, I still feel that all of the marks clearly say "brush" and that the color is sometimes less clean than I'd like. So the painting knife has become a bigger part of my work.I've mentioned this in a previous blog, I know, but I thought that this in-progress still life had a good example of the difference between brushes and knives in alla prima painting.
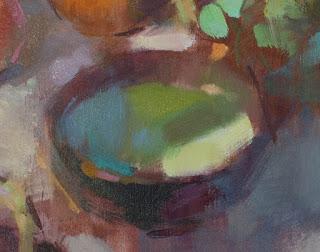
The bowl of water below was painted with brushes. I left a space open for the clean swipe of pale green because I couldn't achieve such a high key, clean area if I'd been layering over another color wet in wet.
You can see that the marks have a softness to them from the pressure of my hand (I paint firmly!) spreading the bristles slightly as I place the mark. That softness also comes from the fact that I have to slightly dilute the paint in order to allow it to flow smoothly off my brush and make simple, long strokes.

using a brush
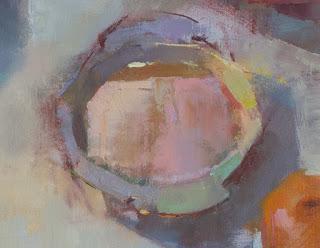
The second water bowl was painted using a knife. It has an entirely different feel: crisper and less obvious in displaying the method of its application. And, it has a patch of clean, high key paint that's been placed over darker, wet paint. The center of the bowl was initially a warm dark ochre, and, with a loaded knife, I smoothed the pale pinks and peach colours over top, allowing some show through. I think it really says "water". If I were painting a reflective pond, I'd do it this way so that I could build a lot of colours underneath the reflection first.The paint consistency was my preferred "mayonnaise softness" so that I didn't have to press too hard to move it over the length of the bowl, but, even with the pressure of my hand, it didn't soften at the edges. It has a totally different effect than the brushwork.
knife painting
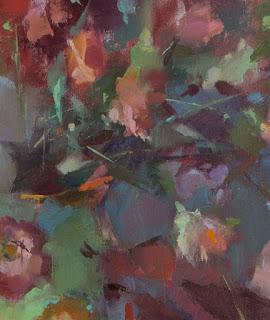
To make the brush-painted bowl settle in with its rather edgy company, I added a line of knife-applied orange on the left side. It serves as a link between the softness of one tool and the crispness of the other. Because the knifed bowl has so much brushwork near it, I haven't felt the need to add a brushy touch to it. But it's still in progress, so who knows what will happen in the future?I like both effects. A painting done entirely with the knife or one done entirely with the brush aren't as exciting for me as a painting that shows both. Knives and brushes can live harmoniously within the same work as long as they're each sprinkled throughout the surface. Those crisp little lines and dashes in the top third of the painting are done with a knife edge laid over brush work.

It's just another piece of visual vocabulary and I'm having fun exploring it.
If you, like me, struggle to find a good, flexible knife, I can recommend Oakblade Palette Knives by fellow Canadian Ray Hyder for their extreme springiness and razor-sharp edge. And, no: this isn't a paid promotion; more of a public service announcement. Ray didn't ask me to shill for him, but I like to mention good art supplies when I find them.
Also, if you're looking to paint some florals with me, I hope you'll consider joining me for a 3-day workshop in BC in June at Bear Valley Highlands. There are only 3 spots left.
Happy painting!

