Why do I bake bread?
1. Because the world can be a scary place. For me, the process of measuring, kneading, and waiting allows my mind to settle on a singular purpose--creating something whole out of a collection of disparate parts.
2. Because I like my house to smell good. Forget synthetic room fresheners or heavily scented candles. Give me the aroma of baking bread and melted butter. Nothing, and I'll stand behind this, smells better than freshly baked bread.
3. Because bread brings people together. This morning, I visited a local bakery in Austin. As I sat with friends, I watched families, couples and acquaintances join the snaking line to the front counter. Seeing all these people together, in a store full of flour and sugar and the heady aroma of yeast, made me glad I participate in this age-old endeavor.
4. Because bread heals wounds. If you've flipped through a magazine lately, you might have seen an advertisement for Pepperidge Farm Cinnamon Bread. In the middle of the page, a single slice of cinnamon bread rests, with all its sugary swirls leading to one small cinnamon heart in the middle. Can any food make me feel better than a slice of warm bread?
 Last week, I had the privilege of teaching a bread baking class to some folks here in Austin.
Which brings me to the 5th reason why I love baking bread...
5. Because bread is best baked in the presence of real people. Of course, there is much to learn in this world of blogs and cooking magazines. Obviously, I'm a big proponent of the online movement. But there is something to be said about talking to a real person, watching them knead dough and then learning how to do it yourself. As much as I love blogs and YouTube and twitter, I don't think we'll ever do away with real-live learning and teaching. At least I certainly hope so.
Last weekend, I taught a bread-baking class with Hour School, an amazing organization that empowers anyone to teach and everyone to learn. I encourage you to explore their website, see if classes are offered in your hometown, and consider teaching your own.
We are all learners. We are all teachers.
So even though I'm happy to share this recipe for a classic lean dough, I hope you can find someone (maybe a friend, family member) who can bake this with you. Because bread-making is an art worth learning...and passing on.
A lean bread is the main-stay of artisan breads from around the world. Simple ingredients + ample time for a slow and flavorful rise = some of the best bread you'll ever make or taste.
This is what the French do. This is what the Italians do. And if you've traveled abroad, you know that Europe has bread-making down.
 Lean Bread
*Yields two sandwich loaves, 4-6 boules, or up to 24 rolls
24 oz (5-1/3 cups) unbleached bread flour
2 teaspoons table salt
2 teaspoons instant yeast
18 oz (2-1/4 cups) lukewarm water
1. Combine everything in a large bowl and stir for 2 minutes with spoon. Or, combine ingredients in the bowl of a stand mixer, and mix on low speed with paddle attachment.. The dough will come together but will look very shaggy and sticky.
2. Lightly oil another bowl and transfer dough into the bowl. Let rest for 5 minutes.
3. Oil your hands lightly. Stretch the dough into a rectangle and fold two opposite ends on top of each other and then fold the other two ends on top. Place the dough seam side down in the oiled bowl. Allow the dough to rest for 10 minutes.
4. After ten minutes, lightly flour a surface and transfer the dough. Stretch the dough into a square or rectangle. Fold the two opposite ends on top of each other and then fold the other two ends. Place seam side down in oiled bowl and cover with plastic wrap. Repeat this process two more times, with 10 minute resting periods in between. You need to complete these 4 folds within one hour.
5. Place the folded dough in the refrigerator to proof overnight. 2 hours before baking remove from the fridge and divide into 2-4 equal pieces (you can also use this recipe to make 24 rolls.)
7. You can shape the dough into boules, loaves or rolls.
Boules—the fundamental shape. This process creates tight surface tension, which allows the bread to rise up and not just out. The key in this step is to press firmly on the bottom crease to tighten the surface. To shape a boule: pat the dough into a rectangle, and then bring all four corners together in the center. Squeeze the corners to seal them and tighten the skin of the dough to create surface tension. Use your hands to rotate the dough on the counter and make a tight, round ball.
Sandwich Loaves—flatten the dough into two 5 x 8 inch rectangles. Working from the 5-inch side, roll up the length of the dough. The log should be 8 inches long. Pinch the final seam closed with your fingertips. Gently rock the loaf to even it out. Don’t taper the ends; keep the top surface of the loaf even. Place the loaf in a greased pan, seam side down. Repeat with 2nd rectangle
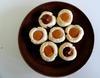
Rolls—place a 2 oz piece of dough on work surface, cup your hand around it, then rapidly rotate the dough in a circular motion, as if trying to push it through the counter. Transfer the rolls to a parchment-lined baking sheet to proof.
Put cornmeal or flour on a baking sheet lined with parchment paper. Place the shaped dough on the mat and cover with plastic wrap. Allow to rise for 60 minutes. After first rise, remove plastic wrap and allow to rise for an additional hour. This will dry out the skin, making it easier to score if desired.
8. About 45 minutes before baking, preheat the oven to 550-degrees. Place a ramekin full of water on the bottom rack in the oven.
9. At the end of the second hour, with a serrated knife or sharp razor, score the top of the bread. Make sure you score with a quick move. Once the oven is heated, place the baking sheet(s) on the middle rack and close the door quickly. Turn the heat down to 450-degrees. Bake for 10-12 minutes and then turn the sheet 180-degrees. Bake for another 10-15 minutes or until the bread is a rich, golden color. Allow to cool for at least 30 minutes before slicing.
Always,
Monet
Anecdotes and Apple Cores
PS. A congratulations to Wendy for winning my facebook contest. If you haven't "liked" Anecdotes and Apple Cores yet, please take a moment to do so!