Last Update: 1/9/2015
Security has become an important part of using a personal computer. Gone are the days of just installing anti-virus and not worrying any further. Increasingly, the headlines include news of companies and websites getting hacked and personal date stolen. It is important to learn how to secure Windows and apply Internet Security, whether it is a notebook or desktop. Microsoft Windows remains the most popular personal computer operating system around. Because of its ubiquity, Windows has become a prime target for cyber criminals intent on stealing your information. This article focuses on how to secure your Windows-based PC so that you do not become part of the statistics. Our other tutorials help you secure your web browser, e-mail, secure your wireless network, online shopping, iPad, smartphone and more.
Before you make any changes to your system, always back it up.
We recommend booting from a Linux CD or USB key when performing mission critical applications such as online banking, online trading, or online shopping.
Physical Hardware SecurityIf the computer is located in a location accessible by others, it needs to be physically secured. Prevent others from stealing the machine, installing key loggers into the machine's ports, or other foreign, unapproved devices into your personal computer's USB interface ports. Consider disabling your USB ports for safety sake. Obviously, if the computer is located in a home, physical hardware security is not as important. Never, plug in a USB flash drive or device that you find on the ground or that unexpectedly arrives.
Consider buying a secure flash drive such as Lok-it that requires a PIN to be entered before it allows access.
Securing the Windows Vista and Windows 7 Operating System.We are focusing on securing Windows Vista and Windows 7 operating systems only. Older Windows XP does not possess the security models built into newer versions of Windows; XP will soon be unsupported. We have seen estimates showing that Vista has 60% less malware infections versus Windows XP. Windows 7 has an advanced two-way firewall, anti-spyware software built in, User Access control, an Action Center pointing out security problems, and much more. Windows 7 included Internet Explorer 8 (Which has been superseded by newer versions), which features In Private browsing, Smart screen filters, and domain name highlighting, among other security oriented features. A recent vulnerability in SSL, TLS 1.0 affects Windows XP because it does not support newer versions of SSL TLS like Windows 7. If you are still running Windows XP, we recommend upgrading to Windows 7. 64-bit versions of Windows 7 and Vista offer slightly more security.
Corporate Windows 7 Security GuidelinesThe NSA has a document on securing Windows 7 and performing Internet Security, as does the CCE. These documents are pretty detailed, but overkill for many users unless you are super paranoid like us.
Microsoft Security Compliance Manager (SCM) is a business oriented program that has continually updated settings for Windows, Microsoft Office, and Internet Explorer. You can view the settings they recommend and import them into group policy. This tool might be overkill for most end users, but it provides Microsoft's security recommendations that should be implemented by those who are security conscious.
Securing Windows Internal settingsConfiguring Windows so that it is more secure is extremely important. Out of the box, Windows could use some additional strength. Unfortunately the higher security level will result in more pop-up dialogs, something that cannot be avoided.
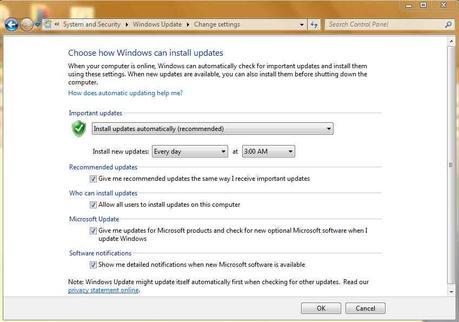
1. Getting the latest updated installed in your system is critical. Install all updates before you use your machine. Reboot if needed, as soon as possible, to ensure the update is installed.
- Ensure that Windows Update is set to Install Updates Automatically - Every day
- Open Control Panel from Start menu
- Select System and Security
- Select Windows Update
- Select Change settings (adjust if necessary)
- Click OK
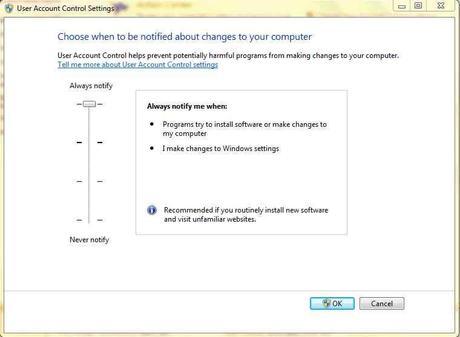
2. Set User Account Control to its highest Security level: Always Notify (Highest Level)
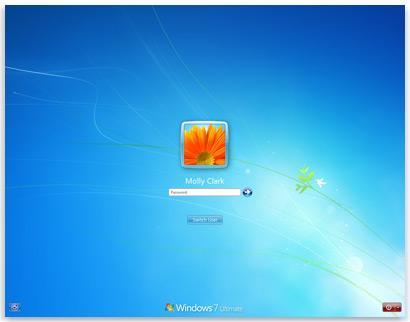
3. Ensure that you are using a strong Windows login password - See our How to generate secure passwords article. To change your password follow these steps:
- Click Start Button
- Type Windows Password into Start menu's Search Box
- Select Change your Windows Password from the results
- Select Change your password from the dialog
*Tip*- The Windows login allows spaces and symbols like !@#$% in the password, so use them.
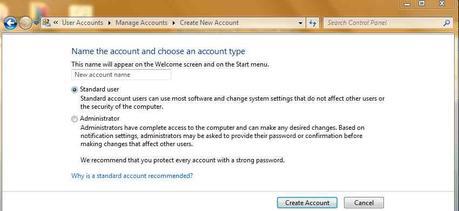
- Click Start Button
- Type Create Standard user account into Start menu's Search Box
- Select Create Standard user account from the results
- Click on Standard user
- Enter a new account name in the dialog
- Click Create Account
Also consider creating a standard user account for children or guests that share the same computer.
Note: If you are using Windows 7 Home, you cannot directly manipulate the administrator account. You need to use the command line to change the administrator's account password and name. Note that the following is a complicated task, not for beginners.
Open elevated privileged command prompt and enter the following command line to enable the Administrator account and set a password on it:
Where "strongpassword!!!!" is a password you want to assign to the administrator account.

5. Turn off Autoplay. Autoplay allows automatic actions to occur when you insert a piece of media. For instance, inserting an audio CD would cause it to begin playing. This has been a security problem because malware could infect media or USB devices and automatically run. To disable Autoplay, do the following:
Panda USB Vaccine performs the same task. Note, in February 2011, Microsoft disabled most Autorun features on Windows PCs, significantly reducing Autorun abusing malware.
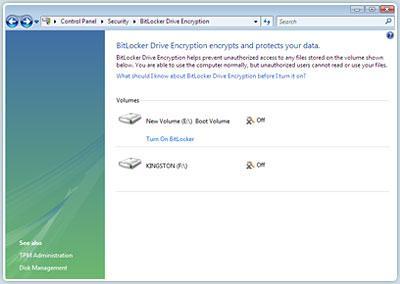
6. If you are using Windows 7 Ultimate or Enterprise, use its built-in BitLocker encryption to encrypt your hard disk drive. This encryption prevents users from booting up with a different disk and viewing your data. BitLocker normally requires a motherboard with a Trusted Platform Module (TPM) chip. Very few motherboards have this chip, so many users apply this setting to enable a USB drive to become the start-up encryption key. You need this USB drive to be plugged in during computer boot-up. Microsoft describes this technique in the following article.
There is also a version of BitLocker for removable drives, known as BitLocker To Go. To access BitLocker do the following:
- Click Start Button
- Type Manage BitLocker into Start menu's Search Box
- Select Manage BitLocker from the results
- Click Turn on BitLocker for each drive you would like to encrypt
Windows has a built in program called syskey that allows you to encrypt the SAM database and require a boot floppy or USB key to login to your computer. This protection prevents hackers from booting up from a USB flash drive or CD and accessing your system. The downside is that if you lose this key, you cannot access your data anymore. Syskey helps protect against Kon-boot.
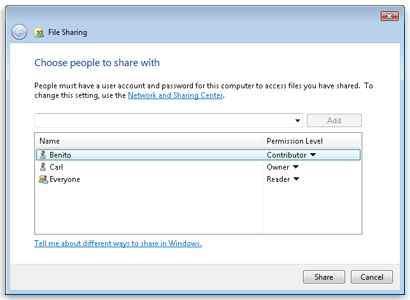
7. Prevent sharing of any files or folders that are unnecessary. This should be obvious, but becomes a large problem if you are connected outside the home, to a public network. To turn off file sharing do the following:
- Click Start Button
- Type Network and Sharing Center into Start menu's Search Box
- Select Network and Sharing Center from the results
- Select Choose homegroup and sharing options then select Files and Printers to be unshared, if necessary.
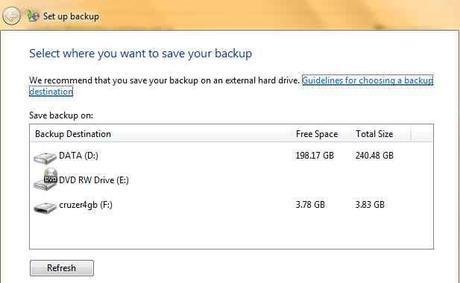
8. Setting up backups prevents accidental data loss. We all hate to back up, but losing data is far more devastating. Automating backups is a must because most users forget to backup. Your documents should be backed up at a bare minimum. We will setup automatic backups for your data.
- Click Start Button
- Type Backup into Start menu's Search Box
- Select Backup and Restore from the results
- Select Set up Backup from the dialog. You can tell it when and what to backup, and where to place the backup. We suggest you back up everything, daily to an external hard disk at a predefined time.
Consider an online backup service like mozy.com, so that you are protected if you lose your computer due to theft or a fire. For services like this, you may just want to backup your data files and not applications, to shorten the duration of backups. Online backups occur over the Internet, so they are especially slow if you have a lot of large files.

- Click Start Button
- Type Backup into Start menu's Search Box
- Select Backup and Restore from the results
- Select Create a system image from the dialog. The system image is an exact of your hard disk and is best created after you have set up your system with all your applications and data. You can quickly restore to this image if necessary. This should not be performed regularly, unlike normal backups.

- Select Control panel
- Select Programs
- Select Programs and Features
- Select programs on the list to uninstall
11. Windows 7's Disk Cleanup tool helps remove temporary Internet files, Windows components, and other unneeded files. Use it to free up disk space and increase the performance of Windows PC.
- Click Start Button
- Type Cleanup into Start menu's Search Box
- Select Disk Cleanup from the results
12. Structured Exception Handling Overwrite Protection (SEHOP) - Can be enabled to block exploits that use the Structured Exception Handler (SEH) overwrite technique. WARNING: After you enable SEHOP, existing versions of Cygwin, Skype, and Armadillo-protected applications may not work correctly.
13. Enhanced Mitigation Experience Toolkit from Microsoft (EMET) - Configures Internet security settings on specific security hole prone applications, to reduce the chance hackers can gain access from an exploit. We suggest you try this with Adobe reader, Adobe acrobat, media players like Windows Media Player, Internet browsers like Internet Explorer, Chrome and Firefox, e-mail clients like Windows live mail and Outlook. Slowly turn on features as some will cause compatibility problems. Mandatory ASLR mitigation should be enabled for Internet Explorer and other applications.
Beware that it may cause the application to malfunction, forcing you to disable it. Also this tool is updated from time to time, so keep your copy refreshed. Those running Windows XP will not have the level of protection newer operating systems have.
14. Data Execution Prevention (DEP) - Can be enabled for all programs and services. This security feature helps prevent damage from malware by ensuring your programs use system memory safely. By default it is turned on only for essential Windows programs and services. We can enable it for all programs. If you encounter a game or other program that behaves erratically, you can add it to the exceptions list.
- Click Start Button
- Type Advanced system settings into Start menu's Search Box
- Select Advanced tab
- Click the Settings button under Performance
- Click Turn on DEP for all programs and services except those I select
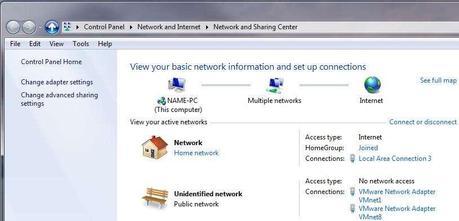
15. Change your network type to Public
When you are setting up a new network connection, Windows will prompt you to choose what type of network this is. The choices are Home Network, Office Network, or Public Network. A Home Network is the most open network because all computers on the network will be treated as friendly, allowing for easy sharing of folders and files, and also allowing the creation of a Home Group for all computers on the network.
Office Network is slightly more strict, but the Public Network is the most strict. Selecting Public Network will hide your computer on the network and disable file and print sharing. This is recommended if you are running a notebook and connect to external networks often. If the computer is only used at home and file or printer sharing is used, do not change the setting.
If you already have a network set up and wish to increase its security by changing it to a Public Network by doing the following:
16. Disable Remote Assistance and Remote Desktop
If you do not want people controlling your system remotely, you should ensure that Remote Assistance and Remote Desktop are turned off.
17. Require CTRL+ALT+DEL to Login
To guarantee the windows login screen is authentic, we can require users to hit Ctrl+Alt+Delete before they login. This guarantees the login prompt is not faked.
- Hit Windows key and the letter R
- Type "control userpasswords2" into the Box, Hit Ok
- If User Account Control is enabled, Hit Yes
- Go to the "Advanced" tab
- Under Secure logon Check the box that says, "Require users to press Ctrl+Alt+Delete"
18. Require CTRL+ALT+DEL to become Administrator temporarily
Some operations require Administrator Privileges temporarily, we can require a Ctrl+Alt+Delete to be hit before we allow the action to take place. This prevents fake screens from popping up and asking for Administrator Privileges.
If you are running Windows Vista Home or Windows 7 Home do the following:
- Hit Windows key and the letter R
- Type "regedit" into the Box, Hit OK
- If User Account Control is enabled, Hit Yes
- Navigate to "HKEY_LOCAL_MACHINE\SOFTWARE\Microsoft\Windows\CurrentVersion\Policies\CredUI\EnableSecureCredentialPrompting"
- Set this REG_DWORD to "1" then Click OK
- Then exit REGEDIT
If you are running Windows Vista Pro or Ultimate or Windows 7 Pro or Ultimate do the following:
- Hit Windows key and the letter R
- Type "gpedit.msc" into the Box, Hit OK
- If User Account Control is enabled, Hit Yes
- Navigate to "Computer Configuration\Administrative Templates\Windows Components\Credential User Interface"
- Open "Require trusted path for credential entry"
- Check Enabled and Press OK
- Close the Group Policy Editor
19. Show Hidden files, folders, drives
Executable files have masqueraded as innocent pictures. This helps to unmask hidden files. A file you think is a jpeg picture, could be a hidden executable with a picture icon.
20. Use AppLocker
White listing only known good applications and preventing all others from running is a great way to secure Windows. Windows 7 Ultimate and Enterprise includes AppLocker which works great but is designed for corporate environments that have Active Directory servers.
By applying special Windows settings, we can significantly increase the Internet Security of our Windows notebook and desktop PCs.
This concludes our How to Secure a Windows based personal computer article. Other articles on Safegadget.com help you secure the other aspects of your personal computer, including How to Set up a Secure wireless Internet Router, and How to Secure Internet Explorer article, or How to Secure Firefox Article. Please see our other articles on security tips for your e-mail, iPad, online banking, online shopping, smart phones, and more.
