Having an eCommerce store, you often worry about your customers who add products to their cart and later leave the website. Sometimes, they come back after a day or two. But, the rest of them never come back to finish the purchase.
So, it is always essential for you to deploy some tools to get back these readers to your website. One great tool that will be useful to target these cart abandoned users is OptinMonster.
Note: This is a sponsored tutorial. However, the contents are completely based on my opinion and all the screenshots posted here are taken by me. If you want me to do a similar tutorial for your product/service, then check my advertising packages.
What is OptinMonster?

OptinMonster is a powerful Lead generation software that helps you build your email list. It has some great technologies like exit-intent, Geo Targeting, Drag and Drop Builder, Monsterlinks 2-step optins etc.
Not to forget, I have already written an in-depth review on OptinMonster. If you haven’t got to chance to read it, take a look at my OptinMonster Review now.
How can OptinMonster help you boost conversions with these abandoned cart users?
As I mentioned earlier, OptinMonster uses exit-intent technology. This technology will automatically detect the users who are trying to leave a particular page. As soon as OptinMonster detects the exit movement of these users, it shoots a nice converting email optin with some great offers that will increase conversion and instantly boost the revenue of your site.
With this email optin, you can get their email addresses and later send some exciting offers / get their feedback on why they abandoned the cart. This feedback will give you an idea about what your customer expects from you.
How can I create an OptinMonster campaign for Abandoned Cart Email Strategy?
To get started with OptinMonster, you need to have an OptinMonster account. If you need help in creating an OptinMonster, do refer to this tutorial.
Creating a New Campaign in OptinMonster:
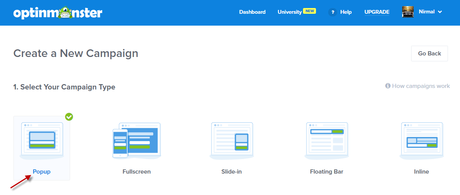
The first step to proceed with this strategy is to create a new campaign. On your OptinMonster dashboard, click “Create Campaign”

The next step is to choose Campaign Type. There are 5 different campaign types namely, Popup, Fullscreen, Slide-in, Floating Bar and Inline. However, the most suitable campaign types for this strategy are:
- Popup
- Fullscreen
- Slide-in
For this tutorial, I will go with a Popup
After choosing the campaign type, proceed with choosing Campaign Template. You can choose the template that best suits your website. You can also make use of the Goals and Categories section in the sidebar to filter your campaign templates.
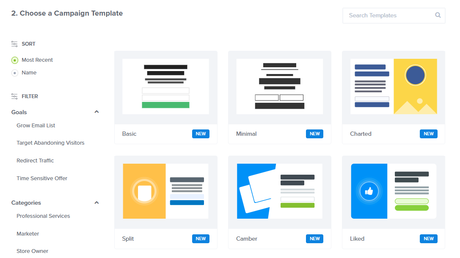
For this tutorial, I am choosing “Abandoning Checkout” template which has been designed especially for our Abandoning Cart Strategy.

Once you have chosen the template, give a name for it. And choose the websites where you want the campaign to appear.
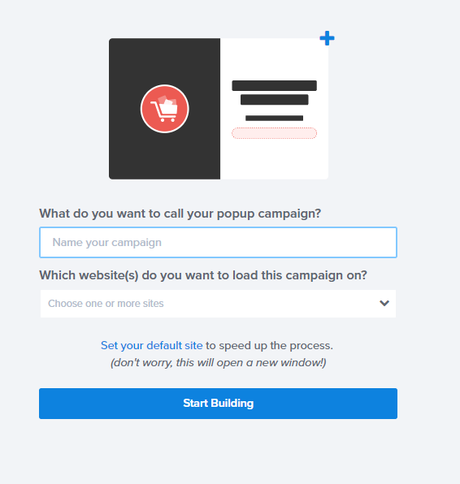
If you haven’t added your website yet to OptinMonster, then simply click “Add a New Website”.
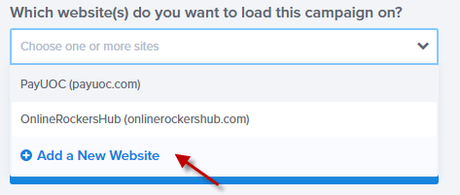
This will get you the form to add your website to OptinMonster list.
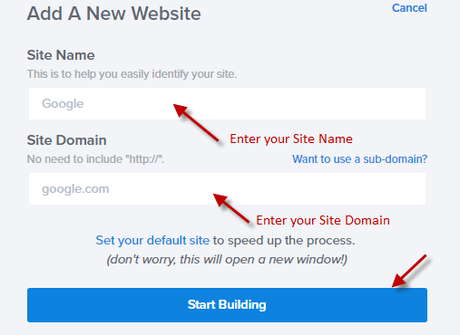
Once you have finished with this, click “Start Building” and proceed with customizing your optin.
Customizing your OptinMonster Campaign:
Now you will be coming up with an editing window, where you can customize your OptinMonster Campaign.
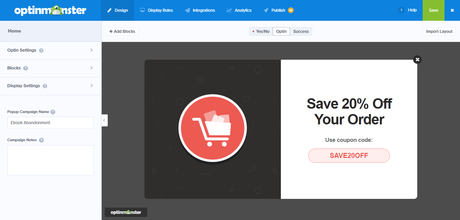
You can add more blocks to this optin, change colors, change text, and make all possible customizations.
Once, you finished these customizations, you need to proceed with display rules section.
Note: For this Abandoned Cart Email Strategy, just displaying an offer is not sufficient. You need to add fields to collect email address. So, make sure you collect the required details for your email campaign.
Choosing Display Rules for your Campaign:
It is a very important part of this strategy because you need to decide when you want this campaign to appear.
Under the conditions, choose the condition as “exit detected”. This will activate the Exit Intent Technology. Now, you can choose exit-intent sensitivity.

Choosing High Exit-Intent Sensitivity will make it work very aggressive. You can start with Medium and later the change the setting as you wish.
You can always choose multiple conditions. Just play with And, OR conditions to get the conditions you desired.
For this abandoned cart email strategy, it is wise to display the offer after the product is added to the cart. If adding product automatically leads you to the checkout page, then you simply enter the URL of the checkout page.

Integrating OptinMonster with your Email Automation Software:
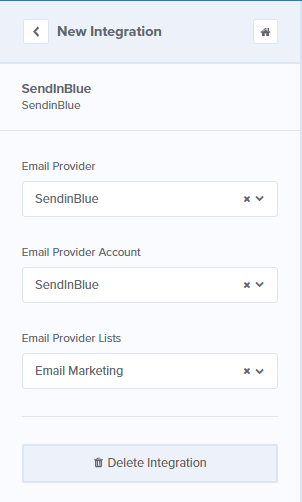
After choosing the display rules, proceed with Integration. Only under the Integration optin, you will be able to connect your OptinMonster account with your Email Automation Software.
I am using SendInBlue for my email automation. And I have already connected my SendInBlue account with OptinMonster.
Connect Google Analytics with OptinMonster:
After Integrating with your email provider, you need to connect with Google Analytics, to get metrics on how your campaign is performing.
Just click the “Connect” button and proceed with the settings to connect your Google Analytics account.

And finally, publish your campaign.
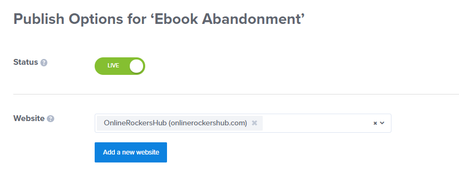
Just Make sure that your Campaign Status is Live. And you need to integrate your website with OptinMonster. If you have a WordPress site, use the OptinMonster Plugin or else you can simply add the code to your website.
Wait!
That’s not the end.
We still haven’t set the email autoresponders.
Creating Email Autoresponders:
Since there are numerous email marketing services, the procedure for setting up email autoresponders is going to vary for each. So, it is always better to refer the tutorials from your Email Provider. If you are using SendInBlue, you can refer to this tutorial for creating Email Automation.
While crafting email campaigns, focus on giving something to your customer on why they want to finish the purchase. Some useful resources to improve your email open rate and performance rate:
- 164 Best Email Subject Lines to boost your email Open Rates (2019)
- 14 Abandoned Cart Email Examples Proven to Boost Revenue
Now, that you have learned how to create a campaign for Abandoned Cart Email Strategy with OptinMonster, you can start to implement on this on your own website. Here are some useful resources for you to check:
- 18 Ingredients of High Converting Product Pages
- 36 Conversion Rate Optimization Tools that Pros can’t Ignore
- How DealDoktor Increased Conversion by 2100% by using Onsite Retargeting
Wrapping Up:
Since I don’t have any eCommerce site, I haven’t shared any results on mine here. However, if you have an eCommerce store, you can help other readers with these statistics and results.
How can you do that?
Just get an OptinMonster account, follow our tutorial, experiment this for a month and post the statistics at the comments section. You can also drop me an email regarding this.
If you find this tutorial useful, pin this.
Image Credits: Freepik
