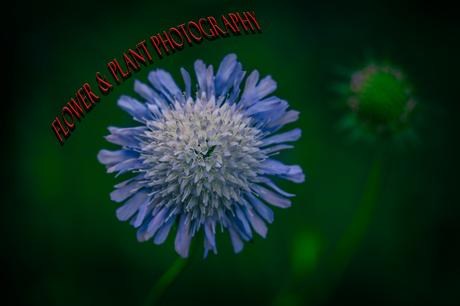
Flowers are one of the most popular photography genres because they just have it all: texture, colours, shapes and some would even say, a personality. But not all flower photographs are made equally, and the question is: how to make outstanding flower images? There are general rules and guidelines how to do this. But on the other side, rules a good but not obligatory. In my opinion, it’s rather a combination of common rules and the photographers own experiences and influences as well. Therefore, in this article, I’ll show you how I do flower photography, and hope to give you a valuable information you can adopt to your own flower photography. So read on, folks.
Preparing for the shoot
When I plan to go out for flower photography, I’m watching the weather forecast. However, I am not necessarily look for good or bad weather. For a cloudy or even a rainy day can bring a bunch of great opportunities as well, like equally lit subjects or excellent water drops on the blooms.
What I am usually looking for, is the forecast for the wind speed because the wind is very rarely useful in flower photography. Someone would say it could be a feature by emphasizing the movement. Yes, maybe. But it’s not what I am personally looking for. Therefore, especially if you are a beginner in flower photography, rather look for days with weak wind forecasts. Later, when you got your first experience in that discipline, you will find your own way.
If you wonder which part of the day is best for flower photography, it’s undoubtedly the time of the golden hour during the sunrise or sunset. But I did a lot of flower shoots at other parts of the day using natural shadows of surrounding subjects like trees. If you cannot shoot flowers during the golden hour, try a least to do this a couple of hours before the sunset. During the spring or summer time, it would usually be from 5 p.m.
Which gear to use for flower photography?
As usually, I’m using my full frame Canon EOS 6D*. But that’s actually not important, and if you don’t have a full frame DSLR, don’t worry. You can use any kind of a DSLR or even a system camera*. It’s all up to you what you would like to do and it’s about your goals. I am recommending this gear just because I made my best experiences with it. Therefore, consider the gear I am mentioning just as a guideline and not as the must have equipment.
As well I am using for flower photography a Canon 100mm macro lens* (EF 100mm f/2.8 L IS USM), and a normal zoom lens from Canon* (24-105mm f/4.0). Although I am using the last one just in about 30% of all cases when I shoot flowers or plants, I achieved good results with the zoom lens.
During the darker days or conditions, I am additionally using a ring flash (Canon Macro Ring Lite MR-14EX*) which is an excellent assistant to light a subject very close to the lens by providing a sufficient shutter speed to freeze the subject. Using a normal external flash wouldn’t be useful in this situation as it sits on the top of your camera and wouldn’t light the subject which is directly in front of your lens.
And last but not least, a solid tripod* is my steady companion. Especially in situations when you shoot very closely to your subject and you want to get your subject sharp from the front to the back, you need to make several photos from the same flower by changing the focus with every shoot. Later, you will stack it Photoshop* (or similar software). Doing this handheld, it would be very hard to achieve the desired result.
Some other extras you might find useful are gloves during colder days, flash triggers in case you would like to fire a flash remotely, kneeling pad or plant clamps. But those are just nice to have ones. I’m usually shooting without those items and mentioning them just for the sake of completeness.
Composition
Now, as we have got clear about the planning and the gear, let’s take a closer look at the composition of the shoots. As I mentioned at the beginning, following the rules is a good idea. But of course, combining it with your own style is even better.
As a photography beginner you might have problems to create your own style.
Therefore, I recommend you to copy the work of other photographers. This doesn’t apply only to flower photography but to photography in general. Doing this, you will eventually find you own way and will be able to add some own “fingerprints”.
So if you see a flower photo and you like it, take your time to analyse it. Ask yourself, why does it look good and why does it work? Is it the rule of thirds? Or does it work because the rule of thirds was ignored? Maybe it looks great because of the simplicity, because of the great matching of the colors. Maybe it’s a classic composition but the photo was shot from an angle you wouldn’t expect?
In other words, do you homework and then go out to practice. That’s what I also did. I copied the work of photographers I like, and I must say, it didn’t work well the first time. But the more often I analysed the photos and the more I practiced (shooting and post-processing) the better my photos became.
But just to give you an orientation: What I do, is trying to transmit a story in a single image. This can be by creating a strong subject and a light mood. Also, during the post-processing, I sometimes change the color of the background, remove disturbing elements and so on.
What I’ve also learnt is that even by copying the work of the others, that the patience it the key. You cannot just take a quick shot and go home, even if you are copying. What you need, is to stay for a while before your subject and let the pictures to play in your head. Just consider the flowers and take your time. When you spend time watching your subject, you would usually discover more than the casual photographer does.
Isolate the subject
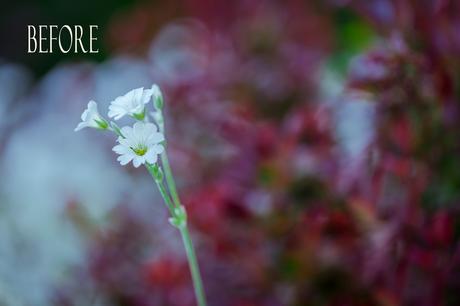
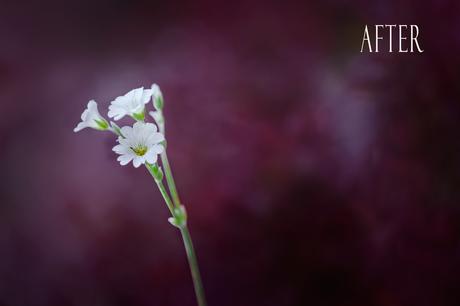
Shooting flowers, you should also isolate the flower from other unnecessary elements as often as you can. Isolating also means to create a smooth background with preferably consistently soft color gradients. If you don’t have the possibility to get a great background on location, you will at least consider replacing it afterwards during the post-processing. Here is one example of a distracting background during the shoot which I improved in Photoshop*.
Shooting flowers with zoom lenses
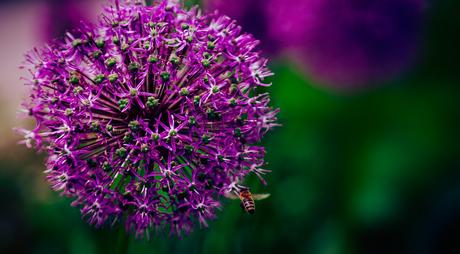
Generally, flower photography is associated with macro lenses. But if you ask me, it’s not always needs to be necessary. As I mentioned, I also did some shots with my 24 – 105 mm f/4.0 lens*. Of course, a 200mm or even a 300m lense would even be better. So if you have one, take it with you! Using a zoom lense would bring a different look, but it can be just as much appealing as shooting with macro lenses. The other advantage using a zoom lense is the fact that you can make a close-up photo of a flower which e.g. in the water (like a water lily) and which you would arrive with a macro lens. Think about it.
What you see here, is one of those images I took with a zoom lense instead of a macro lens.
Background considerations
I already showed you a background in the paragraph about the composition. But let’s get a closer look to backgrounds. In close-up or macro flower photography, the background is as important as the subject itself. By opening your aperture wide and reducing distance to your subject, you’ll get a very smooth background. But it’s important to choose a background which matches the colors of your subject. Therefore, take care to avoid so-called out-of-focus highlights (also called hot spots) and consider to reposition your camera.
But getting perfect backgrounds is not always easy, and it doesn’t mean, you should avoid to do a shot with a good subject but an unfavourable background. During the post-processing which you absolutely should do, you can replace the bad background in Photoshop* by a better one.
Understanding color
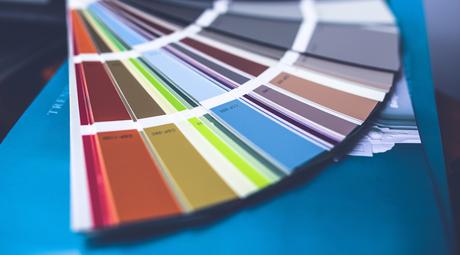
Not only the composition and the background of a photograph are important, but also the combination of colors within a photo. The better they match the more appealing the impact of your photo will be. For this, you should get into the habit to use a color wheel* when you do flower photography. Doing this, you would be able to achieve better results already at the beginning and would start with a better raw material in your post-processing.
Be selective and look for clean lines and strong colors. That means, that your image should have as less different colors as possible. For example, the most appealing background has only one single color (or at least related color gradients). When I do flower shooting and see a good subject but unattractive background with a riot of colors, I capture the image nevertheless and change the background in Photoshop. The more instinctively you understand the interplay between colors the better your images will become.
Depth of field and focus stacking
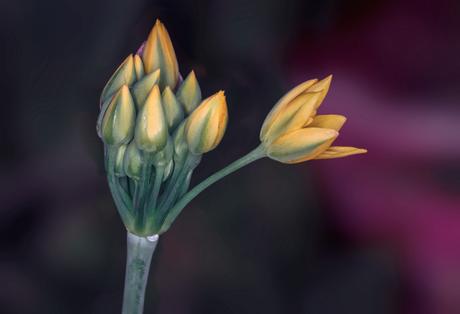
The central challenge in flower photography is the interaction between the depth of field and the sharpness of the subject. When I do flower photography, I try to get as close as possible to the subject to achieve the a very blurry background. The price for that is that I get a very narrow sharp range which forces me to do several pics of the same subject with different focussing points. Later, I would stack them in Photoshop* to one single image with a consistent sharpness from the front of your subject to its back. In this case, you would need a tripod to keep your camera totally still during the single shots.
For the picture below I took 5 shots with different focus points. The result was still not perfect but much, much better as every single image for itself.
Additional tips
Finally, I’d like to give you some additional tips. Remember that every aperture has its own “sweet spot” which offers the sharpest detail at the point of focus. Also remember that very small apertures lose their sharpness which is called diffraction. The diffraction depends on the type of lens and manufacturer, and it starts at the aperture between f/16 – f/18. Some macro lenses, like Canons 100mm lens EF 2,8 L IS USM*, has a tiny aperture of f/32, and shooting at this one, the loss of sharpness is pretty visible.
If you liked this article, you can check my flower & plant gallery, folks. I wish you a lot of fun trying out your own flower photography.
*Affiliate link: when you click on this link, no additional costs would arise for you and the product or the service will not become more expensive. When you decide to buy the product or use the service, I’ll get a little benefit from the provider which I would reinvest to keep this blog alive.
