When you get your new wig, do you feel that the wig is unnatural from different sides? Do you worry about not knowing how to wear a wig? Do you feel overwhelmed and don't know what to do first? Next, we will tell you what to do with the wig after we get it. According to our guide, you can use the wig as easily as a wig blogger on YouTube. Come and learn with me!
When we get the wig, we need to judge whether it needs to be bleached. Some Lace Frontal Wigs have very obvious knots at the roots, and you need to bleach them at the first time. The purpose of bleaching is to make the wig look the same as your skin tone and make the wig look like original and natural.
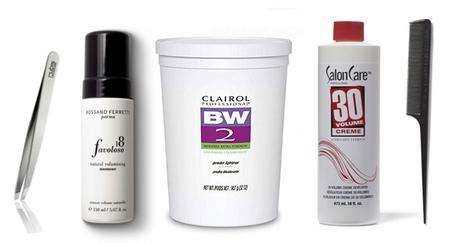
Things you may need to bleach roots:
1.Bleaching powder
2.Developer
3.Brushes
4.Mixing bowl
5.Shampoo

Here we just talk about it briefly, please pay attention to our official blog of Alipearl for the specific operation steps, where we will tell you in detail how to bleach hair roots.
First, you need to mix bleach and developer in a ratio of 1:1, then use a brush or plastic spoon to stir until it becomes thick and does not penetrate when applied to the knot. If it is too thin, add bleach accordingly , if it is too thick, add developer in an appropriate amount. Then apply the mixture to the lace with a brush, leave it on for 20 minutes, until the small black spots on the roots of the hair have been eliminated, you can first rinse the mixture with water, then wash them with shampoo.
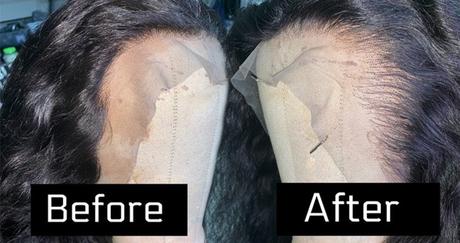
Next, we need to deal with the hairline. Why do you want to do this? Can't we just use it directly?Because generally speaking, the density of the hair on the forehead is not as dense as the hair on the back, the hair on the hairline is very sparse, and the hairline is not a straight line, it has a certain degree of curvature. We need to deal with the hairline. By pulling out part of the hair at the hairline, the wig will look more natural. After treatment, it will be like the hair that grows naturally.
However, the hairline of some wigs are pre-treated.After we received it, the hairline has been pre-plucked. Basically, we don’t have to deal with it. The wig will be more convenient to use, unless you look particularly dissatisfied with the pre-plucked hairline. The face shape is extremely asymmetrical, you can simply adjust it to make it more suitable for your face shape and contour. The shape of the general hairline is mostly m-shaped and square with natural radian. Of course, you can adjust the shape of the hairline to your liking, as long as you like it!

Things you might use to pluck hair:
1. T-nails
2. Rat tail comb
3. Tweezers
4. Styling mousse
5. Wide tooth comb
6. Clip
Put the wig on the model's head
For beginners, we recommend putting the wig on the model's head to pull out the hair, which is safer to operate and reduces your mistakes. In order to better secure the wig, you are better to use a few T-pins to secure the wig to prevent the wig from moving back and forth. If you are more skilled, you can also put the wig on your head to operate.
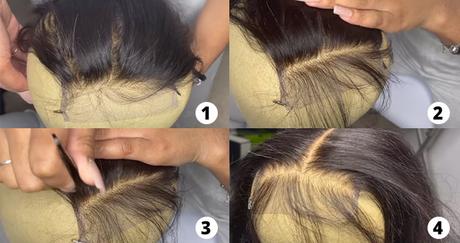
Comb your hair back
Using a wide-toothed comb to start from the ends of the hair little by little, dredging the ends first, and then gradually transitioning up until all the hair is dredged and the tangles are reduced. Then apply two large pumps of Moss to the hair, working from top to bottom to smoothen the hair. Then use a pointed tail comb to comb the hair from the front to the back from the hairline, like a ponytail, and then use a clip to fix the back hair.
Determine the outline of the hairline
You can look in the mirror or take pictures of your front and side hairline with your mobile phone to determine the outline of your hairline, and use these as a reference to make the most natural hairline, of course, you can also determine according to your preferences Hairline silhouette .The general hairline is M-shaped, with the thinnest hair near the temples.

Start pulling the hairline
Follow the outline of the hairline you determined earlier and use a pointed tail comb to layer your hair. Please note that each time is divided into thin layers of hair, pull out layer by layer, so that you do not pull too much. After layering the hair, use the comb to comb the section down, keeping it vertical, and secure the rest of the hair with clips, then you can use tweezers to pull out the hair.
But please note that when pulling, it is up and down, rather than staying in one place and pulling uniformly. We recommend dividing the hair into many small triangles, pulling from top to bottom according to the area, pulling 3-4 hairs at each point, and then Move down a millimeter, if the part is not thinned, you can repeat this step to thin it further, at the same time, we must be very careful when pulling the hair, because it is a wig, once you accidentally pull this piece of hair bald , it will never grow back, and you have no other remedy, be gentle when using tweezers to avoid tearing the lace. Check to see if the hairline is symmetrical after pulling.
Pull out a layer of hair
The rough outline of the hairline has been completed, we next pull out a layer of hair. Remove the clips, let all the hair down, and then use a rat tail comb to divide the hair into thin, roughly one-inch rectangular layers. Repeat the previous steps for picking until the section is thinned and the hairline is shaped to your liking.
Next, you can make baby hair according to your own preferences, but I won't go too far here, if you need it, please continue to follow our Alipearl blog, where we will tell you everything you want to know about Knowledge of wigs.
Here, our tutorial on how to pluck hair is over! As long as you are patient enough, I believe you can definitely get a hairline you satisfied! If you don't want to be so troublesome, you can come to our Alipearl for purchase. Our Alipearl wigs are all pre-plucked, which greatly fit the natural shape of the hairline. You can use it right out of the box, so that you can quickly be beautiful!
See you next time!
