Are you’re curious to know how to play PS4 on laptop screen with HDMI? Connection of PS4 to a laptop screen is a tricky task to do and it requires specific functional requirement on a laptop. You can not connect PS4 directly to your laptop because the HDMI port is unidirectional which means it can take either input or output.
The PS4 is equipped with HDMI port but it doesn’t mean you can connect directly connect the game with the laptop. The HDMI port on the laptop is an output port, similarly, the HDMI port on PS4 is also an output port. However, the functional requirements need that the laptop must have video input and an HDMI input. This thing makes connecting PS4 to the laptop a bit tricky.
How To Play PS4 On Laptop Screen With HDMI
In this guide, we will describe two different methods you can use to covert a laptop as your screen for playing PS4.
1. Using Video Capture Card
Using this method, you can easily use your laptop as a screen to play PS4 but you have to spend some money on it.

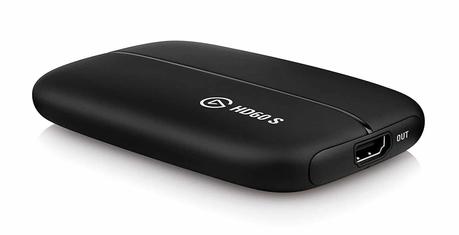
Elgato Video Capture Card hd60 S for PS4
To use this method, you’ll need the following equipment:
- Laptop
- Video Capture Card
- High-speed Internet Connection
- HDMI Cable
- Enabled file sharing
Step 1: First, to enable file sharing, go to Settings in the PS4 menu and look for Network Setting. Next, go to internet connection settings, locate your router and select it.
If you don’t have a wireless connection, you can use the alternate method. To do this, connect the PS4 console and laptop both to the router using ethernet cables. Once you connected, you can swap between two devices seamlessly.
Step 2: The next thing that you need to do is purchase an external video capture card that will allow you to connect PS4 to your laptop.
Step 3: Now connect video capture card to your laptop via USB port. Make sure it includes a composite as well as an S-video connection. Don’t forget to install the software that comes with a video capture card so that it can function properly.
Step 4: Next, you’ll need to connect the PS4 console to the video capture card using S-video cable. Once it gets done, just open the application and turn on your PS4. Be sure that the application is in full screen to view in full resolution.
With these simple steps, you can configure your laptop with PS4 for gameplay and even sharing pictures and videos between both devices with ease.
2. Using Remote Play

Remote Play let you stream PS4 gameplay to your Windows or Mac laptop, make sure you have all the essential system requirements. This application will allow you to play PS4 games from any place that has a good internet connection.
To use this method, make sure you have the following requirements:
- A Laptop
- PS4 system and controller
- USB cable or DualShock 4 USB wireless adaptor
- An account on PlayStation Network
- High-speed internet connection
Step 1: To use this method, you have to download Remote Play to your laptop. You can easily download it by clicking here. Once downloaded, run the installation process and complete the setup.
Step 2: After installation, open the Remote Play app and turn on your PS4. Now, go to Remote Play Connection Settings and click on the Enable Remote Play and then go back to settings.
After that, go to PlayStation Network/Account Management settings where you’ll find Activate as Your Primary PS4 and enable it.
Note: You don’t need to turn on your PS4 every time. Once it is enabled, you can turn on your PS4 from anywhere in the world just by using Remote Play application.
Step 3: Now you have to ensure that PS4 is in rest mode to access the games. For this, go to Settings then select Power Save Settings and click on Set Features Available in Rest Mode.
Check all of the boxes including Enable Turning On PS4 from Network, Stay Connected to the Internet and Stay Connected to the Internet.
Step 4: Now you have to keep your PS4 turned on and disconnected your controller from the console. To do this, go to Settings, click on Devices where you’ll find Bluetooth Devices. Here, select the DualShock 4 controller and click on Disconnect.
How to Use Remote Play
Using the above-mentioned steps, we have successfully prepared the PS4 for Remote Play, now it’s time to utilize the Remote Play app.
To utilize the app, follow these steps:
Step 1: Turn on your PS4 and connect the DualShock 4 controller via USB or you can use DUALSHOCK 4 wireless USB adaptor to plug in your laptop.
Step 2: Now, go to Settings and set the resolution to High (720p) or Best (1080p) to enjoy full HD gameplay. If you’re using PS4 Pro, we recommend you to set 1080p. Also, ensure that your internet speed is good to run games in full HD resolution.
Step 3: After setting the Remote Play video quality, click OK and then Start. Next, sign in to your Sony Remote Play app account and search for your PS4. Once it gets found, you’re ready to play PS4 on your laptop screen!
You may like to read:
- Top 10 Best Gaming Laptops Under $800
- Top 10 Best Gaming Laptops Under $1000
- Top 10 Best Gaming Laptops Under $2000
- Top 10 Best Gaming Laptops Under $1500
