Cardboard Boat Regatta at Rough River Lake, Falls of Rough, KY. Photo courtesy the US Army Corp of Engineers.
Cardboard is a resource that is perfect for creative projects. As an appliance retailer, we get to see a lot of cardboard being used for its original, boring application as a box. But once the product is delivered – such as your new refrigerator – the fun can really begin.
We’ve posted before about making a cardboard spaceship before. Here’s another exciting project: making your own seafaring vessel out of cardboard. You might be surprised to learn that you can even make one that really floats!
The Materials
Obviously, the most important resource for your cardboard boat is cardboard! As with any large cardboard construction a big appliance box is a great starting point for any imaginative project.
Remember getting free toys in your breakfast cereal or Cracker Jack as a kid? Well the box is the free toy you get when you buy appliances from Goedeker’s. Our free bonus toy was even inducted into the National Toy Hall of Fame!
You will also need a way to cut and shape your box into a boat. A good pair of scissors can work, but for the ultimate versatility and precise cuts a box cutter works even better – although it can be more dangerous if you are not careful. Consider wearing protective gloves if using a sharp box cutter.
You will also need a way to fasten the box pieces together at certain points. Tape works, but you will want heavy duty duct tape or good packing tape for the strongest bond. You can also glue boxes panels together, since that is how boxes are held together.
For the smoothest look, try using water-activated brown paper tape. It will match the basic finish of your cardboard boat, and it applies and holds very well.
If you want your boat to actually float in the water, opt for professional adhesives and varnish. For sailing the imaginary waves, white glue will be just fine.
The Design

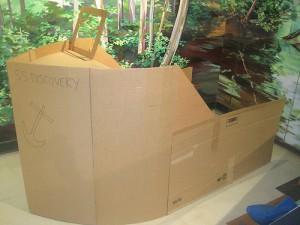
Photo by Andrew Watson.
If you are building a land-based ship for use during rainy, cold, or snowy days, you have a lot of freedom for design. It can be open topped, or have open decks and enclosed spaces – the sky (or should I say the horizon?) is the limit.
My brothers and I used to make elaborate submarines with paper plate wheels, dials, and controls. There was always a periscope – whether it was an actual periscope or a milk-carton DIY job with some mirrors.
For a really useful boat, you will have consider a few more factors. How many people will fit in the boat? How will you keep it from tipping? How will you waterproof it?
One way to help stabilize a narrow boat is with an outrigger – a narrow floating bar the length of the boat attached by some rigid material. Or, you can just make the boat wide enough that it will not be likely to tip.
Waterproofing your cardboard boat is the most critical part of the design. The simplest way is to wrap the boat in duct tape. An oil-based paint, stain, or varnish can also do the trick. In the video below, varnish was used, and the boat had lasted for more than 3 years of use on the lake (note that he made it from an appliance box).
Building Your Boat
The most important part of building a cardboard boat (especially one to really float) is patience! Rushing the process of gluing any project can make things fall apart.
Use pencil and a ruler to mark cuts and folds before you make them. Cardboard can be forgiving, so you can start to fold a section to see how it will work before committing the particular fold to a permanent position.
Scoring a fold can make a nice clean, sharp fold. Score a line by marking the line with pencil, then carefully cutting only one layer of the corrugated cardboard. Reinforce with tape.
To waterproof the boat, use a waterproof paint or varnish, and seal the joints with silicone caulk – the same stuff you seal your tub or kitchen sink with.
The most fun part of the process is decorating and personalizing your finished boat! Don’t forget to fly a flag of your country – or run up the Jolly Roger and go a’ pirating.
Remember the lesson of the Titanic – any boat can sink. Wear floatation devices when setting out on your new cardboard boat.

